- •contents
- •preface
- •acknowledgments
- •about this book
- •Special features
- •Best practices
- •Design patterns in action
- •Software directory
- •Roadmap
- •Part 1: JUnit distilled
- •Part 2: Testing strategies
- •Part 3: Testing components
- •Code
- •References
- •Author online
- •about the authors
- •about the title
- •about the cover illustration
- •JUnit jumpstart
- •1.1 Proving it works
- •1.2 Starting from scratch
- •1.3 Understanding unit testing frameworks
- •1.4 Setting up JUnit
- •1.5 Testing with JUnit
- •1.6 Summary
- •2.1 Exploring core JUnit
- •2.2 Launching tests with test runners
- •2.2.1 Selecting a test runner
- •2.2.2 Defining your own test runner
- •2.3 Composing tests with TestSuite
- •2.3.1 Running the automatic suite
- •2.3.2 Rolling your own test suite
- •2.4 Collecting parameters with TestResult
- •2.5 Observing results with TestListener
- •2.6 Working with TestCase
- •2.6.1 Managing resources with a fixture
- •2.6.2 Creating unit test methods
- •2.7 Stepping through TestCalculator
- •2.7.1 Creating a TestSuite
- •2.7.2 Creating a TestResult
- •2.7.3 Executing the test methods
- •2.7.4 Reviewing the full JUnit life cycle
- •2.8 Summary
- •3.1 Introducing the controller component
- •3.1.1 Designing the interfaces
- •3.1.2 Implementing the base classes
- •3.2 Let’s test it!
- •3.2.1 Testing the DefaultController
- •3.2.2 Adding a handler
- •3.2.3 Processing a request
- •3.2.4 Improving testProcessRequest
- •3.3 Testing exception-handling
- •3.3.1 Simulating exceptional conditions
- •3.3.2 Testing for exceptions
- •3.4 Setting up a project for testing
- •3.5 Summary
- •4.1 The need for unit tests
- •4.1.1 Allowing greater test coverage
- •4.1.2 Enabling teamwork
- •4.1.3 Preventing regression and limiting debugging
- •4.1.4 Enabling refactoring
- •4.1.5 Improving implementation design
- •4.1.6 Serving as developer documentation
- •4.1.7 Having fun
- •4.2 Different kinds of tests
- •4.2.1 The four flavors of software tests
- •4.2.2 The three flavors of unit tests
- •4.3 Determining how good tests are
- •4.3.1 Measuring test coverage
- •4.3.2 Generating test coverage reports
- •4.3.3 Testing interactions
- •4.4 Test-Driven Development
- •4.4.1 Tweaking the cycle
- •4.5 Testing in the development cycle
- •4.6 Summary
- •5.1 A day in the life
- •5.2 Running tests from Ant
- •5.2.1 Ant, indispensable Ant
- •5.2.2 Ant targets, projects, properties, and tasks
- •5.2.3 The javac task
- •5.2.4 The JUnit task
- •5.2.5 Putting Ant to the task
- •5.2.6 Pretty printing with JUnitReport
- •5.2.7 Automatically finding the tests to run
- •5.3 Running tests from Maven
- •5.3.2 Configuring Maven for a project
- •5.3.3 Executing JUnit tests with Maven
- •5.3.4 Handling dependent jars with Maven
- •5.4 Running tests from Eclipse
- •5.4.1 Creating an Eclipse project
- •5.4.2 Running JUnit tests in Eclipse
- •5.5 Summary
- •6.1 Introducing stubs
- •6.2 Practicing on an HTTP connection sample
- •6.2.1 Choosing a stubbing solution
- •6.2.2 Using Jetty as an embedded server
- •6.3 Stubbing the web server’s resources
- •6.3.1 Setting up the first stub test
- •6.3.2 Testing for failure conditions
- •6.3.3 Reviewing the first stub test
- •6.4 Stubbing the connection
- •6.4.1 Producing a custom URL protocol handler
- •6.4.2 Creating a JDK HttpURLConnection stub
- •6.4.3 Running the test
- •6.5 Summary
- •7.1 Introducing mock objects
- •7.2 Mock tasting: a simple example
- •7.3 Using mock objects as a refactoring technique
- •7.3.1 Easy refactoring
- •7.3.2 Allowing more flexible code
- •7.4 Practicing on an HTTP connection sample
- •7.4.1 Defining the mock object
- •7.4.2 Testing a sample method
- •7.4.3 Try #1: easy method refactoring technique
- •7.4.4 Try #2: refactoring by using a class factory
- •7.5 Using mocks as Trojan horses
- •7.6 Deciding when to use mock objects
- •7.7 Summary
- •8.1 The problem with unit-testing components
- •8.2 Testing components using mock objects
- •8.2.1 Testing the servlet sample using EasyMock
- •8.2.2 Pros and cons of using mock objects to test components
- •8.3 What are integration unit tests?
- •8.4 Introducing Cactus
- •8.5 Testing components using Cactus
- •8.5.1 Running Cactus tests
- •8.5.2 Executing the tests using Cactus/Jetty integration
- •8.6 How Cactus works
- •8.6.2 Stepping through a test
- •8.7 Summary
- •9.1 Presenting the Administration application
- •9.2 Writing servlet tests with Cactus
- •9.2.1 Designing the first test
- •9.2.2 Using Maven to run Cactus tests
- •9.2.3 Finishing the Cactus servlet tests
- •9.3 Testing servlets with mock objects
- •9.3.1 Writing a test using DynaMocks and DynaBeans
- •9.3.2 Finishing the DynaMock tests
- •9.4 Writing filter tests with Cactus
- •9.4.1 Testing the filter with a SELECT query
- •9.4.2 Testing the filter for other query types
- •9.4.3 Running the Cactus filter tests with Maven
- •9.5 When to use Cactus, and when to use mock objects
- •9.6 Summary
- •10.1 Revisiting the Administration application
- •10.2 What is JSP unit testing?
- •10.3 Unit-testing a JSP in isolation with Cactus
- •10.3.1 Executing a JSP with SQL results data
- •10.3.2 Writing the Cactus test
- •10.3.3 Executing Cactus JSP tests with Maven
- •10.4 Unit-testing taglibs with Cactus
- •10.4.1 Defining a custom tag
- •10.4.2 Testing the custom tag
- •10.5 Unit-testing taglibs with mock objects
- •10.5.1 Introducing MockMaker and installing its Eclipse plugin
- •10.5.2 Using MockMaker to generate mocks from classes
- •10.6 When to use mock objects and when to use Cactus
- •10.7 Summary
- •Unit-testing database applications
- •11.1 Introduction to unit-testing databases
- •11.2 Testing business logic in isolation from the database
- •11.2.1 Implementing a database access layer interface
- •11.2.2 Setting up a mock database interface layer
- •11.2.3 Mocking the database interface layer
- •11.3 Testing persistence code in isolation from the database
- •11.3.1 Testing the execute method
- •11.3.2 Using expectations to verify state
- •11.4 Writing database integration unit tests
- •11.4.1 Filling the requirements for database integration tests
- •11.4.2 Presetting database data
- •11.5 Running the Cactus test using Ant
- •11.5.1 Reviewing the project structure
- •11.5.2 Introducing the Cactus/Ant integration module
- •11.5.3 Creating the Ant build file step by step
- •11.5.4 Executing the Cactus tests
- •11.6 Tuning for build performance
- •11.6.2 Grouping tests in functional test suites
- •11.7.1 Choosing an approach
- •11.7.2 Applying continuous integration
- •11.8 Summary
- •Unit-testing EJBs
- •12.1 Defining a sample EJB application
- •12.2 Using a façade strategy
- •12.3 Unit-testing JNDI code using mock objects
- •12.4 Unit-testing session beans
- •12.4.1 Using the factory method strategy
- •12.4.2 Using the factory class strategy
- •12.4.3 Using the mock JNDI implementation strategy
- •12.5 Using mock objects to test message-driven beans
- •12.6 Using mock objects to test entity beans
- •12.7 Choosing the right mock-objects strategy
- •12.8 Using integration unit tests
- •12.9 Using JUnit and remote calls
- •12.9.1 Requirements for using JUnit directly
- •12.9.2 Packaging the Petstore application in an ear file
- •12.9.3 Performing automatic deployment and execution of tests
- •12.9.4 Writing a remote JUnit test for PetstoreEJB
- •12.9.5 Fixing JNDI names
- •12.9.6 Running the tests
- •12.10 Using Cactus
- •12.10.1 Writing an EJB unit test with Cactus
- •12.10.2 Project directory structure
- •12.10.3 Packaging the Cactus tests
- •12.10.4 Executing the Cactus tests
- •12.11 Summary
- •A.1 Getting the source code
- •A.2 Source code overview
- •A.3 External libraries
- •A.4 Jar versions
- •A.5 Directory structure conventions
- •B.1 Installing Eclipse
- •B.2 Setting up Eclipse projects from the sources
- •B.3 Running JUnit tests from Eclipse
- •B.4 Running Ant scripts from Eclipse
- •B.5 Running Cactus tests from Eclipse
- •references
- •index
Different kinds of tests |
75 |
|
|
Listing 4.2 Timed test example
package com.clarkware.junitperf;
import junit.framework.Test; import junit.framework.TestSuite;
public class ExampleTimedTest {
public static final long toleranceInMillis = 100;
public static Test suite() {
long maxElapsedTimeInMillis = 1000 + toleranceInMillis;
Test testCase =
new ExampleTestCase("testOneSecondResponse"); Test timedTest =
new TimedTest(testCase, maxElapsedTimeInMillis);
TestSuite suite = new TestSuite(); suite.addTest(timedTest);
return suite;
}
public static void main(String args[]) {
junit.textui.TestRunner.run(suite());
}
}
Acceptance software testing
It’s important that an application perform well; but, in the end, the only question that matters is Does the application meet the customer’s needs? Acceptance tests are the final sphere of tests. These tests are usually conducted directly by the customer or someone acting as the customer’s proxy. Acceptance tests ensure that the application has met whatever goals the customer or stakeholder defined.
Acceptance tests are a superset of all other tests. Usually they start as functional and performance tests, but they may include subjective criteria like “ease of use” and “look and feel.” Sometimes, the acceptance suite may include a subset of the tests run by the developers, the difference being that this time the tests are run by the customer or a QA team.
For more about using acceptance tests with an agile software methodology, visit the Wiki site regarding Ward Cunningham’s fit framework (http://fit.c2.com/).
4.2.2The three flavors of unit tests
The focus of this book is automatic unit tests used by programmers. Unit testing, as we use the term, concentrates on testing the code from the inside (white box
76CHAPTER 4
Examining software tests
testing; see section 4.3.1). This activity is inextricably linked with coding and happens at the same time. Unit tests can ensure that your application is under test from the very beginning.
Of course, your application should undergo other forms of software testing, starting with unit tests and ending with acceptance tests. The previous section outlined the other types of software tests that should be applied to your application.
Most applications are divided into subsystems. As a developer, you want to ensure that each of your subsystems works correctly. As you write code, your first tests will probably be logic unit tests. As you write more tests and more code, you will begin to add integration and functional unit tests. At any one time, you will probably be working on a logic unit test, an integration unit test, or a functional unit test. Table 4.3 summarizes the different types of unit tests.
Table 4.3 Three flavors of unit tests: logic, integration, and functional
Test type |
Description |
|
|
Logic unit tests |
Unit tests that focus on exercising the code logic. These tests are usually meant to |
|
exercise only a single method and no other. You can control the boundaries of a |
|
given method using mock objects or stubs (see chapters 6 and 7). |
|
|
Integration unit |
Unit tests that focus on testing the interaction between components in their real |
tests |
environment (or part of the real environment). For example, code that accesses a |
|
database has tests that effectively call the database, thus proving that the code- |
|
database interaction works (see chapter 11). |
|
|
Functional unit |
Unit tests that extend the boundaries of integration unit testing to confirm a |
tests |
stimulus-response. For example, imagine a web page that is protected and that |
|
you can access only after being logged in. If you are not logged in, accessing the |
|
page results in a redirect to the login page. A functional unit test verifies that |
|
behavior by sending an HTTP request to the page and verifying that the result is |
|
a 302 response code. It does not, however, verify that the full workflow leads to |
|
the login page. Workflow is the domain of pure, software functional testing (see |
|
section 4.2.1). |
|
|
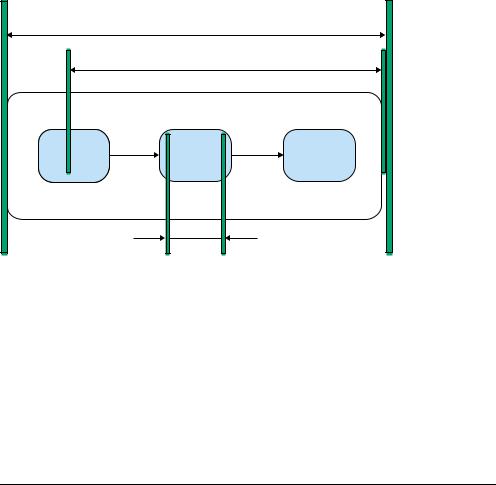
Figure 4.4 illustrates how these three flavors of unit tests interact. The sliders define the boundaries between the types of unit tests. The tests can be defined by the locations of the sliders. All three types of tests are needed to ensure your code works. If you use them, you can sleep well at night and come in the next day, well rested and eager to create more great code!
Strictly speaking, the functional unit tests are not pure unit tests, but neither are they pure functional tests. They are more dependent on an external environment than pure unit tests are, but they do not test a complete workflow, as
Determining how good tests are |
77 |
|
|
Functional unit testing
Integration unit testing
System
Class
Logic unit testing
Figure 4.4 Unit testing within the application life cycle
expected by pure functional tests. We put functional unit tests in our scope because they are often useful as part of the battery of tests run in development.
An example is the StrutsTestCase (http://strutstestcase.sourceforge.net/) framework, which provides functional unit testing of the runtime Struts configuration. These tests tell a developer that the controller is invoking the appropriate software action and forwarding to the expected presentation page, but they do not confirm that the page is actually present and renders correctly.
4.3 Determining how good tests are
When you test a rivet, you can apply simple, objective standards. You can look at its dimensions, its weight, and whether it can withstand a certain amount of pressure. You can say that your tests cover just these aspects, and let the builder decide if the test coverage is sufficient.
But how do you express what aspects an application’s unit tests cover? “Everything that could possibly fail” is a fine standard, but it’s rather subjective. What kind of metrics can we apply?
78CHAPTER 4
Examining software tests
4.3.1Measuring test coverage
One metric of test coverage would be to count how many methods are being called by your tests. This doesn’t tell you whether the test is doing the right thing, but it does tell you whether you have a test in place.
Without unit tests, you can only write tests against the application’s public API methods. Because you don’t need to see inside the application to create the tests, these are called black box tests. Figure 4.5 diagrams what an application’s test coverage might look like using only black box tests.
Black box tests
Method
calls
Figure 4.5 Black box test coverage
Unit tests can be written with an intimate knowledge of how a method is implemented. If a conditional branch exists within the method, you can write two unit tests: one for each branch. Because you need to see into the method to create such a test, this is called white box testing. Figure 4.6 shows what an application’s test coverage might look like using white box unit tests.
Unit tests
Unit tests
Unit tests
Figure 4.6
Unit test coverage
With white box unit tests, it’s easier to achieve a higher test coverage metric, mainly because you have access to more methods and because you can control both the inputs to each method and the behavior of secondary objects called (using stubs or mock objects, as you’ll see in later chapters). White box unit tests can be written against both package-protected and public methods.