- •contents
- •preface
- •acknowledgments
- •about this book
- •Special features
- •Best practices
- •Design patterns in action
- •Software directory
- •Roadmap
- •Part 1: JUnit distilled
- •Part 2: Testing strategies
- •Part 3: Testing components
- •Code
- •References
- •Author online
- •about the authors
- •about the title
- •about the cover illustration
- •JUnit jumpstart
- •1.1 Proving it works
- •1.2 Starting from scratch
- •1.3 Understanding unit testing frameworks
- •1.4 Setting up JUnit
- •1.5 Testing with JUnit
- •1.6 Summary
- •2.1 Exploring core JUnit
- •2.2 Launching tests with test runners
- •2.2.1 Selecting a test runner
- •2.2.2 Defining your own test runner
- •2.3 Composing tests with TestSuite
- •2.3.1 Running the automatic suite
- •2.3.2 Rolling your own test suite
- •2.4 Collecting parameters with TestResult
- •2.5 Observing results with TestListener
- •2.6 Working with TestCase
- •2.6.1 Managing resources with a fixture
- •2.6.2 Creating unit test methods
- •2.7 Stepping through TestCalculator
- •2.7.1 Creating a TestSuite
- •2.7.2 Creating a TestResult
- •2.7.3 Executing the test methods
- •2.7.4 Reviewing the full JUnit life cycle
- •2.8 Summary
- •3.1 Introducing the controller component
- •3.1.1 Designing the interfaces
- •3.1.2 Implementing the base classes
- •3.2 Let’s test it!
- •3.2.1 Testing the DefaultController
- •3.2.2 Adding a handler
- •3.2.3 Processing a request
- •3.2.4 Improving testProcessRequest
- •3.3 Testing exception-handling
- •3.3.1 Simulating exceptional conditions
- •3.3.2 Testing for exceptions
- •3.4 Setting up a project for testing
- •3.5 Summary
- •4.1 The need for unit tests
- •4.1.1 Allowing greater test coverage
- •4.1.2 Enabling teamwork
- •4.1.3 Preventing regression and limiting debugging
- •4.1.4 Enabling refactoring
- •4.1.5 Improving implementation design
- •4.1.6 Serving as developer documentation
- •4.1.7 Having fun
- •4.2 Different kinds of tests
- •4.2.1 The four flavors of software tests
- •4.2.2 The three flavors of unit tests
- •4.3 Determining how good tests are
- •4.3.1 Measuring test coverage
- •4.3.2 Generating test coverage reports
- •4.3.3 Testing interactions
- •4.4 Test-Driven Development
- •4.4.1 Tweaking the cycle
- •4.5 Testing in the development cycle
- •4.6 Summary
- •5.1 A day in the life
- •5.2 Running tests from Ant
- •5.2.1 Ant, indispensable Ant
- •5.2.2 Ant targets, projects, properties, and tasks
- •5.2.3 The javac task
- •5.2.4 The JUnit task
- •5.2.5 Putting Ant to the task
- •5.2.6 Pretty printing with JUnitReport
- •5.2.7 Automatically finding the tests to run
- •5.3 Running tests from Maven
- •5.3.2 Configuring Maven for a project
- •5.3.3 Executing JUnit tests with Maven
- •5.3.4 Handling dependent jars with Maven
- •5.4 Running tests from Eclipse
- •5.4.1 Creating an Eclipse project
- •5.4.2 Running JUnit tests in Eclipse
- •5.5 Summary
- •6.1 Introducing stubs
- •6.2 Practicing on an HTTP connection sample
- •6.2.1 Choosing a stubbing solution
- •6.2.2 Using Jetty as an embedded server
- •6.3 Stubbing the web server’s resources
- •6.3.1 Setting up the first stub test
- •6.3.2 Testing for failure conditions
- •6.3.3 Reviewing the first stub test
- •6.4 Stubbing the connection
- •6.4.1 Producing a custom URL protocol handler
- •6.4.2 Creating a JDK HttpURLConnection stub
- •6.4.3 Running the test
- •6.5 Summary
- •7.1 Introducing mock objects
- •7.2 Mock tasting: a simple example
- •7.3 Using mock objects as a refactoring technique
- •7.3.1 Easy refactoring
- •7.3.2 Allowing more flexible code
- •7.4 Practicing on an HTTP connection sample
- •7.4.1 Defining the mock object
- •7.4.2 Testing a sample method
- •7.4.3 Try #1: easy method refactoring technique
- •7.4.4 Try #2: refactoring by using a class factory
- •7.5 Using mocks as Trojan horses
- •7.6 Deciding when to use mock objects
- •7.7 Summary
- •8.1 The problem with unit-testing components
- •8.2 Testing components using mock objects
- •8.2.1 Testing the servlet sample using EasyMock
- •8.2.2 Pros and cons of using mock objects to test components
- •8.3 What are integration unit tests?
- •8.4 Introducing Cactus
- •8.5 Testing components using Cactus
- •8.5.1 Running Cactus tests
- •8.5.2 Executing the tests using Cactus/Jetty integration
- •8.6 How Cactus works
- •8.6.2 Stepping through a test
- •8.7 Summary
- •9.1 Presenting the Administration application
- •9.2 Writing servlet tests with Cactus
- •9.2.1 Designing the first test
- •9.2.2 Using Maven to run Cactus tests
- •9.2.3 Finishing the Cactus servlet tests
- •9.3 Testing servlets with mock objects
- •9.3.1 Writing a test using DynaMocks and DynaBeans
- •9.3.2 Finishing the DynaMock tests
- •9.4 Writing filter tests with Cactus
- •9.4.1 Testing the filter with a SELECT query
- •9.4.2 Testing the filter for other query types
- •9.4.3 Running the Cactus filter tests with Maven
- •9.5 When to use Cactus, and when to use mock objects
- •9.6 Summary
- •10.1 Revisiting the Administration application
- •10.2 What is JSP unit testing?
- •10.3 Unit-testing a JSP in isolation with Cactus
- •10.3.1 Executing a JSP with SQL results data
- •10.3.2 Writing the Cactus test
- •10.3.3 Executing Cactus JSP tests with Maven
- •10.4 Unit-testing taglibs with Cactus
- •10.4.1 Defining a custom tag
- •10.4.2 Testing the custom tag
- •10.5 Unit-testing taglibs with mock objects
- •10.5.1 Introducing MockMaker and installing its Eclipse plugin
- •10.5.2 Using MockMaker to generate mocks from classes
- •10.6 When to use mock objects and when to use Cactus
- •10.7 Summary
- •Unit-testing database applications
- •11.1 Introduction to unit-testing databases
- •11.2 Testing business logic in isolation from the database
- •11.2.1 Implementing a database access layer interface
- •11.2.2 Setting up a mock database interface layer
- •11.2.3 Mocking the database interface layer
- •11.3 Testing persistence code in isolation from the database
- •11.3.1 Testing the execute method
- •11.3.2 Using expectations to verify state
- •11.4 Writing database integration unit tests
- •11.4.1 Filling the requirements for database integration tests
- •11.4.2 Presetting database data
- •11.5 Running the Cactus test using Ant
- •11.5.1 Reviewing the project structure
- •11.5.2 Introducing the Cactus/Ant integration module
- •11.5.3 Creating the Ant build file step by step
- •11.5.4 Executing the Cactus tests
- •11.6 Tuning for build performance
- •11.6.2 Grouping tests in functional test suites
- •11.7.1 Choosing an approach
- •11.7.2 Applying continuous integration
- •11.8 Summary
- •Unit-testing EJBs
- •12.1 Defining a sample EJB application
- •12.2 Using a façade strategy
- •12.3 Unit-testing JNDI code using mock objects
- •12.4 Unit-testing session beans
- •12.4.1 Using the factory method strategy
- •12.4.2 Using the factory class strategy
- •12.4.3 Using the mock JNDI implementation strategy
- •12.5 Using mock objects to test message-driven beans
- •12.6 Using mock objects to test entity beans
- •12.7 Choosing the right mock-objects strategy
- •12.8 Using integration unit tests
- •12.9 Using JUnit and remote calls
- •12.9.1 Requirements for using JUnit directly
- •12.9.2 Packaging the Petstore application in an ear file
- •12.9.3 Performing automatic deployment and execution of tests
- •12.9.4 Writing a remote JUnit test for PetstoreEJB
- •12.9.5 Fixing JNDI names
- •12.9.6 Running the tests
- •12.10 Using Cactus
- •12.10.1 Writing an EJB unit test with Cactus
- •12.10.2 Project directory structure
- •12.10.3 Packaging the Cactus tests
- •12.10.4 Executing the Cactus tests
- •12.11 Summary
- •A.1 Getting the source code
- •A.2 Source code overview
- •A.3 External libraries
- •A.4 Jar versions
- •A.5 Directory structure conventions
- •B.1 Installing Eclipse
- •B.2 Setting up Eclipse projects from the sources
- •B.3 Running JUnit tests from Eclipse
- •B.4 Running Ant scripts from Eclipse
- •B.5 Running Cactus tests from Eclipse
- •references
- •index
342APPENDIX B
Eclipse quick start
In this appendix, you will learn how to install Eclipse (http://eclipse.org/) and how to run the book’s source code from within the IDE. This appendix is meant as a quick start to get you up and running quickly with Eclipse and with the integrated JUnit.
B.1 Installing Eclipse
Installing Eclipse is very simple; the process consists of downloading Eclipse from http://eclipse.org/ and then unzipping it to somewhere on your hard drive. We recommend downloading Eclipse 2.1 or greater. In the remainder of this appendix, we’ll assume Eclipse is installed in [ECLIPSE_HOME] (for example, c:\eclipse-2.1).
B.2 Setting up Eclipse projects from the sources
The good news is that it’s extremely easy to set up an Eclipse project, because we have provided the Eclipse project files with the book’s source code distribution. Please refer to appendix A (“The source code”) for directory structure organization and project names.
The first Eclipse project to import corresponds to the junitbook/repository/ directory. It contains all the external libraries (jars) required by all the other projects. All the other Eclipse projects for this book depend upon this repository project for their classpath, which is why you need to import it first.
To import this project, select File→Import and then select Existing Project into Workspace. Point the Project Content to the junitbook/repository/ directory on your hard disk, as shown in figure B.1.
Repeat the same process for all the projects you wish to see in your Eclipse workspace. If you import all the projects, you should end up with the workspace shown in figure B.2.
Figure B.1 Importing the junitbook-repository project into Eclipse
Running JUnit tests from Eclipse |
343 |
|
|
Figure B.2
Eclipse workspace when all the book projects have been imported
B.3 Running JUnit tests from Eclipse
To run a JUnit test in Eclipse, select the Java perspective (), click on the test class to execute, click the Run As icon arrow (), and select JUnit Test. Figure B.3 shows what you’ll get if you run the
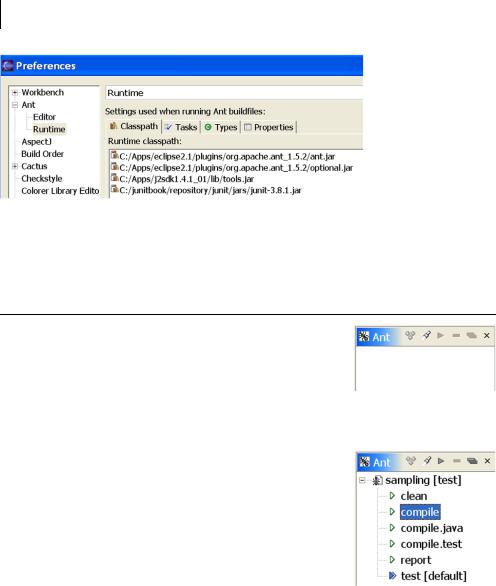
 TestAccount test case found in the junit- book-examining Eclipse project from chapter 4.
For full details on how to run JUnit tests from Eclipse, please see the integrated Eclipse Help: Click Help→Help Contents. Then, in the Help browser, select the
Figure B.3 Running the TestAccount test case in Eclipse using the built-in JUnit plugin
344APPENDIX B
Eclipse quick start
Figure B.4 Adding the JDK tools.jar and the JUnit jar to the Ant classpath in Eclipse
following topic: Java Development User Guide→Getting Started→Basic Tutorial→Writing and Running JUnit tests.
B.4 Running Ant scripts from Eclipse
Before running Ant scripts, make sure you’ve added the JDK tools.jar library to your Ant classpath (it’s needed by the Ant javac task). In addition, you also need to add the JUnit jar to the Ant classpath. To do so, s el ec t W in dow →Preferen ces, ch oose Ant→Runtime in the Preferences dialog box, and add the jars as shown in figure B.4.
To execute a target from an Ant buildfile, first tell Eclipse to display the Ant view by clicking the Window→Show View menu entry and selecting Ant. Figure B.5 shows the result.
Then, click the icon to add a buildfile to the Ant view. For example, add the build.xml file from the junitbook-sampling project. The Ant view now lists all the Ant targets it has found in the build.xml file, highlighting the default target (see figure B.6).
To execute a target, select it and click the button. Figure B.7 shows the result of executing the compile target. Note that Eclipse captures the Ant output
and displays it in the console view at the bottom right of the figure.
For full details on how to run Ant scripts from Eclipse, please see the integrated Eclipse Help: Click Help→Help Contents. Then, in the Help browser,
Running Cactus tests from Eclipse |
345 |
|
|
Figure B.7 Result of executing the compile Ant target for the junitbook-sampling project
select the following topic: Workbench User Guide→Getting Started→Ant & External Tools Tutorial→Eclipse Ant Basics.
B.5 Running Cactus tests from Eclipse
Executing a Cactus test involves several steps: packaging the application to run as a war file, deploying it to the container, starting the container, and launching the tests using a JUnit runner. Launching a JUnit runner is easy, as demonstrated by the previous section. However, the other steps are harder to perform. The Cactus project provides two solutions to help:
■A Jetty integration, which can be run from any IDE (including Eclipse). This integration is described in detail in chapter 8 (“In-container testing with Cactus”).
■A Cactus plugin for Eclipse, which lets you run Cactus tests within several containers (Resin, WebLogic, Tomcat, Orion, and so on). However, this plugin is still experimental (at the time of this writing). Full information about using the Eclipse plugin is available on the Cactus web site at http:// jakarta.apache.org/cactus/integration/eclipse/index.html.