- •contents
- •preface
- •acknowledgments
- •about this book
- •Special features
- •Best practices
- •Design patterns in action
- •Software directory
- •Roadmap
- •Part 1: JUnit distilled
- •Part 2: Testing strategies
- •Part 3: Testing components
- •Code
- •References
- •Author online
- •about the authors
- •about the title
- •about the cover illustration
- •JUnit jumpstart
- •1.1 Proving it works
- •1.2 Starting from scratch
- •1.3 Understanding unit testing frameworks
- •1.4 Setting up JUnit
- •1.5 Testing with JUnit
- •1.6 Summary
- •2.1 Exploring core JUnit
- •2.2 Launching tests with test runners
- •2.2.1 Selecting a test runner
- •2.2.2 Defining your own test runner
- •2.3 Composing tests with TestSuite
- •2.3.1 Running the automatic suite
- •2.3.2 Rolling your own test suite
- •2.4 Collecting parameters with TestResult
- •2.5 Observing results with TestListener
- •2.6 Working with TestCase
- •2.6.1 Managing resources with a fixture
- •2.6.2 Creating unit test methods
- •2.7 Stepping through TestCalculator
- •2.7.1 Creating a TestSuite
- •2.7.2 Creating a TestResult
- •2.7.3 Executing the test methods
- •2.7.4 Reviewing the full JUnit life cycle
- •2.8 Summary
- •3.1 Introducing the controller component
- •3.1.1 Designing the interfaces
- •3.1.2 Implementing the base classes
- •3.2 Let’s test it!
- •3.2.1 Testing the DefaultController
- •3.2.2 Adding a handler
- •3.2.3 Processing a request
- •3.2.4 Improving testProcessRequest
- •3.3 Testing exception-handling
- •3.3.1 Simulating exceptional conditions
- •3.3.2 Testing for exceptions
- •3.4 Setting up a project for testing
- •3.5 Summary
- •4.1 The need for unit tests
- •4.1.1 Allowing greater test coverage
- •4.1.2 Enabling teamwork
- •4.1.3 Preventing regression and limiting debugging
- •4.1.4 Enabling refactoring
- •4.1.5 Improving implementation design
- •4.1.6 Serving as developer documentation
- •4.1.7 Having fun
- •4.2 Different kinds of tests
- •4.2.1 The four flavors of software tests
- •4.2.2 The three flavors of unit tests
- •4.3 Determining how good tests are
- •4.3.1 Measuring test coverage
- •4.3.2 Generating test coverage reports
- •4.3.3 Testing interactions
- •4.4 Test-Driven Development
- •4.4.1 Tweaking the cycle
- •4.5 Testing in the development cycle
- •4.6 Summary
- •5.1 A day in the life
- •5.2 Running tests from Ant
- •5.2.1 Ant, indispensable Ant
- •5.2.2 Ant targets, projects, properties, and tasks
- •5.2.3 The javac task
- •5.2.4 The JUnit task
- •5.2.5 Putting Ant to the task
- •5.2.6 Pretty printing with JUnitReport
- •5.2.7 Automatically finding the tests to run
- •5.3 Running tests from Maven
- •5.3.2 Configuring Maven for a project
- •5.3.3 Executing JUnit tests with Maven
- •5.3.4 Handling dependent jars with Maven
- •5.4 Running tests from Eclipse
- •5.4.1 Creating an Eclipse project
- •5.4.2 Running JUnit tests in Eclipse
- •5.5 Summary
- •6.1 Introducing stubs
- •6.2 Practicing on an HTTP connection sample
- •6.2.1 Choosing a stubbing solution
- •6.2.2 Using Jetty as an embedded server
- •6.3 Stubbing the web server’s resources
- •6.3.1 Setting up the first stub test
- •6.3.2 Testing for failure conditions
- •6.3.3 Reviewing the first stub test
- •6.4 Stubbing the connection
- •6.4.1 Producing a custom URL protocol handler
- •6.4.2 Creating a JDK HttpURLConnection stub
- •6.4.3 Running the test
- •6.5 Summary
- •7.1 Introducing mock objects
- •7.2 Mock tasting: a simple example
- •7.3 Using mock objects as a refactoring technique
- •7.3.1 Easy refactoring
- •7.3.2 Allowing more flexible code
- •7.4 Practicing on an HTTP connection sample
- •7.4.1 Defining the mock object
- •7.4.2 Testing a sample method
- •7.4.3 Try #1: easy method refactoring technique
- •7.4.4 Try #2: refactoring by using a class factory
- •7.5 Using mocks as Trojan horses
- •7.6 Deciding when to use mock objects
- •7.7 Summary
- •8.1 The problem with unit-testing components
- •8.2 Testing components using mock objects
- •8.2.1 Testing the servlet sample using EasyMock
- •8.2.2 Pros and cons of using mock objects to test components
- •8.3 What are integration unit tests?
- •8.4 Introducing Cactus
- •8.5 Testing components using Cactus
- •8.5.1 Running Cactus tests
- •8.5.2 Executing the tests using Cactus/Jetty integration
- •8.6 How Cactus works
- •8.6.2 Stepping through a test
- •8.7 Summary
- •9.1 Presenting the Administration application
- •9.2 Writing servlet tests with Cactus
- •9.2.1 Designing the first test
- •9.2.2 Using Maven to run Cactus tests
- •9.2.3 Finishing the Cactus servlet tests
- •9.3 Testing servlets with mock objects
- •9.3.1 Writing a test using DynaMocks and DynaBeans
- •9.3.2 Finishing the DynaMock tests
- •9.4 Writing filter tests with Cactus
- •9.4.1 Testing the filter with a SELECT query
- •9.4.2 Testing the filter for other query types
- •9.4.3 Running the Cactus filter tests with Maven
- •9.5 When to use Cactus, and when to use mock objects
- •9.6 Summary
- •10.1 Revisiting the Administration application
- •10.2 What is JSP unit testing?
- •10.3 Unit-testing a JSP in isolation with Cactus
- •10.3.1 Executing a JSP with SQL results data
- •10.3.2 Writing the Cactus test
- •10.3.3 Executing Cactus JSP tests with Maven
- •10.4 Unit-testing taglibs with Cactus
- •10.4.1 Defining a custom tag
- •10.4.2 Testing the custom tag
- •10.5 Unit-testing taglibs with mock objects
- •10.5.1 Introducing MockMaker and installing its Eclipse plugin
- •10.5.2 Using MockMaker to generate mocks from classes
- •10.6 When to use mock objects and when to use Cactus
- •10.7 Summary
- •Unit-testing database applications
- •11.1 Introduction to unit-testing databases
- •11.2 Testing business logic in isolation from the database
- •11.2.1 Implementing a database access layer interface
- •11.2.2 Setting up a mock database interface layer
- •11.2.3 Mocking the database interface layer
- •11.3 Testing persistence code in isolation from the database
- •11.3.1 Testing the execute method
- •11.3.2 Using expectations to verify state
- •11.4 Writing database integration unit tests
- •11.4.1 Filling the requirements for database integration tests
- •11.4.2 Presetting database data
- •11.5 Running the Cactus test using Ant
- •11.5.1 Reviewing the project structure
- •11.5.2 Introducing the Cactus/Ant integration module
- •11.5.3 Creating the Ant build file step by step
- •11.5.4 Executing the Cactus tests
- •11.6 Tuning for build performance
- •11.6.2 Grouping tests in functional test suites
- •11.7.1 Choosing an approach
- •11.7.2 Applying continuous integration
- •11.8 Summary
- •Unit-testing EJBs
- •12.1 Defining a sample EJB application
- •12.2 Using a façade strategy
- •12.3 Unit-testing JNDI code using mock objects
- •12.4 Unit-testing session beans
- •12.4.1 Using the factory method strategy
- •12.4.2 Using the factory class strategy
- •12.4.3 Using the mock JNDI implementation strategy
- •12.5 Using mock objects to test message-driven beans
- •12.6 Using mock objects to test entity beans
- •12.7 Choosing the right mock-objects strategy
- •12.8 Using integration unit tests
- •12.9 Using JUnit and remote calls
- •12.9.1 Requirements for using JUnit directly
- •12.9.2 Packaging the Petstore application in an ear file
- •12.9.3 Performing automatic deployment and execution of tests
- •12.9.4 Writing a remote JUnit test for PetstoreEJB
- •12.9.5 Fixing JNDI names
- •12.9.6 Running the tests
- •12.10 Using Cactus
- •12.10.1 Writing an EJB unit test with Cactus
- •12.10.2 Project directory structure
- •12.10.3 Packaging the Cactus tests
- •12.10.4 Executing the Cactus tests
- •12.11 Summary
- •A.1 Getting the source code
- •A.2 Source code overview
- •A.3 External libraries
- •A.4 Jar versions
- •A.5 Directory structure conventions
- •B.1 Installing Eclipse
- •B.2 Setting up Eclipse projects from the sources
- •B.3 Running JUnit tests from Eclipse
- •B.4 Running Ant scripts from Eclipse
- •B.5 Running Cactus tests from Eclipse
- •references
- •index
256CHAPTER 11
Unit-testing database applications
Figure 11.6 Successful test for unit-testing the JdbcDataAccessManager’s execute method in isolation from the database, by using MockObjects.com JDBC mocks
11.3.2Using expectations to verify state
Although the test was successful, there are still assertions that you may want to verify as part of the test. For example, you may want to verify that the database connection was closed correctly (and only once), that the query string executed was the one you passed during the test, that a PreparedStatement was created only once, and so forth. These kinds of verifications are called expectations in MockObjects.com terminology. (See section 7.5 in chapter 7 for more about expectations.) Almost all mock objects from MockObjects.com expose an Expectation API in the form of addExpectedXXX or setExpectedXXX methods. The expectations are confirmed by calling the verify method on the respective mocks. Some of the MockObjects.com mocks perform default verifications. For example, when you write statement.addExpectedExecuteQuery(sql, resultSet), the MockObjects code verifies at the end of the test that the ResultSet was accessed and the SQL executed was the query passed as parameter. Otherwise, the mock raises an AssertionFailedError.
Adding expectations
Let’s modify listing 11.10 to add some expectations. The result is shown in listing 11.11 (changes are in bold).
Listing 11.11 Adding expectations to the testExecuteOk method
public void testExecuteOk() throws Exception
{
String sql = "SELECT * FROM CUSTOMER"; statement.addExpectedExecuteQuery(sql, resultSet); b
String[] columnsUppercase = new String[] {"FIRSTNAME", "LASTNAME"};
String[] columnsLowercase = new String[] {"firstname", "lastname"};
Testing persistence code in isolation from the database |
257 |
|
|
String[] columnClasseNames = new String[] {
String.class.getName(), String.class.getName()};
resultSetMetaData.setupAddColumnNames(columnsUppercase);
resultSetMetaData.setupAddColumnClassNames(
columnClasseNames);
resultSetMetaData.setupGetColumnCount(2);
resultSet.addExpectedNamedValues(columnsLowercase, new Object[] {"John", "Doe"});
connection.setExpectedCreateStatementCalls(1); c connection.setExpectedCloseCalls(1); d
Collection result = manager.execute(sql);
[...]
}
protected void tearDown()
{
connection.verify();
statement.verify();
resultSet.verify();
}
e
bAdd an expectation to verify that the SQL string executed is the one passed by the test, unmodified. This expectation isn’t new; you’ve used it since listing 11.8. It
was needed earlier because the call to addExpectedExecuteQuery performs two actions: It sets what SQL query the mock Statement should simulate and verifies that the SQL query that is executed is the one expected. However, because you were not calling the verify method on your Statement mock, the expectation wasn’t verified.
c |
Verify that only one Statement is created. |
d |
Verify that the close method is called and that it’s called only once. |
eVerify the expectations set on mocks in b, c, and D.
So far, you have only tested a valid execution of the execute method. Obviously this isn’t enough for a real-world test class. Alternate execution paths are a leading source of bugs in software. It’s extremely important to unit-test exception paths. Put yourself in Murphy’s shoes: Ask yourself what could possibly go wrong, and then write a test for that possibility.
Testing for errors
Here is a non-exhaustive list of things that can go wrong in your code and that therefore deserve a test case:
258CHAPTER 11
Unit-testing database applications
■The getConnection may fail with a SQLException. (There may be no connections left in the pool, the database may be offline, and so forth.)
■The creation of the Statement may fail.
■The execution of the query may fail.
These types of errors are easy to discover. However, there are always other errors that aren’t so obvious. The subtle, unexpected errors can only be exposed through experience (and bug reports).
In the database application realm, there is a well-known error that can happen: The database connection may not be closed when an exception is raised. This is a common error, so let’s write a test for it (see listing 11.12).
Listing 11.12 Verifying that the connection is closed even when an exception is raised
public void testExecuteCloseConnectionOnException() throws Exception
{
String sql = "SELECT * FROM CUSTOMER"; |
|
|
statement.setupThrowExceptionOnExecute( |
|
b |
|
||
new SQLException("sql error")); |
|
|
connection.setExpectedCloseCalls(1); c
try
{
manager.execute(sql);
fail("Should have thrown a SQLException");
}
catch (SQLException expected)
{
assertEquals("sql error", expected.getMessage());
}
}
bTo verify that the database connection is correctly closed when a database exception is raised, tell the MockStatement to throw a SQLException when it’s executed.
cAdd an expectation to verify that a close call on the mock Connection happens once and only once.
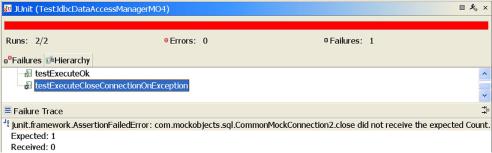
If you try to run the test now, it fails as shown in figure 11.7. (Flip back to listing 11.5, where you implemented the execute method, and you may see why.) You can easily fix the code by wrapping it in a try/finally block:
Testing persistence code in isolation from the database |
259 |
|
|
Figure 11.7 Failure to close the connection when a database exception is raised
public Collection execute(String sql) throws Exception
{
ResultSet resultSet = null; Connection connection = null; Collection result = null;
try
{
connection = getConnection();
resultSet = connection.createStatement().executeQuery(sql);
RowSetDynaClass rsdc = new RowSetDynaClass(resultSet);
result = rsdc.getRows();
}
finally
{
if (resultSet != null)
{
resultSet.close();
}
if (connection != null)
{
connection.close();
}
}
return result;
}
That’s much better. You can now be confident that the database access code performs as expected. But there is more to database access than SQL code. For example, are you sure the connection pool is set up correctly? Do you have to wait for functional tests to discover that something else doesn’t work? The focus of the next section is the third type of test: database integration unit testing.