- •contents
- •preface
- •acknowledgments
- •about this book
- •Special features
- •Best practices
- •Design patterns in action
- •Software directory
- •Roadmap
- •Part 1: JUnit distilled
- •Part 2: Testing strategies
- •Part 3: Testing components
- •Code
- •References
- •Author online
- •about the authors
- •about the title
- •about the cover illustration
- •JUnit jumpstart
- •1.1 Proving it works
- •1.2 Starting from scratch
- •1.3 Understanding unit testing frameworks
- •1.4 Setting up JUnit
- •1.5 Testing with JUnit
- •1.6 Summary
- •2.1 Exploring core JUnit
- •2.2 Launching tests with test runners
- •2.2.1 Selecting a test runner
- •2.2.2 Defining your own test runner
- •2.3 Composing tests with TestSuite
- •2.3.1 Running the automatic suite
- •2.3.2 Rolling your own test suite
- •2.4 Collecting parameters with TestResult
- •2.5 Observing results with TestListener
- •2.6 Working with TestCase
- •2.6.1 Managing resources with a fixture
- •2.6.2 Creating unit test methods
- •2.7 Stepping through TestCalculator
- •2.7.1 Creating a TestSuite
- •2.7.2 Creating a TestResult
- •2.7.3 Executing the test methods
- •2.7.4 Reviewing the full JUnit life cycle
- •2.8 Summary
- •3.1 Introducing the controller component
- •3.1.1 Designing the interfaces
- •3.1.2 Implementing the base classes
- •3.2 Let’s test it!
- •3.2.1 Testing the DefaultController
- •3.2.2 Adding a handler
- •3.2.3 Processing a request
- •3.2.4 Improving testProcessRequest
- •3.3 Testing exception-handling
- •3.3.1 Simulating exceptional conditions
- •3.3.2 Testing for exceptions
- •3.4 Setting up a project for testing
- •3.5 Summary
- •4.1 The need for unit tests
- •4.1.1 Allowing greater test coverage
- •4.1.2 Enabling teamwork
- •4.1.3 Preventing regression and limiting debugging
- •4.1.4 Enabling refactoring
- •4.1.5 Improving implementation design
- •4.1.6 Serving as developer documentation
- •4.1.7 Having fun
- •4.2 Different kinds of tests
- •4.2.1 The four flavors of software tests
- •4.2.2 The three flavors of unit tests
- •4.3 Determining how good tests are
- •4.3.1 Measuring test coverage
- •4.3.2 Generating test coverage reports
- •4.3.3 Testing interactions
- •4.4 Test-Driven Development
- •4.4.1 Tweaking the cycle
- •4.5 Testing in the development cycle
- •4.6 Summary
- •5.1 A day in the life
- •5.2 Running tests from Ant
- •5.2.1 Ant, indispensable Ant
- •5.2.2 Ant targets, projects, properties, and tasks
- •5.2.3 The javac task
- •5.2.4 The JUnit task
- •5.2.5 Putting Ant to the task
- •5.2.6 Pretty printing with JUnitReport
- •5.2.7 Automatically finding the tests to run
- •5.3 Running tests from Maven
- •5.3.2 Configuring Maven for a project
- •5.3.3 Executing JUnit tests with Maven
- •5.3.4 Handling dependent jars with Maven
- •5.4 Running tests from Eclipse
- •5.4.1 Creating an Eclipse project
- •5.4.2 Running JUnit tests in Eclipse
- •5.5 Summary
- •6.1 Introducing stubs
- •6.2 Practicing on an HTTP connection sample
- •6.2.1 Choosing a stubbing solution
- •6.2.2 Using Jetty as an embedded server
- •6.3 Stubbing the web server’s resources
- •6.3.1 Setting up the first stub test
- •6.3.2 Testing for failure conditions
- •6.3.3 Reviewing the first stub test
- •6.4 Stubbing the connection
- •6.4.1 Producing a custom URL protocol handler
- •6.4.2 Creating a JDK HttpURLConnection stub
- •6.4.3 Running the test
- •6.5 Summary
- •7.1 Introducing mock objects
- •7.2 Mock tasting: a simple example
- •7.3 Using mock objects as a refactoring technique
- •7.3.1 Easy refactoring
- •7.3.2 Allowing more flexible code
- •7.4 Practicing on an HTTP connection sample
- •7.4.1 Defining the mock object
- •7.4.2 Testing a sample method
- •7.4.3 Try #1: easy method refactoring technique
- •7.4.4 Try #2: refactoring by using a class factory
- •7.5 Using mocks as Trojan horses
- •7.6 Deciding when to use mock objects
- •7.7 Summary
- •8.1 The problem with unit-testing components
- •8.2 Testing components using mock objects
- •8.2.1 Testing the servlet sample using EasyMock
- •8.2.2 Pros and cons of using mock objects to test components
- •8.3 What are integration unit tests?
- •8.4 Introducing Cactus
- •8.5 Testing components using Cactus
- •8.5.1 Running Cactus tests
- •8.5.2 Executing the tests using Cactus/Jetty integration
- •8.6 How Cactus works
- •8.6.2 Stepping through a test
- •8.7 Summary
- •9.1 Presenting the Administration application
- •9.2 Writing servlet tests with Cactus
- •9.2.1 Designing the first test
- •9.2.2 Using Maven to run Cactus tests
- •9.2.3 Finishing the Cactus servlet tests
- •9.3 Testing servlets with mock objects
- •9.3.1 Writing a test using DynaMocks and DynaBeans
- •9.3.2 Finishing the DynaMock tests
- •9.4 Writing filter tests with Cactus
- •9.4.1 Testing the filter with a SELECT query
- •9.4.2 Testing the filter for other query types
- •9.4.3 Running the Cactus filter tests with Maven
- •9.5 When to use Cactus, and when to use mock objects
- •9.6 Summary
- •10.1 Revisiting the Administration application
- •10.2 What is JSP unit testing?
- •10.3 Unit-testing a JSP in isolation with Cactus
- •10.3.1 Executing a JSP with SQL results data
- •10.3.2 Writing the Cactus test
- •10.3.3 Executing Cactus JSP tests with Maven
- •10.4 Unit-testing taglibs with Cactus
- •10.4.1 Defining a custom tag
- •10.4.2 Testing the custom tag
- •10.5 Unit-testing taglibs with mock objects
- •10.5.1 Introducing MockMaker and installing its Eclipse plugin
- •10.5.2 Using MockMaker to generate mocks from classes
- •10.6 When to use mock objects and when to use Cactus
- •10.7 Summary
- •Unit-testing database applications
- •11.1 Introduction to unit-testing databases
- •11.2 Testing business logic in isolation from the database
- •11.2.1 Implementing a database access layer interface
- •11.2.2 Setting up a mock database interface layer
- •11.2.3 Mocking the database interface layer
- •11.3 Testing persistence code in isolation from the database
- •11.3.1 Testing the execute method
- •11.3.2 Using expectations to verify state
- •11.4 Writing database integration unit tests
- •11.4.1 Filling the requirements for database integration tests
- •11.4.2 Presetting database data
- •11.5 Running the Cactus test using Ant
- •11.5.1 Reviewing the project structure
- •11.5.2 Introducing the Cactus/Ant integration module
- •11.5.3 Creating the Ant build file step by step
- •11.5.4 Executing the Cactus tests
- •11.6 Tuning for build performance
- •11.6.2 Grouping tests in functional test suites
- •11.7.1 Choosing an approach
- •11.7.2 Applying continuous integration
- •11.8 Summary
- •Unit-testing EJBs
- •12.1 Defining a sample EJB application
- •12.2 Using a façade strategy
- •12.3 Unit-testing JNDI code using mock objects
- •12.4 Unit-testing session beans
- •12.4.1 Using the factory method strategy
- •12.4.2 Using the factory class strategy
- •12.4.3 Using the mock JNDI implementation strategy
- •12.5 Using mock objects to test message-driven beans
- •12.6 Using mock objects to test entity beans
- •12.7 Choosing the right mock-objects strategy
- •12.8 Using integration unit tests
- •12.9 Using JUnit and remote calls
- •12.9.1 Requirements for using JUnit directly
- •12.9.2 Packaging the Petstore application in an ear file
- •12.9.3 Performing automatic deployment and execution of tests
- •12.9.4 Writing a remote JUnit test for PetstoreEJB
- •12.9.5 Fixing JNDI names
- •12.9.6 Running the tests
- •12.10 Using Cactus
- •12.10.1 Writing an EJB unit test with Cactus
- •12.10.2 Project directory structure
- •12.10.3 Packaging the Cactus tests
- •12.10.4 Executing the Cactus tests
- •12.11 Summary
- •A.1 Getting the source code
- •A.2 Source code overview
- •A.3 External libraries
- •A.4 Jar versions
- •A.5 Directory structure conventions
- •B.1 Installing Eclipse
- •B.2 Setting up Eclipse projects from the sources
- •B.3 Running JUnit tests from Eclipse
- •B.4 Running Ant scripts from Eclipse
- •B.5 Running Cactus tests from Eclipse
- •references
- •index
Collecting parameters with TestResult |
25 |
|
|
In chapter 5, we look at several techniques for automating tasks like this one, so that you do not have to create and maintain a TestAll class. Of course, you still may want to create specialty suites for discrete subsets of your tests.
Design patterns in action: Composite and Command
Composite pattern. “Compose objects into tree structures to represent partwhole hierarchies. Composite lets clients treat individual objects and compositions of objects uniformly.”1 JUnit’s use of the Test interface to run a single test or suites of suites of suites of tests is an example of the Composite pattern. When you add an object to a TestSuite, you are really adding a Test, not simply a TestCase. Because both TestSuite and TestCase implement Test, you can add either to a suite. If the Test is a TestCase, the single test is run. If the Test is a TestSuite, then a group of tests is run (which could include other TestSuites).
Command pattern. “Encapsulate a request as an object, thereby letting you parameterize clients with different requests, queue or log requests, and support undoable operations.”2 The use of the Test interface to provide a common run method is an example of the Command pattern.
2.4 Collecting parameters with TestResult
Newton taught us that for every action there is an equal and opposite reaction. Likewise, for every TestSuite, there is a TestResult.
A TestResult collects the results of executing a TestCase. If all your tests always succeeded, what would be the point of running them? So, TestResult stores the details of all your tests, pass or fail.
The TestCalculator program (listing 2.1) includes a line that says
assertEquals(60, result, 0);
If the result did not equal 60, JUnit would create a TestFailure object to be stored in the TestResult.
The TestRunner uses the TestResult to report the outcome of your tests. If there are no TestFailures in the TestResult collection, then the code is clean, and the bar turns green. If there are failures, the TestRunner reports the failure
1Erich Gamma et al., Design Patterns (Reading, MA: Addison-Wesley, 1995).
2Ibid.
26CHAPTER 2
Exploring JUnit
count and the stack trace for failing tests. Figure 2.4 shows what a failed test looks like in the Swing test runner.
JUnit distinguishes between failures and errors. Failures are to be expected. From time to time changes in the code will cause an assertion to fail. When it does, you fix the code so the failure goes away. An error is an unexpected condition that is not expected by the test, such as an exception in a conventional program.
Of course, an error may indicate a failure in the underlying environment. The test itself may not be broken. A good heuristic in the face of an error is the following:
■Check the environment. (Is the database up? What about the network?)
■Check the test.
■Check the code.
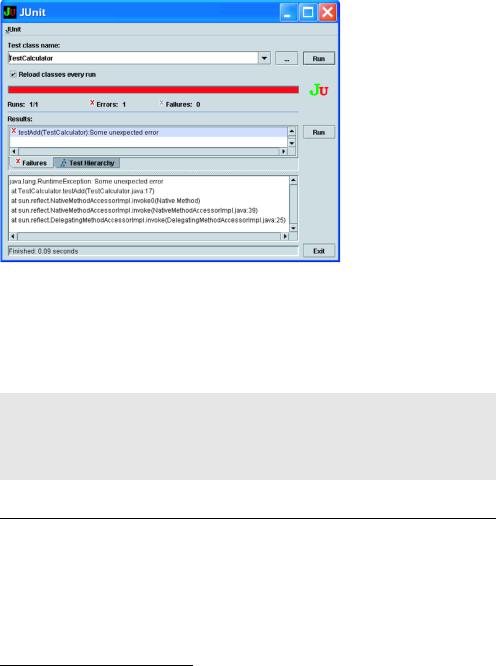
Figure 2.5 shows what an error condition looks like in the Swing test runner. At the end of a suite, the test runner provides a tally of how many tests passed and failed, along with details of any test that failed.
With JUnit 3.8.1, you can use the automatic suite mechanism to ensure that any new tests you write are included in the run. If you’d like to retain the results
Figure 2.4 Oops—time to fix the code!
Observing results with TestListener |
27 |
|
|
Figure 2.5
Oh, no! You have to fix the test!
for later review, you can do so using Ant, Eclipse, and other tools. See chapter 5 for more about using automated tools.
The TestResult is used by almost all the JUnit classes internally. As a JUnit test writer, you won’t interact with the TestResult directly; but in trying to understand how JUnit works, it’s helpful to know that it exists.
Design patterns in action: Collecting Parameter
“When you need to collect results over several methods, you should add a parameter to the method and pass an object that will collect the results for you.”3 The TestResult class is an example of the Collecting Parameter pattern.
2.5 Observing results with TestListener
The TestResult collects information about the test, and the TestRunner reports it. But does an object have to be a TestRunner to report on a test? Can more than one object report on a test at once?
The JUnit framework provides the TestListener interface to help objects access the TestResult and create useful reports. The TestRunners implement TestListener, as do many of the special JUnit extensions. Any number of TestListeners can register with the framework and do whatever they need to do
3 Kent Beck, Smalltalk Best Practice Patterns (Upper Saddle River, NJ: Prentice Hall, 1996).
28CHAPTER 2
Exploring JUnit
with the information provided by the TestResult. Table 2.2 describes the
TestListener interface.
NOTE Although the TestListener interface is an essential part of the JUnit framework, it is not an interface that you will implement when writing your own tests. We provide this section for completeness only.
Table 2.2 The TestListener interface
|
Method |
Description |
|
|
|
void addError(Test test, Throwable t) |
Called when an error occurs |
|
|
|
|
void addFailure(Test test, AssertionFailedError e) |
Called when a failure occurs |
|
|
|
|
void |
endTest(Test test) |
Called when a test ends |
|
|
|
void |
startTest(Test test) |
Called when a test begins |
|
|
|
As mentioned, although the TestListener interface is an interesting bit of plumbing, you would only need to implement it if you were extending the JUnit framework, rather than just using it.
Design patterns in action: Observer
“Define a one-to-many dependency between objects so that when one object changes state, all its dependants are notified and updated automatically.”4
The TestRunner registering as a TestListener with the TestResult is an example of the Observer pattern.
2.6 Working with TestCase
The JUnit big picture is that the TestRunner runs a TestSuite, which contains one or more TestCases (or other TestSuites). On a daily basis, you usually work only with the TestCases.
The framework ships with ready-to-use graphical and textual TestRunners. The framework can also generate a default runtime TestSuite for you. So, the only class you absolutely must provide yourself is the TestCase. A typical TestCase includes two major components: the fixture and the unit tests.
4 Ibid.