- •contents
- •preface
- •acknowledgments
- •about this book
- •Special features
- •Best practices
- •Design patterns in action
- •Software directory
- •Roadmap
- •Part 1: JUnit distilled
- •Part 2: Testing strategies
- •Part 3: Testing components
- •Code
- •References
- •Author online
- •about the authors
- •about the title
- •about the cover illustration
- •JUnit jumpstart
- •1.1 Proving it works
- •1.2 Starting from scratch
- •1.3 Understanding unit testing frameworks
- •1.4 Setting up JUnit
- •1.5 Testing with JUnit
- •1.6 Summary
- •2.1 Exploring core JUnit
- •2.2 Launching tests with test runners
- •2.2.1 Selecting a test runner
- •2.2.2 Defining your own test runner
- •2.3 Composing tests with TestSuite
- •2.3.1 Running the automatic suite
- •2.3.2 Rolling your own test suite
- •2.4 Collecting parameters with TestResult
- •2.5 Observing results with TestListener
- •2.6 Working with TestCase
- •2.6.1 Managing resources with a fixture
- •2.6.2 Creating unit test methods
- •2.7 Stepping through TestCalculator
- •2.7.1 Creating a TestSuite
- •2.7.2 Creating a TestResult
- •2.7.3 Executing the test methods
- •2.7.4 Reviewing the full JUnit life cycle
- •2.8 Summary
- •3.1 Introducing the controller component
- •3.1.1 Designing the interfaces
- •3.1.2 Implementing the base classes
- •3.2 Let’s test it!
- •3.2.1 Testing the DefaultController
- •3.2.2 Adding a handler
- •3.2.3 Processing a request
- •3.2.4 Improving testProcessRequest
- •3.3 Testing exception-handling
- •3.3.1 Simulating exceptional conditions
- •3.3.2 Testing for exceptions
- •3.4 Setting up a project for testing
- •3.5 Summary
- •4.1 The need for unit tests
- •4.1.1 Allowing greater test coverage
- •4.1.2 Enabling teamwork
- •4.1.3 Preventing regression and limiting debugging
- •4.1.4 Enabling refactoring
- •4.1.5 Improving implementation design
- •4.1.6 Serving as developer documentation
- •4.1.7 Having fun
- •4.2 Different kinds of tests
- •4.2.1 The four flavors of software tests
- •4.2.2 The three flavors of unit tests
- •4.3 Determining how good tests are
- •4.3.1 Measuring test coverage
- •4.3.2 Generating test coverage reports
- •4.3.3 Testing interactions
- •4.4 Test-Driven Development
- •4.4.1 Tweaking the cycle
- •4.5 Testing in the development cycle
- •4.6 Summary
- •5.1 A day in the life
- •5.2 Running tests from Ant
- •5.2.1 Ant, indispensable Ant
- •5.2.2 Ant targets, projects, properties, and tasks
- •5.2.3 The javac task
- •5.2.4 The JUnit task
- •5.2.5 Putting Ant to the task
- •5.2.6 Pretty printing with JUnitReport
- •5.2.7 Automatically finding the tests to run
- •5.3 Running tests from Maven
- •5.3.2 Configuring Maven for a project
- •5.3.3 Executing JUnit tests with Maven
- •5.3.4 Handling dependent jars with Maven
- •5.4 Running tests from Eclipse
- •5.4.1 Creating an Eclipse project
- •5.4.2 Running JUnit tests in Eclipse
- •5.5 Summary
- •6.1 Introducing stubs
- •6.2 Practicing on an HTTP connection sample
- •6.2.1 Choosing a stubbing solution
- •6.2.2 Using Jetty as an embedded server
- •6.3 Stubbing the web server’s resources
- •6.3.1 Setting up the first stub test
- •6.3.2 Testing for failure conditions
- •6.3.3 Reviewing the first stub test
- •6.4 Stubbing the connection
- •6.4.1 Producing a custom URL protocol handler
- •6.4.2 Creating a JDK HttpURLConnection stub
- •6.4.3 Running the test
- •6.5 Summary
- •7.1 Introducing mock objects
- •7.2 Mock tasting: a simple example
- •7.3 Using mock objects as a refactoring technique
- •7.3.1 Easy refactoring
- •7.3.2 Allowing more flexible code
- •7.4 Practicing on an HTTP connection sample
- •7.4.1 Defining the mock object
- •7.4.2 Testing a sample method
- •7.4.3 Try #1: easy method refactoring technique
- •7.4.4 Try #2: refactoring by using a class factory
- •7.5 Using mocks as Trojan horses
- •7.6 Deciding when to use mock objects
- •7.7 Summary
- •8.1 The problem with unit-testing components
- •8.2 Testing components using mock objects
- •8.2.1 Testing the servlet sample using EasyMock
- •8.2.2 Pros and cons of using mock objects to test components
- •8.3 What are integration unit tests?
- •8.4 Introducing Cactus
- •8.5 Testing components using Cactus
- •8.5.1 Running Cactus tests
- •8.5.2 Executing the tests using Cactus/Jetty integration
- •8.6 How Cactus works
- •8.6.2 Stepping through a test
- •8.7 Summary
- •9.1 Presenting the Administration application
- •9.2 Writing servlet tests with Cactus
- •9.2.1 Designing the first test
- •9.2.2 Using Maven to run Cactus tests
- •9.2.3 Finishing the Cactus servlet tests
- •9.3 Testing servlets with mock objects
- •9.3.1 Writing a test using DynaMocks and DynaBeans
- •9.3.2 Finishing the DynaMock tests
- •9.4 Writing filter tests with Cactus
- •9.4.1 Testing the filter with a SELECT query
- •9.4.2 Testing the filter for other query types
- •9.4.3 Running the Cactus filter tests with Maven
- •9.5 When to use Cactus, and when to use mock objects
- •9.6 Summary
- •10.1 Revisiting the Administration application
- •10.2 What is JSP unit testing?
- •10.3 Unit-testing a JSP in isolation with Cactus
- •10.3.1 Executing a JSP with SQL results data
- •10.3.2 Writing the Cactus test
- •10.3.3 Executing Cactus JSP tests with Maven
- •10.4 Unit-testing taglibs with Cactus
- •10.4.1 Defining a custom tag
- •10.4.2 Testing the custom tag
- •10.5 Unit-testing taglibs with mock objects
- •10.5.1 Introducing MockMaker and installing its Eclipse plugin
- •10.5.2 Using MockMaker to generate mocks from classes
- •10.6 When to use mock objects and when to use Cactus
- •10.7 Summary
- •Unit-testing database applications
- •11.1 Introduction to unit-testing databases
- •11.2 Testing business logic in isolation from the database
- •11.2.1 Implementing a database access layer interface
- •11.2.2 Setting up a mock database interface layer
- •11.2.3 Mocking the database interface layer
- •11.3 Testing persistence code in isolation from the database
- •11.3.1 Testing the execute method
- •11.3.2 Using expectations to verify state
- •11.4 Writing database integration unit tests
- •11.4.1 Filling the requirements for database integration tests
- •11.4.2 Presetting database data
- •11.5 Running the Cactus test using Ant
- •11.5.1 Reviewing the project structure
- •11.5.2 Introducing the Cactus/Ant integration module
- •11.5.3 Creating the Ant build file step by step
- •11.5.4 Executing the Cactus tests
- •11.6 Tuning for build performance
- •11.6.2 Grouping tests in functional test suites
- •11.7.1 Choosing an approach
- •11.7.2 Applying continuous integration
- •11.8 Summary
- •Unit-testing EJBs
- •12.1 Defining a sample EJB application
- •12.2 Using a façade strategy
- •12.3 Unit-testing JNDI code using mock objects
- •12.4 Unit-testing session beans
- •12.4.1 Using the factory method strategy
- •12.4.2 Using the factory class strategy
- •12.4.3 Using the mock JNDI implementation strategy
- •12.5 Using mock objects to test message-driven beans
- •12.6 Using mock objects to test entity beans
- •12.7 Choosing the right mock-objects strategy
- •12.8 Using integration unit tests
- •12.9 Using JUnit and remote calls
- •12.9.1 Requirements for using JUnit directly
- •12.9.2 Packaging the Petstore application in an ear file
- •12.9.3 Performing automatic deployment and execution of tests
- •12.9.4 Writing a remote JUnit test for PetstoreEJB
- •12.9.5 Fixing JNDI names
- •12.9.6 Running the tests
- •12.10 Using Cactus
- •12.10.1 Writing an EJB unit test with Cactus
- •12.10.2 Project directory structure
- •12.10.3 Packaging the Cactus tests
- •12.10.4 Executing the Cactus tests
- •12.11 Summary
- •A.1 Getting the source code
- •A.2 Source code overview
- •A.3 External libraries
- •A.4 Jar versions
- •A.5 Directory structure conventions
- •B.1 Installing Eclipse
- •B.2 Setting up Eclipse projects from the sources
- •B.3 Running JUnit tests from Eclipse
- •B.4 Running Ant scripts from Eclipse
- •B.5 Running Cactus tests from Eclipse
- •references
- •index
222CHAPTER 10
Unit-testing JSPs and taglibs
org.apache.cactus.WebResponse object, you can perform asserts on the content of the HTTP response, such as verifying the returned cookies, the returned HTTP headers, or the content. The Cactus org.apache.cactus.WebResponse object sports a simple API. The HttpUnit web response API (com.meterware.httpunit.WebResponse) is much more comprehensive. With HttpUnit, you can view the returned XML or HTML pages as DOM objects. In listing 10.3, you use the provided HTML DOM to verify that the returned web page contains the expected HTML table.
10.3.3Executing Cactus JSP tests with Maven
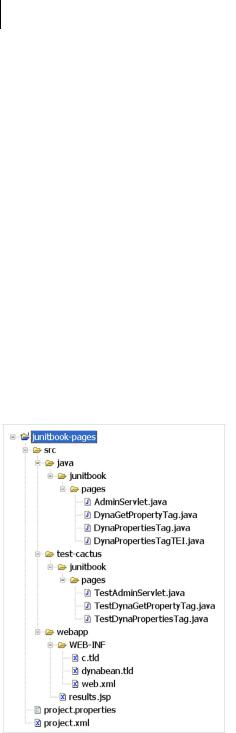
Let’s run the Cactus tests with the Maven plugin for Cactus (introduced in chapter 9). The Maven directory structure for this chapter is shown in figure 10.4. The figure lists not only the AdminServlet and TestAdminServlet classes but also tag library classes that you’ll develop in section 10.4.
As usual, you put the Java source files in src/java (as required by Maven) and the Cactus tests in src/test-cactus (as required by the Maven Cactus plugin). Internally, the Maven Cactus plugin calls the Maven war plugin, which requires the web application resource and configuration files to be put in src/webapp. The Maven project configuration files (project.xml and project.properties) are put in the root directory. Table 10.1 describes the different project files.
Figure 10.4
Directory structure for the JSP tests showing how to set up a web app for the Maven Cactus plugin
|
Unit-testing a JSP in isolation with Cactus |
|
223 |
|
|
|
|
Table 10.1 Source files and directories for the JSP sample project |
|
||
|
|
|
|
File and directory locations |
Description |
|
|
|
|
|
|
src/java/junitbook/pages/ |
Main runtime Java sources |
|
|
|
|
||
AdminServlet.java |
Administration servlet that forwards to the results.jsp |
||
|
JSP |
|
|
|
|
|
|
Dyna*.java |
Custom taglib implementations described in detail in |
|
|
|
section 10.4 |
|
|
|
|
|
|
src/test-cactus/junitbook/pages/ |
Cactus unit tests |
|
|
|
|
||
TestAdminServlet.java |
Unit test class for unit-testing the callView method of |
||
|
the administration servlet |
|
|
|
|
|
|
TestDyna*.java |
Unit tests for the custom taglibs |
|
|
|
|
|
|
src/webapp/results.jsp |
Results View JSP that you want to unit test |
|
|
|
|
|
|
src/webapp/WEB-INF/ |
Web app configuration files |
|
|
|
|
|
|
c.tld |
Configuration file for the JSTL Core taglib |
|
|
|
|
|
|
dynabean.tld |
Configuration file for the custom taglib |
|
|
|
|
||
web.xml |
Main web app configuration file containing the taglib map- |
||
|
ping between the URIs used in the JSP and the taglib con- |
||
|
figuration files (.tld files) |
|
|
|
|
|
|
project.properties |
Maven configuration file |
|
|
|
|
|
|
project.xml |
Maven project descriptor |
|
|
|
|
|
|
NOTE For conciseness, the .tld, web.xml, and project.xml file contents are not shown here. However, they can be downloaded from the book’s web site (see appendix A for details).
Before you execute your tests, you need to tell the Maven Cactus plugin what servlet container to use to execute the Cactus tests. To do so, add a property in your project.properties or build.properties file. This property defines where the container is installed on the local hard disk. For example, if you want to run the tests in Tomcat 4.1.24, you need to add the following property (assuming you’ve installed Tomcat in c:/Apps/jakarta-tomcat-4.1.24):
cactus.home.tomcat4x = C:/Apps/jakarta-tomcat-4.1.24
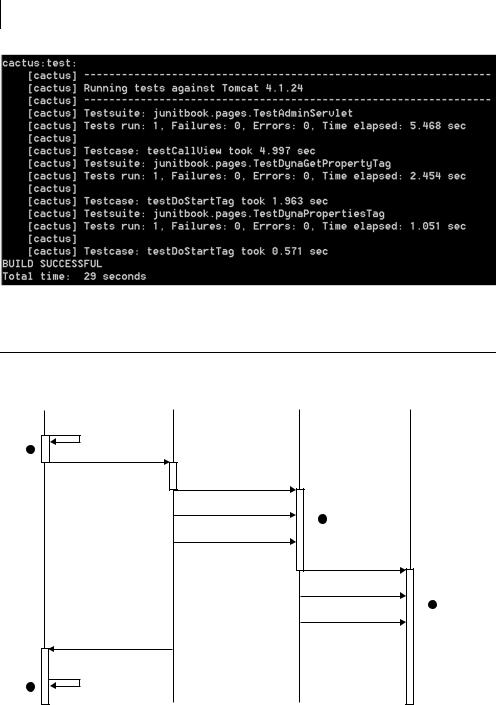
Starting the Maven Cactus plugin is as simple as opening a shell in the junitbook/ pages/ directory and typing maven cactus:test. Figure 10.5 shows the result.
224CHAPTER 10
Unit-testing JSPs and taglibs
Figure 10.5 Cactus test results for the JSP (results.jsp) using the Maven Cactus plugin
10.4 Unit-testing taglibs with Cactus
Figure 10.6 depicts how you unit-test a tag from a taglib with Cactus.
TestYyy:JspTestCase |
|
jspRedirector.jsp : JSP Redirector |
|
TestYyy : JspTestCase |
|
Yyy : Tag |
|
|
|
|
|
|
|
: beginXXX(WebRequest)
b |
HTTP request : |
|
: new
set implicit objects :
C
: testXXX()
: new
: setPageContext(pageContext)
D
: methodToTest()
HTTP response : |
: endXXX(WebResponse) |
E |
Figure 10.6 Sequence diagram of taglib testing with Cactus
Unit-testing taglibs with Cactus |
225 |
|
|
bCactus instantiates the test class, which must extend JspTestCase. You must configure any HTTP parameter needed by the tag you are testing in a beginXXX
method. For example, if the tag extracts information from an HTTP parameter, you need to define this parameter in beginXXX.
cUnder the hood, the Cactus JspTestCase class calls the Cactus JSP Redirector (which is a JSP). The JSP Redirector is in charge of instantiating the JspTestCase
class on the server side, passing to it the JSP implicit objects (mainly the PageContext object). Then, it calls the testXXX test method.
dIn the testXXX method, you write code to unit-test the JSP tag. The typical steps for testing a tag are as follows: instantiate the tag by calling new, set the PageCon-
text by calling setPageContext, call the method to test, and perform server-side assertions. For example, if the tag sets some objects in the HTTP session, you can assert that the object is there.
eThe Cactus JSP Redirector returns the output of the tag to the client side in an HTTP response. You can then assert the tag output by writing an endXXX method
in the JspTestCase class. Cactus provides a tight integration with HttpUnit, which allows very fine-grained assertions on the returned content of the tag.
10.4.1Defining a custom tag
The Administration application displays the query results on a page called the Results View JSP (results.jsp). In the Results View JSP, the first tag class you use is DynaPropertiesTag. This tag extracts all the properties of a DynaBean object into an array. The properties, which are DynaProperty objects, are stored in the PageContext under a name passed to the tag. Here’s how the tag is used:
<d:properties var="properties" item="${dynaBean}"/>
where properties is the variable name to use for the array of DynaProperty objects and dynaBean is the DynaBean instance from which to extract your properties.
The DynaPropertiesTag code is shown in listing 10.4.
Listing 10.4 DynaPropertiesTag.java
package junitbook.pages;
import org.apache.commons.beanutils.DynaBean; import org.apache.taglibs.standard.lang.support.
→ExpressionEvaluatorManager;
import javax.servlet.jsp.tagext.TagSupport; import javax.servlet.jsp.JspException;
public class DynaPropertiesTag extends TagSupport
{
226CHAPTER 10
Unit-testing JSPs and taglibs
private String varName; private String item;
public void setVar(String varName)
{
this.varName = varName;
}
public String getVar()
{
return this.varName;
}
public void setItem(String item)
{
this.item = item;
}
public String getItem()
{
return this.item;
}
public int doStartTag() throws JspException
{
//Evaluate the item attribute (an EL expression) which
//must result in a DynaBean object.
DynaBean bean =
(DynaBean) ExpressionEvaluatorManager.evaluate( "item", getItem(), DynaBean.class, this, this.pageContext);
//Get the DynaBean meta-properties and store them in the
//variable pointed to by the "var" attribute.
this.pageContext.setAttribute(getVar(), bean.getDynaClass().getDynaProperties());
return SKIP_BODY;
}
public int doEndTag() throws JspException
{
return EVAL_PAGE;
}
}
To be consistent with the JSTL library (http://java.sun.com/products/jsp/jstl/), you implement the content of the item attribute as an Expression Language (EL) expression. EL is the expression language used in the JSTL tags. It’s very convenient for passing variables from one JSP tag to another. For example, in the tag shown before listing 10.4, you pass the dynaBean variable (${dynaBean}) to the