


172CHAPTER 8
In-container testing with Cactus
Whereas this section has dwelled on the mock-objects approach, the next section introduces the other approach: integration unit testing.
8.3 What are integration unit tests?
Running unit tests inside the container gives you the best of both worlds: all the benefits of unit tests and confirmation that your code will run correctly inside its target container. Integration unit tests stand between logic unit tests (testing individual methods) and functional tests (testing interactions between methods). Figure 8.2 depicts the relationship between integration, logic, and functional unit tests.
Viewed from another angle, integration unit-testing is a generalization of logic unit-testing and functional testing. If you set the test-start slider to be in a given method and the test-end slider to be the same method, you get a logic unit test. If you set the start and end sliders to be one of the application entry points, you get a functional test.
The main idea is that nothing is completely white or black. Sometimes you need more flexibility in how you manage your tests, and you would like to perform testing between logic unit tests and functional tests. With integration unit tests, you can decide where the test starts and where it ends. It can begin in a given method, span several method calls, and stop in another method further down the chain. It can begin in a given method and go all the way to the end (up
Functional unit testing
Integration unit testing
System
Class
Logic unit testing
Figure 8.2 Integration unit tests versus logic unit tests versus functional tests

Testing components using Cactus |
173 |
|
|
to a database). Or, it can begin at an entry point of the application and stop somewhere in the calling chain (say, by using mock objects or stubs to cut the chain).
In the next section we introduce Jakarta Cactus, a unit-testing framework specializing in integration unit-testing for server-side Java components.
8.4 Introducing Cactus
Cactus is an open source framework (http://jakarta.apache.org/cactus/) for unittesting server-side Java code (mostly J2EE components in the current version of Cactus). More specifically, it is geared toward integration unit-testing (also called in-container unit-testing, a term coined by the Cactus team).
The Cactus vision goes something like this: In the past few years we have seen a move from Java code toward metadata, such as deployment descriptors. Containers offer more services for their components in an increasingly transparent fashion for the component writer. The latest trend is to use Aspect-Oriented Programming (AOP) to decouple programming aspects (security, logging, and so forth) from the business code. The main business code is shrinking, whereas configuration data and metadata are expanding. Integration is becoming more important to verify that an application works. Cactus takes a proactive approach to integration by moving it into the development cycle and providing a solution for fine-grained testing.
Let’s see Cactus in action. In later sections, we’ll explain in more detail how it works.
8.5 Testing components using Cactus
Let’s write unit tests for the isAuthenticated method (listing 8.1). The tests in listing 8.3 are exactly the same tests that you wrote using the mock-objects approach in listing 8.2, but this time you use Cactus.
Listing 8.3 Using Cactus to unit-test servlet code
package junitbook.container;
import org.apache.cactus.ServletTestCase; import org.apache.cactus.WebRequest;
public class TestSampleServletIntegration extends ServletTestCase
{
private SampleServlet servlet;
protected void setUp()
{

174CHAPTER 8
In-container testing with Cactus
servlet = new SampleServlet();
}
public void testIsAuthenticatedAuthenticated()
{
session.setAttribute("authenticated", "true"); |
b |
assertTrue(servlet.isAuthenticated(request)); |
|
}
public void testIsAuthenticatedNotAuthenticated()
{
assertFalse(servlet.isAuthenticated(request)); b
}
public void beginIsAuthenticatedNoSession(WebRequest request)
{
request.setAutomaticSession(false);
}
public void testIsAuthenticatedNoSession()
{
assertFalse(servlet.isAuthenticated(request)); b
}
}
bThe Cactus framework exposes the container objects (in this case the HttpServletRequest and HttpSession objects) to your tests, making it easy and quick
to write unit tests.
8.5.1Running Cactus tests
Let’s run the Cactus tests. Doing so is more complex than running a pure JUnit test, because you need to package your code, deploy it into a container, start the container, and then start the tests using a JUnit test runner. Fortunately, Cactus hides much of the complexity and has several runners (a.k.a. front ends) that simplify the execution of the tests by automatically performing most, if not all, of these different steps. We’ll demonstrate how to run Cactus tests using the most advanced runners: Ant integration, the Maven plugin, and Jetty integration. Figure 8.3 shows the full list (as of this writing) of available Cactus runners. Many of these are written by the Cactus team: Ant integration, browser integration, Eclipse plugin, Jetty integration, and the Maven plugin.
8.5.2Executing the tests using Cactus/Jetty integration
Cactus/Jetty integration makes it easy to run the Cactus tests from any IDE, in much the same way you ran mock objects with Jetty (but this time, the tests will

Testing components using Cactus |
175 |
|
|
|
Ant |
|
|
|
|
Maven |
Integration |
Together CC |
|
||
Plugin |
|
|
Integration |
|
|
Jetty |
Cactus |
JBuilder |
|
||
Integration |
Plugin |
|
|||
|
Tests |
|
|
|
|
Eclipse |
|
|
Objecteering |
|
|
Plugin |
|
|
UML |
|
|
Browser |
JUnitEE |
Figure 8.3 |
|||
Integration |
Runner |
||||
The Cactus runners, which are used |
|||||
|
|
|
|
||
to easily execute Cactus tests
run inside the container). For these examples, we’ll use two of our favorite products, Jetty and Eclipse. (For more about Jetty, see chapter 6. For more about Eclipse, see chapter 5 and appendix B.)
Cactus/Jetty integration yields several benefits: It works with any IDE, it is very fast, and you can set breakpoints for debugging. (Jetty runs in the same JVM as your tests.) As we mentioned in the previous section, Cactus boasts an Eclipse plugin that integrates it even more tightly with Eclipse. However, our goal here is to be tool-agnostic and show you techniques that will work in any IDE.
Figure 8.4 shows what the project looks like in Eclipse. The mock object tests are in src/test and the Cactus tests are in src/test-cactus.
In order to run a Cactus test with Jetty, you need to create a JUnit test suite containing the tests and wrapped by the special JettyTestSetup class provided by Cactus (found in the Cactus jar). JettyTestSetup extends the JUnit TestSetup
Figure 8.4
The project structure in Eclipse
176CHAPTER 8
In-container testing with Cactus
JUnit best practices: put Cactus tests in their own directories
It’s a good strategy to put the Cactus tests in their own directory structure, such as in src/test-cactus. The main reason is that integration unit tests and pure JUnit tests have different running life cycles: Pure JUnit tests are usually run more often than Cactus tests, because they execute faster. Separate directories allow the build system to perform different build actions on either type of test. Most Cactus test runners expect the Cactus tests to be in a specific directory, because they need a different setup than pure JUnit tests (such as packaging and deploying them in a container, and so forth).
class, which lets you run setUp and tearDown code before any test is executed and at the end of the test suite execution. JettyTestSetup uses that to start Jetty before the suite starts, and it stops Jetty when the suite terminates. Listing 8.4 demonstrates how to create a test suite to run Cactus tests inside the Jetty container.
Listing 8.4 Test suite to run Cactus test inside the Jetty container
package junitbook.container;
import org.apache.cactus.extension.jetty.JettyTestSetup;
import junit.framework.Test; import junit.framework.TestSuite;
public class TestAllWithJetty
{
public static Test suite()
{
System.setProperty("cactus.contextURL",
"http://localhost:8080/test");
TestSuite suite = new TestSuite("All tests with Jetty"); suite.addTestSuite(TestSampleServletIntegration.class);
b
c
return new JettyTestSetup(suite);
}
}
d
bDefine the context under which the web application containing the Cactus tests will run. The JettyTestSetup class uses this information to set up a listener on the
port defined and to create a context. Because cactus.contextURL is a System property, it’s also possible to pass it by using a -Dcactus.contextURL=... flag when you start the JVM used for the tests.

Testing components using Cactus |
177 |
|
|
cCreate a JUnit test suite and add all the tests found in the TestSampleServletIntegration class.
dWrap the JUnit test suite with the Cactus JettyTestSetup so that Jetty will be started and stopped during the execution of the tests.
Now that you have all the required source files, let’s see what you need in order to execute the tests with Cactus/Jetty. Cactus requires some jars to be present on your classpath: the Cactus jar, the Commons Logging jar, the Commons HttpClient jar, and the AspectJ runtime jar. You’ll be running the Jetty servlet engine, so you also need to have the Jetty jar on your classpath. If you’re following the directory structure and the Eclipse projects as defined in appendix A, you should find the jars in the junitbook/repository directory, as shown in figure 8.5. Notice that we created an Eclipse project (named junitbook-repository) for the junitbook/ repository directory to make it easier to include these jars on the junitbookcontainer project classpath (but doing so is not mandatory).
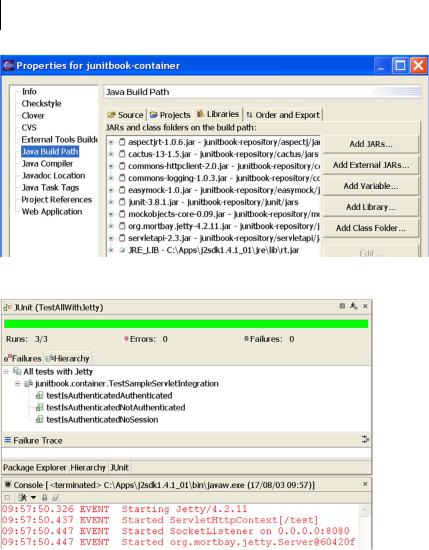
Let’s now add the required jars to junitbook-container project, as shown in figure 8.6. In order to add these jars, right-click your project and select Properties. In the dialog that appears (on the Libraries tab), select Add JARs; then, in the next dialog that appears, open the junitbook-repository project and select all the jars you need.
You can now enjoy running the Cactus tests by clicking the Run button in the toolbar. The result is shown in figure 8.7. The console shows that Cactus started Jetty automatically before running the tests. Don’t worry if you don’t understand how Cactus works at this point. We’ll come back to the Cactus mechanism later.
Figure 8.5
The Eclipse project named junitbookrepository. It’s a placeholder for the jars used in all the other projects.
178CHAPTER 8
In-container testing with Cactus
Figure 8.6 Jars required for the junitbook-container project in Eclipse
Figure 8.7 Cactus tests running in the Jetty container from inside Eclipse
8.5.3Drawbacks of in-container testing
So far, we’ve shown you the advantages of in-container unit-testing. However, there are also a few disadvantages.
Specific tools required
A major drawback is that although the concept is generic, the tools that implement in-container unit-testing are very specific to the underlying API being tested. In the J2EE world, the de facto standard is Jakarta Cactus (introduced in the previous section). However, if you wish to write integration unit tests for another