


Using Cactus |
333 |
|
|
12.10.4Executing the Cactus tests
You execute the Cactus tests using the Cactus-provided cactus task. This is the nice part, compared to the pure JUnit approach from section 12.9, because the cactus task does everything for you: It deploys the ear, starts the container, executes the tests, and stops the container. The cactus task extends the junit JUnit Ant task and thus inherits from all its features. Listing 12.29 demonstrates how to use the cactus task to run the TestOrderEJB test.
Listing 12.29 Running Cactus tests automatically with the cactus task
<?xml version="1.0"?>
<project name="Ejb" default="test" basedir="."> [...]
<target name="test" depends="ear.cactify">
<cactus earfile="${target.dir}/ejb.ear" fork="yes"
printsummary="yes" haltonerror="true" |
|
|
haltonfailure="true"> |
|
|
<containerset> |
|
|
<jboss3x dir="${cactus.home.jboss3x}" |
|
Run Cactus tests in |
|
||
output="jbossresult.txt"/> |
|
JBoss container |
</containerset> |
|
|
<formatter type="brief" usefile="false"/> |
|
|
<test name="junitbook.ejb.domain.TestOrderEJB"/> <classpath>
<pathelement location="${target.classes.java.dir}"/> <pathelement location="${target.classes.cactus.dir}"/>
</classpath>
</cactus>
</target>
</project>
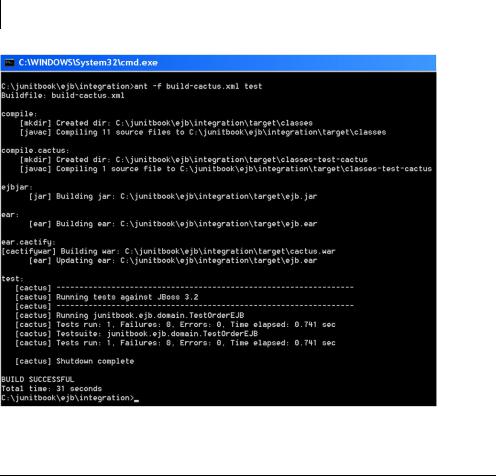
Executing the tests by typing ant -f build-cactus.xml test yields the result shown in figure 12.9.
334CHAPTER 12
Unit-testing EJBs
Figure 12.9 Result of executing Cactus EJB tests with the Cactus/Ant integration
12.11 Summary
EJBs are complex and powerful beasts. Unit-testing doesn’t have to be difficult. This chapter has demonstrated several techniques for handling EJB unit tests: mock objects for out-of-the-container testing of any kind of EJBs (session beans, entity beans, message-driven beans) and integration unit testing for testing Enterprise Beans when they run inside the container. We demonstrated integration unit testing with two tools: pure JUnit tests that call the EJBs remotely; and Cactus, which runs the tests from inside the container and lets you unit-test local interfaces.
When you’re performing integration unit tests, writing the tests isn’t even half the story. The hard part, which isn’t specifically related to unit testing, is about automating the packaging of the application, its deployment and test execution, and the start/stop of containers. We’ve demonstrated several techniques using Ant, including using some Cactus custom-made Ant tasks that have helped in this endeavor.

336APPENDIX A
The source code
This appendix gives an overview of the book’s source code, where to find it, how to install it, and how to run it. When we were writing, we decided to donate all of the book’s source code to the Apache Software Foundation because we’ve used a lot of frameworks from there in the making of this book. Thus we have made our source code available as open source on Sourceforge at http://junitbook.sourceforge.net/.
We’re also committed to maintaining this source code and fixing it if bugs are found, as a standard open source project. In addition, a Sourceforge forum has been set up for discussing the code at http://sourceforge.net/forum/ forum.php?forum_id=291665.
A.1 Getting the source code
There are two possibilities for getting the source code on your local machine:
■Download a released version from http://sourceforge.net/project/showfiles.php?group_id=68011 and unzip it somewhere on your hard drive.
■Use a CVS client and get the source from CVS HEAD. Getting the source from CVS is explained at http://sourceforge.net/cvs/?group_id=68011.
Either way, place the source code in a local directory named junitbook/ (for example c:\junitbook on Windows or /opt/junitbook on UNIX).
A.2 Source code overview
Once you put the source code in the junitbook/ directory, you should have the directory structure shown in figure A.1. Each directory represents the source code for a chapter of the book (except the repository/ directory, which contains external jars required by the chapter projects). The mapping between chapter names and directory names is listed in table A.1.
Each directory maps directly to a project. A project is a way to regroup Java sources, test sources, configurations files, and so on under a single location. A project also has a build, which lets you perform various actions such as compiling the code, running the tests, and generating the Javadoc. We have used different build tools (Ant and Maven) for the different projects, as explained in the chapter matching each project.

Source code overview |
337 |
|
|
Figure A.1
Directory structure for the source code, |
|
shown here in Windows Explorer. (Note that |
|
the directories are colored by the |
|
TortoiseCVS CVS client.) |
|
Table A.1 Mappings between chapter names and source directory names |
|
|
|
Chapter name |
Directory name |
|
|
Chapter 1: JUnit jumpstart |
junitbook/jumpstart/ |
|
|
Chapter 2: Exploring JUnit |
junitbook/exploring/ |
|
|
Chapter 3: Sampling JUnit |
junitbook/sampling/ |
|
|
Chapter 4: Examining software tests |
junitbook/examining/ |
|
|
Chapter 5: Automating JUnit |
junitbook/automating/ |
|
|
Chapter 6: Coarse-grained testing with stubs |
junitbook/coarse/ |
|
|
Chapter 7: Testing in isolation with mock objects |
junitbook/fine/ |
|
|
Chapter 8: In-container testing with Cactus |
junitbook/container/ |
|
|
Chapter 9: Unit-testing servlets and filters |
junitbook/servlets/ |
|
|
Chapter 10: Unit-testing JSPs and taglibs |
junitbook/pages/ |
|
|
Chapter 11: Unit-testing database applications |
junitbook/database/ |
|
|
Chapter 12: Unit-testing EJBs |
junitbook/ejb/ |
|
|