- •contents
- •preface
- •acknowledgments
- •about this book
- •Special features
- •Best practices
- •Design patterns in action
- •Software directory
- •Roadmap
- •Part 1: JUnit distilled
- •Part 2: Testing strategies
- •Part 3: Testing components
- •Code
- •References
- •Author online
- •about the authors
- •about the title
- •about the cover illustration
- •JUnit jumpstart
- •1.1 Proving it works
- •1.2 Starting from scratch
- •1.3 Understanding unit testing frameworks
- •1.4 Setting up JUnit
- •1.5 Testing with JUnit
- •1.6 Summary
- •2.1 Exploring core JUnit
- •2.2 Launching tests with test runners
- •2.2.1 Selecting a test runner
- •2.2.2 Defining your own test runner
- •2.3 Composing tests with TestSuite
- •2.3.1 Running the automatic suite
- •2.3.2 Rolling your own test suite
- •2.4 Collecting parameters with TestResult
- •2.5 Observing results with TestListener
- •2.6 Working with TestCase
- •2.6.1 Managing resources with a fixture
- •2.6.2 Creating unit test methods
- •2.7 Stepping through TestCalculator
- •2.7.1 Creating a TestSuite
- •2.7.2 Creating a TestResult
- •2.7.3 Executing the test methods
- •2.7.4 Reviewing the full JUnit life cycle
- •2.8 Summary
- •3.1 Introducing the controller component
- •3.1.1 Designing the interfaces
- •3.1.2 Implementing the base classes
- •3.2 Let’s test it!
- •3.2.1 Testing the DefaultController
- •3.2.2 Adding a handler
- •3.2.3 Processing a request
- •3.2.4 Improving testProcessRequest
- •3.3 Testing exception-handling
- •3.3.1 Simulating exceptional conditions
- •3.3.2 Testing for exceptions
- •3.4 Setting up a project for testing
- •3.5 Summary
- •4.1 The need for unit tests
- •4.1.1 Allowing greater test coverage
- •4.1.2 Enabling teamwork
- •4.1.3 Preventing regression and limiting debugging
- •4.1.4 Enabling refactoring
- •4.1.5 Improving implementation design
- •4.1.6 Serving as developer documentation
- •4.1.7 Having fun
- •4.2 Different kinds of tests
- •4.2.1 The four flavors of software tests
- •4.2.2 The three flavors of unit tests
- •4.3 Determining how good tests are
- •4.3.1 Measuring test coverage
- •4.3.2 Generating test coverage reports
- •4.3.3 Testing interactions
- •4.4 Test-Driven Development
- •4.4.1 Tweaking the cycle
- •4.5 Testing in the development cycle
- •4.6 Summary
- •5.1 A day in the life
- •5.2 Running tests from Ant
- •5.2.1 Ant, indispensable Ant
- •5.2.2 Ant targets, projects, properties, and tasks
- •5.2.3 The javac task
- •5.2.4 The JUnit task
- •5.2.5 Putting Ant to the task
- •5.2.6 Pretty printing with JUnitReport
- •5.2.7 Automatically finding the tests to run
- •5.3 Running tests from Maven
- •5.3.2 Configuring Maven for a project
- •5.3.3 Executing JUnit tests with Maven
- •5.3.4 Handling dependent jars with Maven
- •5.4 Running tests from Eclipse
- •5.4.1 Creating an Eclipse project
- •5.4.2 Running JUnit tests in Eclipse
- •5.5 Summary
- •6.1 Introducing stubs
- •6.2 Practicing on an HTTP connection sample
- •6.2.1 Choosing a stubbing solution
- •6.2.2 Using Jetty as an embedded server
- •6.3 Stubbing the web server’s resources
- •6.3.1 Setting up the first stub test
- •6.3.2 Testing for failure conditions
- •6.3.3 Reviewing the first stub test
- •6.4 Stubbing the connection
- •6.4.1 Producing a custom URL protocol handler
- •6.4.2 Creating a JDK HttpURLConnection stub
- •6.4.3 Running the test
- •6.5 Summary
- •7.1 Introducing mock objects
- •7.2 Mock tasting: a simple example
- •7.3 Using mock objects as a refactoring technique
- •7.3.1 Easy refactoring
- •7.3.2 Allowing more flexible code
- •7.4 Practicing on an HTTP connection sample
- •7.4.1 Defining the mock object
- •7.4.2 Testing a sample method
- •7.4.3 Try #1: easy method refactoring technique
- •7.4.4 Try #2: refactoring by using a class factory
- •7.5 Using mocks as Trojan horses
- •7.6 Deciding when to use mock objects
- •7.7 Summary
- •8.1 The problem with unit-testing components
- •8.2 Testing components using mock objects
- •8.2.1 Testing the servlet sample using EasyMock
- •8.2.2 Pros and cons of using mock objects to test components
- •8.3 What are integration unit tests?
- •8.4 Introducing Cactus
- •8.5 Testing components using Cactus
- •8.5.1 Running Cactus tests
- •8.5.2 Executing the tests using Cactus/Jetty integration
- •8.6 How Cactus works
- •8.6.2 Stepping through a test
- •8.7 Summary
- •9.1 Presenting the Administration application
- •9.2 Writing servlet tests with Cactus
- •9.2.1 Designing the first test
- •9.2.2 Using Maven to run Cactus tests
- •9.2.3 Finishing the Cactus servlet tests
- •9.3 Testing servlets with mock objects
- •9.3.1 Writing a test using DynaMocks and DynaBeans
- •9.3.2 Finishing the DynaMock tests
- •9.4 Writing filter tests with Cactus
- •9.4.1 Testing the filter with a SELECT query
- •9.4.2 Testing the filter for other query types
- •9.4.3 Running the Cactus filter tests with Maven
- •9.5 When to use Cactus, and when to use mock objects
- •9.6 Summary
- •10.1 Revisiting the Administration application
- •10.2 What is JSP unit testing?
- •10.3 Unit-testing a JSP in isolation with Cactus
- •10.3.1 Executing a JSP with SQL results data
- •10.3.2 Writing the Cactus test
- •10.3.3 Executing Cactus JSP tests with Maven
- •10.4 Unit-testing taglibs with Cactus
- •10.4.1 Defining a custom tag
- •10.4.2 Testing the custom tag
- •10.5 Unit-testing taglibs with mock objects
- •10.5.1 Introducing MockMaker and installing its Eclipse plugin
- •10.5.2 Using MockMaker to generate mocks from classes
- •10.6 When to use mock objects and when to use Cactus
- •10.7 Summary
- •Unit-testing database applications
- •11.1 Introduction to unit-testing databases
- •11.2 Testing business logic in isolation from the database
- •11.2.1 Implementing a database access layer interface
- •11.2.2 Setting up a mock database interface layer
- •11.2.3 Mocking the database interface layer
- •11.3 Testing persistence code in isolation from the database
- •11.3.1 Testing the execute method
- •11.3.2 Using expectations to verify state
- •11.4 Writing database integration unit tests
- •11.4.1 Filling the requirements for database integration tests
- •11.4.2 Presetting database data
- •11.5 Running the Cactus test using Ant
- •11.5.1 Reviewing the project structure
- •11.5.2 Introducing the Cactus/Ant integration module
- •11.5.3 Creating the Ant build file step by step
- •11.5.4 Executing the Cactus tests
- •11.6 Tuning for build performance
- •11.6.2 Grouping tests in functional test suites
- •11.7.1 Choosing an approach
- •11.7.2 Applying continuous integration
- •11.8 Summary
- •Unit-testing EJBs
- •12.1 Defining a sample EJB application
- •12.2 Using a façade strategy
- •12.3 Unit-testing JNDI code using mock objects
- •12.4 Unit-testing session beans
- •12.4.1 Using the factory method strategy
- •12.4.2 Using the factory class strategy
- •12.4.3 Using the mock JNDI implementation strategy
- •12.5 Using mock objects to test message-driven beans
- •12.6 Using mock objects to test entity beans
- •12.7 Choosing the right mock-objects strategy
- •12.8 Using integration unit tests
- •12.9 Using JUnit and remote calls
- •12.9.1 Requirements for using JUnit directly
- •12.9.2 Packaging the Petstore application in an ear file
- •12.9.3 Performing automatic deployment and execution of tests
- •12.9.4 Writing a remote JUnit test for PetstoreEJB
- •12.9.5 Fixing JNDI names
- •12.9.6 Running the tests
- •12.10 Using Cactus
- •12.10.1 Writing an EJB unit test with Cactus
- •12.10.2 Project directory structure
- •12.10.3 Packaging the Cactus tests
- •12.10.4 Executing the Cactus tests
- •12.11 Summary
- •A.1 Getting the source code
- •A.2 Source code overview
- •A.3 External libraries
- •A.4 Jar versions
- •A.5 Directory structure conventions
- •B.1 Installing Eclipse
- •B.2 Setting up Eclipse projects from the sources
- •B.3 Running JUnit tests from Eclipse
- •B.4 Running Ant scripts from Eclipse
- •B.5 Running Cactus tests from Eclipse
- •references
- •index
188CHAPTER 9
Unit-testing servlets and filters
The only time you don’t fail is the last time you try anything—and it works.
—William Strong
When you unit-test servlet and filter code, you must test not only these objects, but also any Java class calling the Servlet/Filter API, the JNDI API, or any back-end services. Starting in this chapter, you’ll build a real-life sample application that will help demonstrate how to unit-test each of the different kinds of components that make up a full-blown web application. This chapter focuses on unit-testing the servlet and filter parts of that application. Later chapters test the other common components (JSPs, taglibs, and database access).
In this chapter, you’ll learn how to unit-test servlets and filters using both the Cactus in-container testing approach and the mock-objects approach with the DynaMock framework from http://www.mockobjects.com/. You’ll also learn the pros and cons of each approach and when to use them.
9.1 Presenting the Administration application
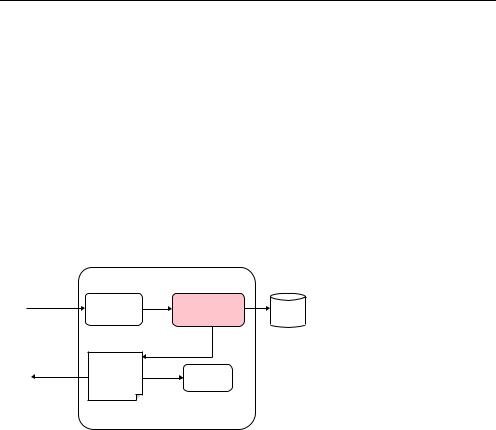
The goal of this sample Administration application is to let administrators perform database queries on a relational database. Suppose that the application it administers already exists. Administrators can perform queries such as listing all the transactions that took place during a given time interval, listing the transactions that were out of Service Level Agreement (SLA), and so forth. We set up a typical web application architecture (see figure 9.1) to demonstrate how to unittest each type of component (filter, servlet, JSP, taglib, and database access).
The application first receives from the user an HTTP request containing the SQL query to execute. The request is caught by a security filter that checks
HTTP request |
Security |
Admin |
DB |
|
Filter |
Servlet |
|
HTTP Response |
Results |
|
|
View |
Taglib |
|
|
(HTML) |
|
||
JSP |
|
|
Servlet Container
Figure 9.1 The sample Administration application. You’ll use it as a base sample in this chapter and following chapters to see how to unit-test servlets, filters, JSPs, taglibs, and database applications.
Writing servlet tests with Cactus |
189 |
|
|
whether the SQL query is a SELECT query (to prevent modifying the database). If not, the user is redirected to an error page. If the query is a SELECT, the AdminServlet servlet is called. The servlet performs the requested database query and forwards the result to a JSP page, which displays the results. The page uses JSP tags to iterate over the returned results and to display them in HTML tables. JSP tags are used for all the presentation logic code. The JSPs contain only layout/style tags (no Java code in scriptlets).
You’ll start by unit-testing the AdminServlet servlet. Then, in section 9.4, you’ll unit-test your security filter. You’ll test the other components of the Administration application in following chapters.
9.2 Writing servlet tests with Cactus
In this section, we’ll focus on using Cactus to unit-test the AdminServlet servlet (shaded in figure 9.2) from the Administration application.
Let’s test AdminServlet by writing the tests before you write the servlet code. This strategy is called Test-Driven Development (TDD) or Test-First, and it’s very efficient for designing extensible and flexible code and making sure the unit test suite is as complete as possible. (See chapter 4 for an introduction to TDD.)
Before you begin coding the test, let’s review the requirement for AdminServlet. The servlet should extract the needed parameter containing the command to execute from the HTTP request (in this case, the SQL command to run). Then it should fetch the data using the extracted command. Finally, it should pass the control to the JSP page for display, passing the fetched data. Let’s call the methods corresponding to these actions getCommand, executeCommand, and callView, respectively.
HTTP request |
Security |
Admin |
DB |
|
Filter |
Servlet |
|
HTTP response |
Results |
|
|
View |
Taglib |
|
|
(HTML) |
|
||
JSP |
|
Figure 9.2 |
|
|
|
|
|
|
Servlet Container |
Unit-testing AdminServlet of |
|
|
the Administration application |
||
|
|
|
190CHAPTER 9
Unit-testing servlets and filters
9.2.1Designing the first test
Listing 9.1 shows the unit tests for the getCommand method. Remember that you have not yet written the code under test. The AdminServlet class doesn’t exist, and your code doesn’t compile (yet).
Listing 9.1 Designing and testing the getCommand method
package junitbook.servlets; |
|
|
import javax.servlet.ServletException; |
|
|
import org.apache.cactus.ServletTestCase; |
|
|
import org.apache.cactus.WebRequest; |
|
|
public class TestAdminServlet extends ServletTestCase |
|
|
{ |
|
|
public void beginGetCommandOk(WebRequest request) |
|
Test valid case: |
|
||
{ |
|
|
request.addParameter("command", "SELECT..."); |
command defined |
|
} |
|
as HTTP |
|
|
parameter |
public void testGetCommandOk() throws Exception |
|
|
|
|
|
{ |
|
|
AdminServlet servlet = new AdminServlet(); |
|
|
String command = servlet.getCommand(request); |
|
assertEquals("SELECT...", command);
}
Test invalid case: no command
parameter defined
public void testGetCommandNotDefined
{
AdminServlet servlet = new AdminServlet();
try
{
servlet.getCommand(request); fail("Command should not have existed");
}
catch (ServletException expected)
{
assertTrue(true);
}
}
}
If you’ve typed this code in Eclipse, you’ll notice that Eclipse supports what it calls Quick Fixes. Quick Fixes are corrections that the Java editor offers to problems found while you’re typing and after compiling. The Quick Fix is visible as a lightbulb in
Writing servlet tests with Cactus |
191 |
|
|
Figure 9.3 Working by intention with Eclipse’s Quick Fixes
the left gutter. In figure 9.3, a lightbulb appears on the lines referring to the AdminServlet class (which does not yet exist). Clicking the lightbulb shows the list of Quick Fixes offered by Eclipse. Here, Eclipse proposes to automatically create the class for you. The same operation can then be repeated for the getCommand method. This is very efficient when you’re using the TDD approach. (Other IDEs, like IntelliJ IDEA, also support this feature.)
Listing 9.2 shows the code Eclipse generates for you, to which you have made some modifications:
■Added the throws ServletException clause. You need it because the testGetCommandNotDefined test clearly shows that if the command parameter is not found, the getCommand method should return a ServletException exception.
■The request object in TestAdminServlet comes from the ServletTestCase class and is of type HttpServletRequestWrapper. This Cactus class transparently wraps an HttpServletRequest object and provides additional features that are useful for unit testing. Eclipse thus generated a signature of getCommand(HttpServletRequestWrapper request), but what you really want is getCommand(HttpServletRequest request).
Listing 9.2 Minimum code to make the TestAdminServlet compile
package junitbook.servlets;
import javax.servlet.ServletException; import javax.servlet.http.HttpServlet; import javax.servlet.http.HttpServletRequest;
public class AdminServlet extends HttpServlet
{