


330CHAPTER 12
Unit-testing EJBs
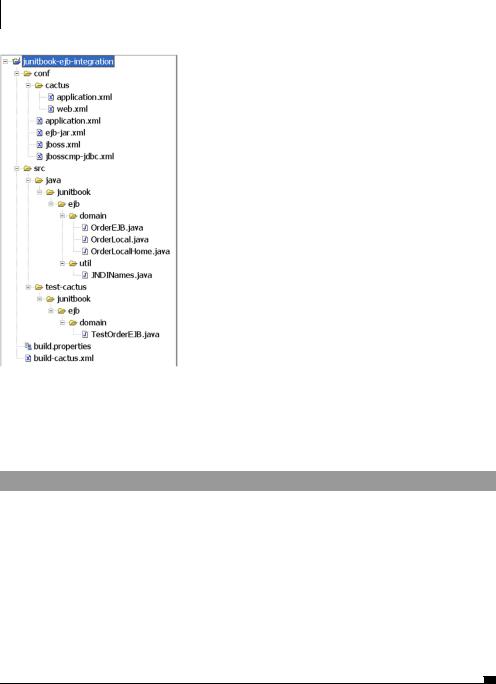
Figure 12.8
Full directory structure, including configuration files and Ant build files for Cactus tests
The version attribute specifies that you build a war for the Servlet API 2.3. Notice the mergewebxml attribute. This is needed because TestOrderEJB is called from a web context and is calling an EJB. Thus, as the J2EE specification mandates, you need an <ejb-local-ref> in the war web.xml file, as shown in listing 12.26.
Listing 12.26 conf/cactus/web.xml containing ejb-local-ref entry to call OrderEJB
<?xml version="1.0" encoding="ISO-8859-1"?> <!DOCTYPE web-app
PUBLIC "-//Sun Microsystems, Inc.//DTD Web Application 2.3//EN" "http://java.sun.com/dtd/web-app_2_3.dtd">
<web-app> <ejb-local-ref>
<ejb-ref-name>Order</ejb-ref-name> <ejb-ref-type>Entity</ejb-ref-type> <local-home>junitbook.ejb.domain.OrderLocalHome</local-home> <local>junitbook.ejb.domain.OrderLocal</local> <ejb-link>Order</ejb-link>
</ejb-local-ref> </web-app>

Using Cactus |
331 |
|
|
The last packaging step is to package the war in the ear:
<ear update="true" destfile="${target.dir}/ejb.ear" appxml="${conf.dir}/cactus/application.xml">
<fileset dir="${target.dir}"> <include name="cactus.war"/>
</fileset>
</ear>
You update the application ear by overwriting the application.xml deployment descriptor with the special Cactus one. This step is necessary in order to add the Cactus war in application.xml, as shown in listing 12.27. This step is required only because your production ear doesn’t container any war. Had it contained one, you could have reused this war by cactifying it. In that case, you wouldn’t have needed to provide an additional application.xml file containing Cactusspecific definitions.
Listing 12.27 Special application.xml file containing the Cactus war definition
<?xml version="1.0"?> <!DOCTYPE application PUBLIC
'-//Sun Microsystems, Inc.//DTD J2EE Application 1.2//EN' 'http://java.sun.com/j2ee/dtds/application_1_2.dtd'>
<application> <display-name>ejb</display-name>
<description>EJB Chapter Sample Application</description> <module>
<ejb>ejb.jar</ejb>
</module>
<module>
<web> <web-uri>cactus.war</web-uri> <context-root>test</context-root>
</web>
</module>
</application>
The full Ant script is shown in listing 12.28.

332CHAPTER 12
Unit-testing EJBs
Listing 12.28 Cactification of the application ear
<?xml version="1.0"?>
<project name="Ejb" default="test" basedir="."> [...]
<property name="src.cactus.dir" location="${src.dir}/test-cactus"/>
[...]
<property name="target.classes.cactus.dir" location="${target.dir}/classes-test-cactus"/>
[...]
<target name="compile.cactus" depends="compile"> <mkdir dir="${target.classes.cactus.dir}"/> <javac destdir="${target.classes.cactus.dir}"
srcdir="${src.cactus.dir}"> <classpath>
<pathelement location="${target.classes.java.dir}"/> <pathelement location="${cactus.jar}"/> <pathelement location="${j2ee.jar}"/>
</classpath>
</javac>
</target>
<target name="ear.cactify" depends="compile.cactus,ear">
<taskdef resource="cactus.tasks"> <classpath>
<pathelement location="${cactus.ant.jar}"/> <pathelement location="${cactus.jar}"/> <pathelement location="${logging.jar}"/> <pathelement location="${aspectjrt.jar}"/> <pathelement location="${httpclient.jar}"/>
</classpath>
</taskdef>
<cactifywar version="2.3" destfile="${target.dir}/cactus.war" mergewebxml="${conf.dir}/cactus/web.xml">
<classes dir="${target.classes.cactus.dir}"/> </cactifywar>
<ear update="true" destfile="${target.dir}/ejb.ear" appxml="${conf.dir}/cactus/application.xml">
<fileset dir="${target.dir}"> <include name="cactus.war"/>
</fileset>
</ear>
</target>
</project>