


98CHAPTER 5
Automating JUnit
Running optional tasks
The junit task is one of several components bundled in Ant’s optional.jar. The optional.jar file should already be in your ANT_HOME/lib directory. Ant does not bundle a copy of JUnit, so you must be sure that junit.jar is on your system classpath or in the ANT_HOME/lib directory. (The optional.jar file is for tasks that depend on another package, like JUnit.) For more about installing Ant, see the sidebars on pages 89–90. If you have any trouble running the Ant buildfiles presented in this chapter, make sure the Ant optional.jar is in the ANT_HOME/lib folder and junit.jar is either on your system classpath or also in the ANT_HOME/lib folder.
The empty classpath
Given a tool like Ant, many developers don’t bother with a system classpath anymore: You can let Ant take care of all that. Ant’s classpath element makes it easy to build the classpath you need when you need it.
The only blind spot is the jars you need in order to run one of the optional Ant tasks, like junit. To provide the flexibility you need for other circumstances, Ant uses Sun’s delegation model to create whatever classpath you need at runtime. In the case of the optional tasks, there’s a bootstrap issue. To employ a task, whatever libraries a task needs must be on the same classpath as the code for the task. This means you need to load junit.jar in the same place you load optional.jar. Meanwhile, you also need to load the task (and any external libraries) before you can use the task in your buildfile. In short, you can’t specify the path to junit.jar as part of the junit task.
The simplest solution is to move junit.jar to ANT_HOME/lib. There are alternative configurations, but they are usually more trouble than they are worth.3
So, to keep a clean classpath and use optional tasks like JUnit, you should move the jar for the external library to ANT_HOME/lib. Ant will then automatically load optional.jar and the external libraries together, enabling use of the optional tasks in your buildfiles. Just remember to update junit.jar in ANT_HOME/lib whenever you install a new version of either Ant or JUnit.
5.2.6Pretty printing with JUnitReport
A report like the one in figure 5.1 is fine when you are running tests interactively. But what if you want to run a test suite and review the results later? For
3 Ant 1.6 will let you put optional task jars in places other than ANT_HOME/lib.
Running tests from Ant |
99 |
|
|
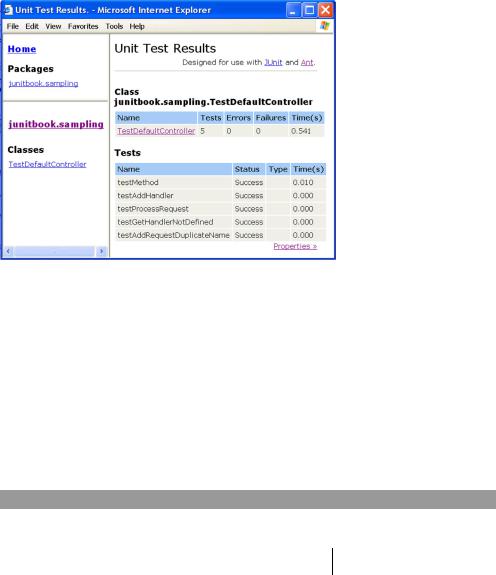
Figure 5.2 Output of the junitreport Ant task
example, the tests might be run automatically every day by a cron job (whether you liked it or not!).
Another optional Ant task, junitreport, is designed to output the result of the tests as XML. To finish the job, junitreport renders the XML into HTML using an XSL stylesheet. The result is an attractive and functional report that you (or your boss) can peruse with any browser. A junitreport page for the sampling project is shown in figure 5.2.
Listing 5.4 shows the changes (in bold) necessary in the buildfile to generate this report. To execute the script, type ant report on the command line in the sampling project.
Listing 5.4 Adding a JUnitReport task to the buildfile
<project name="sampling" default="test"> [...]
<property name="target.report.dir"
location="${target.dir}/report"/>
[...]
<target name="test" depends="compile">
<mkdir dir="${target.report.dir}"/>
b
c
<junit printsummary="yes" haltonerror="yes" haltonfailure="yes" fork="yes">
<formatter type="plain" usefile="false"/>
<formatter type="xml"/> |
d |
<test name="junitbook.sampling.TestDefaultController"

100CHAPTER 5
Automating JUnit
todir="${target.report.dir}"/>
<classpath>
e
<pathelement location="${target.classes.java.dir}"/> <pathelement location="${target.classes.test.dir}"/>
</classpath> |
|
|
|
</junit> |
|
|
|
</target> |
|
|
|
<target name="report" depends="test"> |
|
|
f |
<mkdir dir="${target.report.dir}/html"/> |
|
|
g |
<junitreport todir="${target.report.dir}"> |
|
|
h |
<fileset dir="${target.report.dir}"> |
|
i |
|
|
|
||
<include name="TEST-*.xml"/> |
|
|
|
</fileset> |
|
|
j |
|
|
||
<report todir="${target.report.dir}/html"/> |
|||
</junitreport>
</target>
</project>
|
|
|
b |
Define a property holding the target location where your reports will be generated. |
|
c |
Create that directory. |
|
dYou need to modify the junit task so that it outputs the test results as XML. The junitreport task works by transforming the XML test result into an HTML report.
e Tell the junit task to create a report file in the ${target.report.dir} directory. f Introduce a new report target that generates the HTML report.
g You begin by creating the directory where the HTML will be generated. h Call the junitreport task to create the report.
iThe junitreport task works by scanning the list of XML test results you specify as an Ant fileset.
jTell the junitreport task where to generate the HTML report.
5.2.7Automatically finding the tests to run
The buildfile you have written is using the test element of the junit task to tell JUnit what test to execute. Although this is fine when there are only a few test cases, it becomes tiresome when your test suite grows. The biggest issue then becomes ensuring that you haven’t forgotten to include a test in the buildfile. Fortunately, the junit task has a convenient batchtest element that lets you specify test cases using wildcards. Listing 5.5 shows how to use it (changes from listing 5.4 are shown in bold).

Running tests from Ant |
101 |
|
|
Listing 5.5 A better buildfile using batchtest
<project name="sampling" default="test"> [...]
<target name="test" depends="compile"> <mkdir dir="${target.report.dir}"/>
<property name="tests" value="Test*"/>
b
<junit printsummary="yes" haltonerror="yes" haltonfailure="yes" fork="yes">
<formatter type="plain" usefile="false"/> <formatter type="xml"/>
<batchtest todir="${target.report.dir}">
<fileset dir="${src.test.dir}"> |
c |
<include name="**/${tests}.java"/> |
<exclude name="**/Test*All.java"/>
</fileset>
</batchtest>
<classpath>
<pathelement location="${target.classes.java.dir}"/> <pathelement location="${target.classes.test.dir}"/>
</classpath> |
|
|
|
</junit> |
|
|
|
</target> |
|
|
|
[...] |
|
|
|
<target name="clean"> |
|
d |
|
|
|||
<delete dir="${target.dir}"/> |
|
||
</target> |
|
|
|
|
|
|
|
</project> |
|
|
|
|
|
|
|
|
|
|
|
bYou may wonder why you define a property here when you could have put the wildcards directly into the fileset element at c. Using this trick, you can define the tests property on the command line and run a single test (or a specific set of
tests) instead. This is an easy way to run a test against the class you are working on right now. Of course, once it’s working, you still run the full test suite to be sure everyone is on the same page. Here is an example that only executes the TestDefaultController test case:
ant –Dtests=TestDefaultController test
cYou improve the buildfile by making the test target more flexible. Whereas before you had to explicitly name the different tests you wanted to execute, here
you leverage the junit task’s nested batchtest element. With batchtest, you can specify the test to run as a fileset, thus allowing the use of wildcards.
dAdd the always-useful clean target to remove all build-generated files. Doing so lets you start with a fresh build with no side effects from obsolete classes. Typically,
a dist target that generates the project distributable depends on the clean target.