- •contents
- •preface
- •acknowledgments
- •about this book
- •Special features
- •Best practices
- •Design patterns in action
- •Software directory
- •Roadmap
- •Part 1: JUnit distilled
- •Part 2: Testing strategies
- •Part 3: Testing components
- •Code
- •References
- •Author online
- •about the authors
- •about the title
- •about the cover illustration
- •JUnit jumpstart
- •1.1 Proving it works
- •1.2 Starting from scratch
- •1.3 Understanding unit testing frameworks
- •1.4 Setting up JUnit
- •1.5 Testing with JUnit
- •1.6 Summary
- •2.1 Exploring core JUnit
- •2.2 Launching tests with test runners
- •2.2.1 Selecting a test runner
- •2.2.2 Defining your own test runner
- •2.3 Composing tests with TestSuite
- •2.3.1 Running the automatic suite
- •2.3.2 Rolling your own test suite
- •2.4 Collecting parameters with TestResult
- •2.5 Observing results with TestListener
- •2.6 Working with TestCase
- •2.6.1 Managing resources with a fixture
- •2.6.2 Creating unit test methods
- •2.7 Stepping through TestCalculator
- •2.7.1 Creating a TestSuite
- •2.7.2 Creating a TestResult
- •2.7.3 Executing the test methods
- •2.7.4 Reviewing the full JUnit life cycle
- •2.8 Summary
- •3.1 Introducing the controller component
- •3.1.1 Designing the interfaces
- •3.1.2 Implementing the base classes
- •3.2 Let’s test it!
- •3.2.1 Testing the DefaultController
- •3.2.2 Adding a handler
- •3.2.3 Processing a request
- •3.2.4 Improving testProcessRequest
- •3.3 Testing exception-handling
- •3.3.1 Simulating exceptional conditions
- •3.3.2 Testing for exceptions
- •3.4 Setting up a project for testing
- •3.5 Summary
- •4.1 The need for unit tests
- •4.1.1 Allowing greater test coverage
- •4.1.2 Enabling teamwork
- •4.1.3 Preventing regression and limiting debugging
- •4.1.4 Enabling refactoring
- •4.1.5 Improving implementation design
- •4.1.6 Serving as developer documentation
- •4.1.7 Having fun
- •4.2 Different kinds of tests
- •4.2.1 The four flavors of software tests
- •4.2.2 The three flavors of unit tests
- •4.3 Determining how good tests are
- •4.3.1 Measuring test coverage
- •4.3.2 Generating test coverage reports
- •4.3.3 Testing interactions
- •4.4 Test-Driven Development
- •4.4.1 Tweaking the cycle
- •4.5 Testing in the development cycle
- •4.6 Summary
- •5.1 A day in the life
- •5.2 Running tests from Ant
- •5.2.1 Ant, indispensable Ant
- •5.2.2 Ant targets, projects, properties, and tasks
- •5.2.3 The javac task
- •5.2.4 The JUnit task
- •5.2.5 Putting Ant to the task
- •5.2.6 Pretty printing with JUnitReport
- •5.2.7 Automatically finding the tests to run
- •5.3 Running tests from Maven
- •5.3.2 Configuring Maven for a project
- •5.3.3 Executing JUnit tests with Maven
- •5.3.4 Handling dependent jars with Maven
- •5.4 Running tests from Eclipse
- •5.4.1 Creating an Eclipse project
- •5.4.2 Running JUnit tests in Eclipse
- •5.5 Summary
- •6.1 Introducing stubs
- •6.2 Practicing on an HTTP connection sample
- •6.2.1 Choosing a stubbing solution
- •6.2.2 Using Jetty as an embedded server
- •6.3 Stubbing the web server’s resources
- •6.3.1 Setting up the first stub test
- •6.3.2 Testing for failure conditions
- •6.3.3 Reviewing the first stub test
- •6.4 Stubbing the connection
- •6.4.1 Producing a custom URL protocol handler
- •6.4.2 Creating a JDK HttpURLConnection stub
- •6.4.3 Running the test
- •6.5 Summary
- •7.1 Introducing mock objects
- •7.2 Mock tasting: a simple example
- •7.3 Using mock objects as a refactoring technique
- •7.3.1 Easy refactoring
- •7.3.2 Allowing more flexible code
- •7.4 Practicing on an HTTP connection sample
- •7.4.1 Defining the mock object
- •7.4.2 Testing a sample method
- •7.4.3 Try #1: easy method refactoring technique
- •7.4.4 Try #2: refactoring by using a class factory
- •7.5 Using mocks as Trojan horses
- •7.6 Deciding when to use mock objects
- •7.7 Summary
- •8.1 The problem with unit-testing components
- •8.2 Testing components using mock objects
- •8.2.1 Testing the servlet sample using EasyMock
- •8.2.2 Pros and cons of using mock objects to test components
- •8.3 What are integration unit tests?
- •8.4 Introducing Cactus
- •8.5 Testing components using Cactus
- •8.5.1 Running Cactus tests
- •8.5.2 Executing the tests using Cactus/Jetty integration
- •8.6 How Cactus works
- •8.6.2 Stepping through a test
- •8.7 Summary
- •9.1 Presenting the Administration application
- •9.2 Writing servlet tests with Cactus
- •9.2.1 Designing the first test
- •9.2.2 Using Maven to run Cactus tests
- •9.2.3 Finishing the Cactus servlet tests
- •9.3 Testing servlets with mock objects
- •9.3.1 Writing a test using DynaMocks and DynaBeans
- •9.3.2 Finishing the DynaMock tests
- •9.4 Writing filter tests with Cactus
- •9.4.1 Testing the filter with a SELECT query
- •9.4.2 Testing the filter for other query types
- •9.4.3 Running the Cactus filter tests with Maven
- •9.5 When to use Cactus, and when to use mock objects
- •9.6 Summary
- •10.1 Revisiting the Administration application
- •10.2 What is JSP unit testing?
- •10.3 Unit-testing a JSP in isolation with Cactus
- •10.3.1 Executing a JSP with SQL results data
- •10.3.2 Writing the Cactus test
- •10.3.3 Executing Cactus JSP tests with Maven
- •10.4 Unit-testing taglibs with Cactus
- •10.4.1 Defining a custom tag
- •10.4.2 Testing the custom tag
- •10.5 Unit-testing taglibs with mock objects
- •10.5.1 Introducing MockMaker and installing its Eclipse plugin
- •10.5.2 Using MockMaker to generate mocks from classes
- •10.6 When to use mock objects and when to use Cactus
- •10.7 Summary
- •Unit-testing database applications
- •11.1 Introduction to unit-testing databases
- •11.2 Testing business logic in isolation from the database
- •11.2.1 Implementing a database access layer interface
- •11.2.2 Setting up a mock database interface layer
- •11.2.3 Mocking the database interface layer
- •11.3 Testing persistence code in isolation from the database
- •11.3.1 Testing the execute method
- •11.3.2 Using expectations to verify state
- •11.4 Writing database integration unit tests
- •11.4.1 Filling the requirements for database integration tests
- •11.4.2 Presetting database data
- •11.5 Running the Cactus test using Ant
- •11.5.1 Reviewing the project structure
- •11.5.2 Introducing the Cactus/Ant integration module
- •11.5.3 Creating the Ant build file step by step
- •11.5.4 Executing the Cactus tests
- •11.6 Tuning for build performance
- •11.6.2 Grouping tests in functional test suites
- •11.7.1 Choosing an approach
- •11.7.2 Applying continuous integration
- •11.8 Summary
- •Unit-testing EJBs
- •12.1 Defining a sample EJB application
- •12.2 Using a façade strategy
- •12.3 Unit-testing JNDI code using mock objects
- •12.4 Unit-testing session beans
- •12.4.1 Using the factory method strategy
- •12.4.2 Using the factory class strategy
- •12.4.3 Using the mock JNDI implementation strategy
- •12.5 Using mock objects to test message-driven beans
- •12.6 Using mock objects to test entity beans
- •12.7 Choosing the right mock-objects strategy
- •12.8 Using integration unit tests
- •12.9 Using JUnit and remote calls
- •12.9.1 Requirements for using JUnit directly
- •12.9.2 Packaging the Petstore application in an ear file
- •12.9.3 Performing automatic deployment and execution of tests
- •12.9.4 Writing a remote JUnit test for PetstoreEJB
- •12.9.5 Fixing JNDI names
- •12.9.6 Running the tests
- •12.10 Using Cactus
- •12.10.1 Writing an EJB unit test with Cactus
- •12.10.2 Project directory structure
- •12.10.3 Packaging the Cactus tests
- •12.10.4 Executing the Cactus tests
- •12.11 Summary
- •A.1 Getting the source code
- •A.2 Source code overview
- •A.3 External libraries
- •A.4 Jar versions
- •A.5 Directory structure conventions
- •B.1 Installing Eclipse
- •B.2 Setting up Eclipse projects from the sources
- •B.3 Running JUnit tests from Eclipse
- •B.4 Running Ant scripts from Eclipse
- •B.5 Running Cactus tests from Eclipse
- •references
- •index
212CHAPTER 9
Unit-testing servlets and filters
org.apache.cactus.server.FilterTestRedirector </filter-class>
<init-param> <param-name>securityErrorPage</param-name> <param-value>/securityError.jsp</param-value>
</init-param> </filter>
Notice that you add the init parameter to the Cactus FilterRedirector defini- tion—not to the SecurityFilter definition. This is because in the test, you instantiate your SecurityFilter class as a plain old Java object (POJO), not as a filter. Cactus, under the hood, calls a Cactus filter redirector that it uses to provide valid filter objects (Request, Response, FilterConfig, FilterChain) to your testXXX method. However, it’s simpler to use the setInitParameter method as shown here.
dYou have instantiated your filter as a POJO, so you need to call its init(FilterConfig) method to correctly initialize the filter. (This is what the container would
have done internally.)
eTo verify that the SecurityFilter has correctly forwarded you to the error page, check that the returned HTTP response body contains elements that you expect to
be present in the error page.
9.4.3Running the Cactus filter tests with Maven
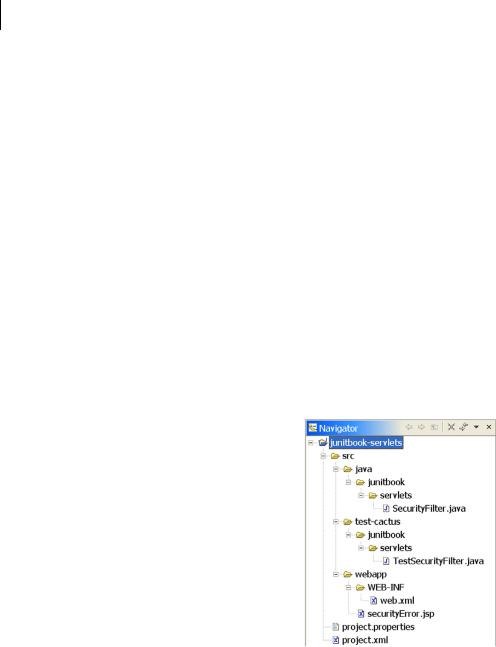
Running your filter tests with Maven is easy. The only prerequisite is to put your sources in the directory structure expected by Maven. Figure 9.9 demonstrates this structure.
The filter code under test is located under src/java, the Cactus tests are in src/testcactus, and the web-app resources (web.xml and JSPs, for example) are located in src/ webapp. These are the default locations where Maven expects to find the different sources.
Running the Cactus tests is simply a matter of opening a shell in the junitbook-serv- lets project directory and entering maven
cactus:test. The Maven cactus:test goal automatically calls the Maven war goal, which packages your application in a war file. Then the Cactus plugin repackages this war (by
Figure 9.9 Directory structure for the Cactus filter tests
When to use Cactus, and when to use mock objects |
213 |
|
|
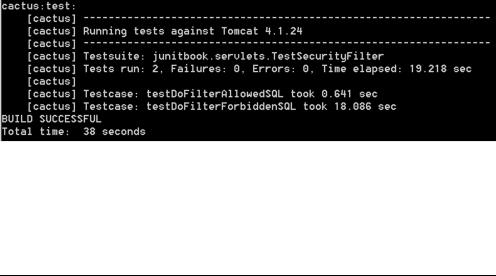
Figure 9.10 Run the Cactus tests using the Maven Cactus plugin.
adding the Cactus jars along with definitions for the Cactus redirectors in the web.xml file), deploys it to your target container, starts the container, runs the tests, and stops the container. Figure 9.10 shows the result.
9.5 When to use Cactus, and when to use mock objects
At this point, you must be wondering whether to use Cactus or mock objects to test your servlets and filter. Both approaches have advantages and disadvantages:
■The main difference is that Cactus performs not only unit tests but also integration tests and, to some extent, functional tests. The added benefits come at the cost of added complexity.
■Mock-object tests are usually harder to write, because you need to define the behavior of all calls made to the mocks. For example, if your method under test makes 10 calls to mocks, then you need to define the behavior for these 10 calls as part of the test setup.
■Cactus provides real objects for which you only need to set some initial conditions.
■If the application to unit-test is already written, it usually has to be refactored to support mock-object testing. Extra refactoring is generally not needed with Cactus.
A good strategy is to separate the business-logic code from the integration code (code that interacts with the container), and then:
■Use mock objects to test the business logic.
■Use Cactus to test the integration code.
214CHAPTER 9
Unit-testing servlets and filters
External
Code
Application
Business logic code |
External |
|
(Mock Objects) |
Code |
|
Integration |
code (Cactus) |
|
External |
Figure 9.11 |
|
Code |
Where to use Cactus, and |
|
where to use mock objects |
||
|
Figure 9.11 illustrates this concept. In the example, the business-logic code is the executeCommand method; the rest is integration code.
The question is not so much whether you should use Cactus or mock objects, but rather where to use Cactus and mock objects. The approaches are not exclusive but complementary. Both can be used to serve the prime objective: increasing overall application quality by discovering as many bugs as early as possible.
9.6 Summary
In this chapter, we have demonstrated how to unit-test servlets and filters and, more generally, any code that uses the Servlet/Filters API. You can create and run these kinds of tests using mock objects or Jakarta Cactus. Although the mockobjects approach can unit-test servlet and filter code, the tests cannot achieve the wide range that’s possible with Cactus-based tests. In practice, the approaches are complementary. Use mock objects to unit-test business-logic code at a very finegrained level, and use Cactus to unit-test integration code (code that interacts with the container).
In the next chapter, we’ll continue unit-testing the Administration application by moving the focus to unit-testing the JavaServer Pages and Taglib APIs.
10Unit-testing JSPs
and taglibs
This chapter covers
■Unit-testing a JSP in isolation with Cactus and mock objects
■Running Cactus JSP tests with Maven
■Unit-testing taglibs with Cactus
■Unit-testing taglibs with mock objects and MockMaker
215