

Testing business logic in isolation from the database |
243 |
|
|
HTTP request |
c |
doGet() |
getCommand() |
b |
|
e |
d |
|
HTTP response |
callView() |
|
execute |
|
|
DB |
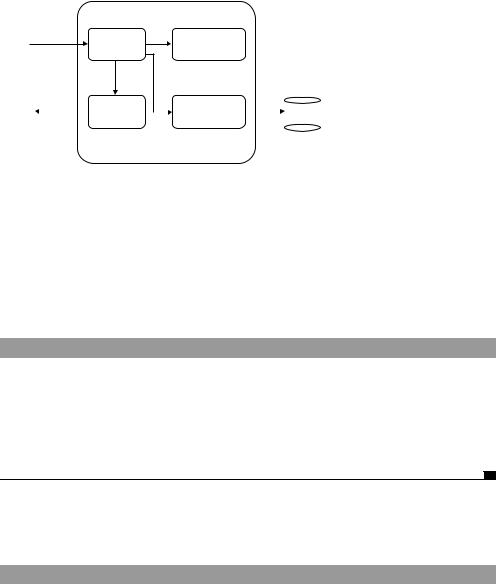
Figure 11.3 |
|
|
|
|
Command() |
|
|
|||
(result of JSP) |
|
|
|
|||||
|
|
|
|
|||||
f |
|
|
|
|
|
|
Execution flow for the |
|
AdminServlet |
|
|
|
AdminServlet class, showing |
||||
|
|
|
|
|
||||
|
|
|
|
|
the order of the method calls |
|||
|
|
|
|
|
|
|
|
|
and most generic solution is to create a database access layer that handles all database access. (In this case, it’s a single class.) The trick is then to create an interface for the database access layer. Given an interface, you can unit-test database access using the mock-objects strategy (see chapter 7).
11.2.1 Implementing a database access layer interface
Let’s call this interface DataAccessManager (listing 11.1) and the implementation
JdbcDataAccessManager.
Listing 11.1 Isolating the database access layer: DataAccessManager.java
package junitbook.database; import java.util.Collection;
public interface DataAccessManager
{
Collection execute(String sql) throws Exception;
}
Now that you have a data access interface, you need to refactor the AdminServlet class to use that interface and to instantiate the JdbcDataAccessManager implementation of DataAccessManager. Listing 11.2 demonstrates this refactoring.
Listing 11.2 Isolating the database access layer: AdminServlet.java
package junitbook.database;
import java.util.Collection;
import javax.naming.NamingException; import javax.servlet.ServletException; import javax.servlet.http.HttpServlet;

244CHAPTER 11
Unit-testing database applications
public class AdminServlet extends HttpServlet
{
// [...]
private DataAccessManager dataManager;
public void init() throws ServletException
{
super.init();
try
{
this.dataManager = new JdbcDataAccessManager();
}
catch (NamingException e)
{
throw new ServletException(e);
}
}
public Collection executeCommand(String command) throws Exception
{
return this.dataManager.execute(command);
}
}
Writing a unit test for a method of the AdminServlet class is now easy. All you need to do is create a mock-object implementation of DataAccessManager. The only tricky part is deciding how to pass the mock instance to the AdminServlet class so that it uses the mock instead of the real JdbcDataAccessManager implementation.
11.2.2Setting up a mock database interface layer
There are several strategies you could use to pass a DataAccessManager mock object to AdminServlet:
■Create a constructor that accepts the DataAccessManager interface as a parameter.
■Create a setter method (setDataAccessManager(DataAccessManager manager)).
■Extend AdminServlet to override the executeCommand method and return the result of calling the mock’s executeCommand method.
■Make the data access manager implementation a parameter of your application by defining the class name in the web.xml as an AdminServlet initialization parameter.

Testing business logic in isolation from the database |
245 |
|
|
The challenge is to use the most natural solution—either the one that makes the class more flexible and extensible or the one that requires the fewest changes. The constructor solution is really not natural in this case, because the class is a servlet and a servlet must only have a default constructor. Extending AdminServlet sounds nice, because it doesn’t involve modifying the AdminServlet class; but this approach has the drawback that the test won’t exercise AdminServlet but rather the class that extends it. The web.xml solution sounds even nicer; but then you have to make the DataAccessManager implementation class an application parameter, which may not be your intent. (In this case, it isn’t.)
In this case, the setter solution sounds most natural. Listing 11.3 shows the implementation. The refactoring performed is shown in bold; all you do is add a setDataAccessManager method.
Listing 11.3 Setter approach to introduce DataAccessManager mock
package junitbook.database;
import java.util.Collection;
import javax.naming.NamingException; import javax.servlet.ServletException; import javax.servlet.http.HttpServlet;
public class AdminServlet extends HttpServlet
{
// [...]
private DataAccessManager dataManager;
public void setDataAccessManager(DataAccessManager manager)
{
this.dataManager = manager;
}
public void init() throws ServletException
{
super.init();
try
{
setDataAccessManager(new JdbcDataAccessManager());
}
catch (NamingException e)
{
throw new ServletException(e);
}
}
public Collection executeCommand(String command) throws Exception
246CHAPTER 11
Unit-testing database applications
{
return this.dataManager.execute(command);
}
}
11.2.3Mocking the database interface layer
Listing 11.4 is a test case template that demonstrates how to create and use a mock DataAccessManager class for unit-testing the AdminServlet class. You can now write any mock object unit test using this canvas. The listing demonstrates writing mocks using the DynaMock API (see chapter 9). However, the strategy will also work with any other mock-object framework (EasyMock, for example).
Listing 11.4 Canvas for mocking the database layer using the DynaMock API
package junitbook.database;
import java.util.ArrayList;
import com.mockobjects.dynamic.Mock; import com.mockobjects.dynamic.C;
import junit.framework.TestCase;
public class TestAdminServletDynaMock extends TestCase
{
public void testSomething() throws Exception
{
Mock mockManager = new Mock(DataAccessManager.class); DataAccessManager manager =
(DataAccessManager) mockManager.proxy();
mockManager.expectAndReturn("execute", C.ANY_ARGS, new ArrayList());
AdminServlet servlet = new AdminServlet(); servlet.setDataAccessManager(manager);
//Call the method to test here. For example:
//manager.doGet(request, response)
//[...]
}
}
You start by creating a DataAccessManager mock using the DynaMock API. Next, you tell the mock object to return an empty ArrayList when the execute method