

216CHAPTER 10
Unit-testing JSPs and taglibs
A test that can’t be repeated is worthless.
—Brian Marick
In this chapter, we’ll continue with the Administration application we introduced in chapter 9. In chapter 9, we focused on unit-testing the servlet component of the application. In this chapter, we concentrate on the view components—namely the JavaServer Pages (JSPs) and custom tag libraries (taglibs).
We’ll cover unit-testing JSPs and taglibs with both Cactus and mock objects. The two techniques are complementary. Mock objects excel at writing focused, fine-grained unit tests against the business logic. Meanwhile, Cactus can perform integration unit tests against the target environment. The integration unit tests are essential in order to ensure that all components work properly when run in their target containers.
10.1 Revisiting the Administration application
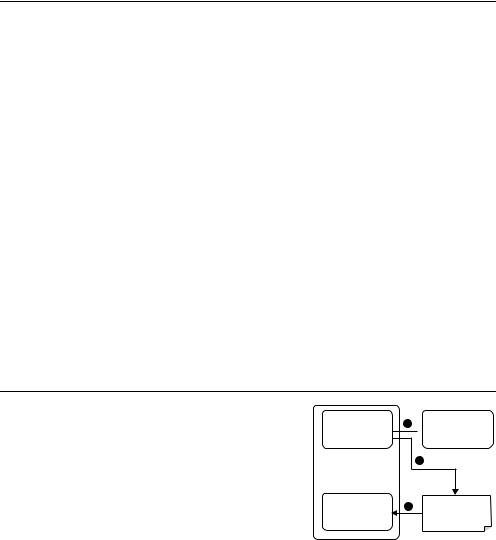
We’ll base our examples on the Administration application (introduced in chapter 9). Its architecture is shown in figure 10.1, which also highlights the parts for which you’ll write unit tests (shaded boxes).
You use the application by sending an HTTP request (from your browser) to the AdminServlet. You pass an SQL query to run as an HTTP parameter, which is retrieved by the AdminServlet. The security filter intercepts the HTTP request and verifies that the SQL query is harmless (that is, it’s a SELECT query). Then, the servlet executes the query on the database, stores the resulting objects in the HTTP Request object, and calls the Results View page. The JSP takes the results from the Request and displays them, nicely formatted, using custom JSP tags from your tag library.
HTTP request |
|
|
Security |
|
|
|
Admin |
|
|
DB |
|
||||
|
|
|
|
|
Filter |
|
|
|
Servlet |
|
|
|
|||
|
|
|
|
|
|
|
|
|
|
|
|
|
|
|
|
HTTP response |
|
|
Results |
|
|
|
|
|
|
|
|
|
|||
|
|
|
|
|
|
|
|
|
|
|
|||||
|
|
View |
|
|
|
Taglib |
|
|
|
|
|||||
|
|
|
|
|
|
|
|
|
|
|
|
||||
(HTML) |
|
|
|
|
|
|
|
|
|
||||||
|
|
JSP |
|
|
|
|
|
|
|
|
Figure 10.1 |
||||
|
|
|
|
|
|
|
|
|
|
|
|
|
|
|
|
|
|
|
|
|
|
|
|
|
|
|
|
|
|
|
|
|
|
|
|
|
Servlet Container |
|
|
|
Unit-testing the Results View JSP |
||||||
|
|
|
|
|
|
|
|
from the Administration application |
|||||||
|
|
|
|
|
|
|
|
|
|
|
|
|
|
|
|
Unit-testing a JSP in isolation with Cactus |
217 |
|
|
10.2 What is JSP unit testing?
First, let’s remove any doubt: What we call unit-testing a JSP is not about unit-testing the servlet that is generated by the compilation of the JSP. We also assume that the JSP is well designed, which means there is no Java code in it. If the page must handle any presentation logic, the logic is encapsulated in a JavaBean or in a taglib. You can perform two kinds of tests to unit-test a JSP: test the JSP page itself in isolation and/or test the JSP’s taglibs.
You can isolate the JSP from the back end by simulating the JavaBeans it uses and then verifying that the returned page contains the expected data. We’ll use Cactus (see chapter 8) to demonstrate this type of test. Because mock objects (see chapter 7) operate only on Java code, you can’t use a pure mock-objects solution to unit-test your JSP in isolation.
You could also write functional tests for the JSP using a framework such as HttpUnit. However, doing so means going all the way to the back end of the application, possibly to the database. With a combination of Cactus and mock objects, you can prevent calling the back end and keep your focus on unit-testing the JSPs themselves.
You can also unit-test the custom tags used in the JSP. You’ll do this with both Cactus and mock objects. Both have pros and cons, and they can be used together effectively.
10.3 Unit-testing a JSP in isolation with Cactus
The strategy for unit-testing JSPs in isolation with Cactus is defined in figure 10.2.
Here is what happens. The Cactus test case class must extend ServletTestCase (or JspTestCase):
bIn the testXXX method (called by Cactus from inside the container), you create the mock
objects that will be used by the JSP. The JSP gets its dynamic information either from one con- tainer-implicit object (HttpServletRequest,
HttpServletResponse, or ServletConfig) or
Sets test objects
testXXX() b in Request, Session, etc.
Cactus C
ServletTestCase
endXXX() D JSP
Figure 10.2 Strategy to unit-test JSPs with Cactus
from a taglib. (We handle the taglib case in section 10.4.)
cStill in testXXX, you perform a forward to call the JSP under test. The JSP then executes, getting the mock data set up in b.
218CHAPTER 10
Unit-testing JSPs and taglibs
dCactus calls endXXX, passing to it the output from the JSP. This allows you to assert the content of the output and verify that the data you set up found its way to the
JSP output, in the correct location on the page.
10.3.1Executing a JSP with SQL results data
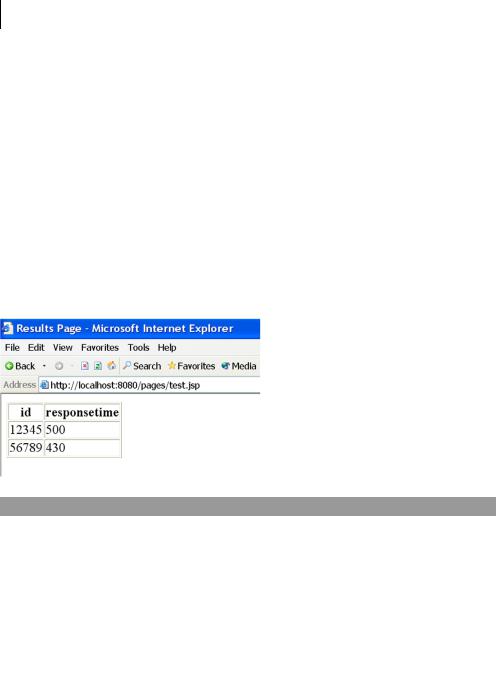
Let’s see some action on the Administration application. In chapter 9 (“Unittesting servlets and filters”), you defined that the results of executing the SQL query would be passed to the JSP by storing them as a collection of DynaBean objects in the HttpServletRequest object. Thanks to the dynamic nature of dyna beans, you can easily write a generic JSP that will display any data contained in the dyna beans. Dyna beans provide metadata about the data they contain. You can create a generic table with columns corresponding to the fields of the dyna beans, as shown in listing 10.1. The result of executing this JSP (using arbitrary SQL results data) is shown in figure 10.3.
Figure 10.3
Result of executing results.jsp with arbitrary data that comes from the execution of a SQL query
Listing 10.1 Results View JSP (results.jsp)
<%@ page contentType="text/html;charset=UTF-8" language="java" %> <%@ taglib prefix="c"
uri="http://jakarta.apache.org/taglibs/core" %> <%@ taglib prefix="d" uri="/dynabeans" %>
<html>
<head>
<title>Results Page</title> </head>
<body bgcolor="white"> <table border="1">
<d:properties var="properties" |
b |
item="${requestScope.results[0]}"/> |
|
<tr>
<c:forEach var="property" items="${properties}">

Unit-testing a JSP in isolation with Cactus |
|
219 |
||
<th><c:out value="${property.name}"/></th> |
|
|
|
|
|
|
|
|
|
</c:forEach> |
|
|
|
|
</tr> |
|
|
|
|
<c:forEach var="result" items="${requestScope.results}"> |
|
|
|
|
<tr> |
|
|
|
|
<c:forEach var="property" items="${properties}"> |
|
|
|
|
<td><d:getProperty name="${property.name}" |
|
c |
|
|
|
|
|||
item="${result}"/></td> |
|
|
|
|
</c:forEach> |
|
|
|
|
</tr> |
|
|
|
|
</c:forEach> |
|
|
|
|
</table>
</body>
</html>
You use both JSTL tags and custom taglibs to write the JSP: The JSTL tag library is a standard set of useful and generic tags. It’s divided into several categories (core, XML, formatting, and SQL). The category used here is the core, which provides output, management of variables, conditional logic, loops, text imports, and URL manipulation. The JSTL implementation used is the Jakarta Standard 1.0 implementation (http://jakarta.apache.org/taglibs/) of the JSTL specifications (http://java.sun.com/products/jsp/jstl/).
You also write two custom tags (<d:properties> and <d:getProperty>), which are used to extract information from the dyna beans. <d:properties> (b) extracts the name of all properties of a dyna bean, and <d:getProperty> (c) extracts the value of a given dyna bean property.
There are two reasons for writing these custom tags. The primary reason is that it isn’t possible to extract dyna bean information without (ouch!) embedding Java code in the JSP (at least, not with the current implementation of the JSTL tags and the DynaBean package). The second reason is that it gives you a chance to write and unit-test custom taglibs of your own. (Of course, the Struts 1.1 tags are dyna- bean-aware, and you could use those, but we decided not to overload this chapter with yet another framework.)
10.3.2Writing the Cactus test
Now let’s write a Cactus ServletTestCase for the JSP. In chapter 9, you defined a method named callView from the AdminServlet class. The callView method forwards control to the Results View JSP, as shown in listing 10.2.

220CHAPTER 10
Unit-testing JSPs and taglibs
Listing 10.2 AdminServlet.callView implementation
package junitbook.pages;
[...]
import java.io.IOException;
public class AdminServlet extends HttpServlet
{
[...]
public void callView(HttpServletRequest request, HttpServletResponse response)
throws IOException, ServletException
{
request.getRequestDispatcher("/results.jsp")
.forward(request, response);
}
}
Listing 10.3 shows a unit test for callView that sets up the DynaBean objects in the Request, calls callView, and then verifies that the JSP output is what you expect.
Listing 10.3 TestAdminServlet.java: unit tests for results.jsp
package junitbook.pages;
import java.util.ArrayList; import java.util.Collection; import java.util.List;
import org.apache.cactus.ServletTestCase;
import org.apache.commons.beanutils.BasicDynaClass; import org.apache.commons.beanutils.DynaBean; import org.apache.commons.beanutils.DynaProperty;
public class TestAdminServlet extends ServletTestCase
{
private Collection createCommandResult() throws Exception
{ |
Create test input |
List results = new ArrayList(); |
|
|
data for JSP |
DynaProperty[] props = new DynaProperty[] { |
|
new DynaProperty("id", String.class), |
|
new DynaProperty("responsetime", Long.class) |
|
};
BasicDynaClass dynaClass = new BasicDynaClass("requesttime", null, props);
DynaBean request1 = dynaClass.newInstance(); request1.set("id", "12345"); request1.set("responsetime", new Long(500));

Unit-testing a JSP in isolation with Cactus |
|
221 |
||
results.add(request1); |
|
|
|
|
|
|
|
|
|
DynaBean request2 = dynaClass.newInstance(); |
Create test |
|
||
request2.set("id", "56789"); |
|
|
||
request2.set("responsetime", |
new Long(430)); |
input data |
|
|
for JSP |
|
|||
results.add(request2); |
|
|
||
|
|
|
|
|
return results; |
|
|
|
|
}
public void testCallView() throws Exception |
|
|
||
{ |
|
|
|
|
AdminServlet servlet = new AdminServlet(); |
|
|
||
request.setAttribute("results", createCommandResult()); |
|
|
||
|
|
|||
servlet.callView(request, response); |
|
|
||
} |
|
|
|
|
public void endCallView( |
|
|
|
|
|
|
|
||
com.meterware.httpunit.WebResponse response) |
|
|
|
|
throws Exception |
|
|
|
|
{ |
|
|
|
|
assertTrue(response.isHTML()); |
|
|
|
|
assertEquals("tables", 1, response.getTables().length); |
|
|
|
|
assertEquals("columns", 2, |
|
|
|
|
response.getTables()[0].getColumnCount()); |
|
|
|
|
assertEquals("rows", 3, |
|
|
Use |
|
response.getTables()[0].getRowCount()); |
|
|
||
|
|
HttpUnit |
||
|
|
|
||
assertEquals("id", |
|
|
integration |
|
response.getTables()[0].getCellAsText(0, 0)); |
|
|
for asserting |
|
assertEquals("responsetime", |
|
|
HTTP |
|
response.getTables()[0].getCellAsText(0, 1)); |
|
|
response |
|
assertEquals("12345", |
|
|
|
|
response.getTables()[0].getCellAsText(1, 0)); |
|
|
|
|
assertEquals("500", |
|
|
|
|
response.getTables()[0].getCellAsText(1, 1)); |
|
|
|
|
assertEquals("56789", |
|
|
|
|
response.getTables()[0].getCellAsText(2, 0)); |
|
|
|
|
assertEquals("430", |
|
|
|
|
response.getTables()[0].getCellAsText(2, 1)); |
|
|
|
|
} |
|
|
|
|
}
You use the Cactus HttpUnit integration in the endCallView method to assert the returned HTML page. When Cactus needs to execute the endXXX method, first it looks for an endXXX(org.apache.cactus.WebResponse) signature. If this signature is found, Cactus calls it; if it isn’t, Cactus looks for an endXXX(com.meterware.httpunit.WebResponse) signature and, if it’s available, calls it. Using the