


10CHAPTER 1
JUnit jumpstart
1.3 Understanding unit testing frameworks
There are several best practices that unit testing frameworks should follow. These seemingly minor improvements in the TestCalculator program highlight three rules that (in our experience) all unit testing frameworks should observe:
■Each unit test must run independently of all other unit tests.
■Errors must be detected and reported test by test.
■It must be easy to define which unit tests will run.
The “slightly better” test program comes close to following these rules but still falls short. For example, in order for each unit test to be truly independent, each should run in a different classloader instance.
Adding a class is also only slightly better. You can now add new unit tests by adding a new method and then adding a corresponding try/catch block to main.
A definite step up, but still short of what you would want in a real unit test suite. The most obvious problem is that large try/catch blocks are known to be maintenance nightmares. You could easily leave a unit test out and never know it wasn’t running!
It would be nice if you could just add new test methods and be done with it. But how would the program know which methods to run?
Well, you could have a simple registration procedure. A registration method would at least inventory which tests are running.
Another approach would be to use Java’s reflection and introspection capabilities. A program could look at itself and decide to run whatever methods are named in a certain way—like those that begin with the letters test, for example.
Making it easy to add tests (the third rule in our earlier list) sounds like another good rule for a unit testing framework.
The support code to realize this rule (via registration or introspection) would not be trivial, but it would be worthwhile. There would be a lot of work up front, but that effort would pay off each time you added a new test.
Happily, the JUnit team has saved you the trouble. The JUnit framework already supports registering or introspecting methods. It also supports using a different classloader instance for each test, and reports all errors on a case-by-case basis.
Now that you have a better idea of why you need unit testing frameworks, let’s set up JUnit and see it in action.

Setting up JUnit |
11 |
|
|
1.4 Setting up JUnit
JUnit comes in the form of a jar file (junit.jar). In order to use JUnit to write your application tests, you’ll simply need to add the junit jar to your project’s compilation classpath and to your execution classpath when you run the tests.
Let’s now download the JUnit (JUnit 3.8.1 or newer5) distribution, which contains several test samples that you will run to get familiar with executing JUnit tests. Follow these steps:
1Download the latest version of JUnit from junit.org, referred to in step 2 as http://junit.zip.
2Unzip the junit.zip distribution file to a directory on your computer system (for example, C:\ on Windows or /opt/ on UNIX).
3Underneath this directory, unzip will create a subdirectory for the JUnit distribution you downloaded (for example, C:\junit3.8.1 on Windows or /opt/junit.3.8.1 on UNIX).
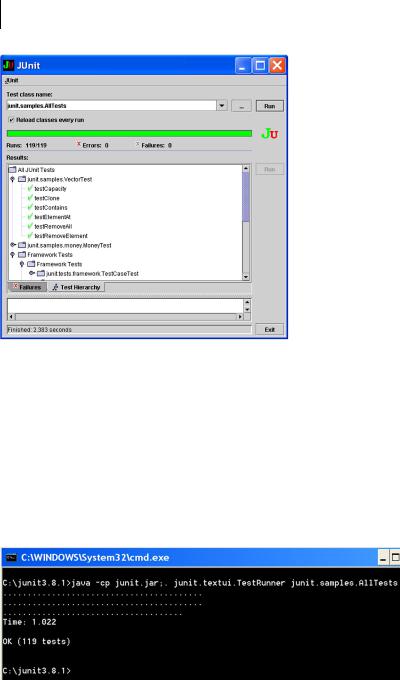
You are now ready to run the tests provided with the JUnit distribution. JUnit comes complete with Java programs that you can use to view the result of a test. There is a graphical, Swing-based test runner (figure 1.2) as well as a textual test runner (figure 1.3) that can be used from the command line.
To run the graphical test runner, open a shell in C:\junit3.8.1 on Windows or in /opt/junit3.8.1 on UNIX, and type the appropriate command:
Windows:
java -cp junit.jar;. junit.swingui.TestRunner junit.samples.AllTests
UNIX:
java -cp junit.jar:. junit.swingui.TestRunner junit.samples.AllTests
To run the text test runner, open a shell in C:\junit3.8.1 on Windows or in /opt/junit3.8.1 on UNIX, and type the appropriate command:
Windows:
java -cp junit.jar;. junit.textui.TestRunner junit.samples.AllTests
UNIX:
java -cp junit.jar:. junit.textui.TestRunner junit.samples.AllTests
5 Earlier versions of JUnit will not work with all of our sample code.
12CHAPTER 1
JUnit jumpstart
Figure 1.2
Execution of the JUnit distribution sample tests using the graphical Swing test runner
Notice that for the text test runner, tests that pass are shown with a dot. Had there been errors, they would have been displayed with an E instead of a dot.
As you can see from the figures, the runners report equivalent results. The textual test runner is easier to run, especially in batch jobs, though the graphical test runner can provide more detail.
The graphical test runner also uses its own classloader instance (a reloading classloader). This makes it easier to use interactively, because you can reload classes (after changing them) and quickly run the test again without restarting the test runner.
Figure 1.3 Execution of the JUnit distribution sample tests using the text test runner

Testing with JUnit |
13 |
|
|
In chapter 5, “Automating JUnit,” we look at running tests using the Ant build tool and from within integrated development environments, like Eclipse.
1.5 Testing with JUnit
JUnit has many features that make tests easier to write and to run. You’ll see these features at work throughout this book:
■Alternate front-ends, or test runners, to display the result of your tests. Command-line, AWT, and Swing test runners are bundled in the JUnit distribution.
■Separate classloaders for each unit test to avoid side effects.
■Standard resource initialization and reclamation methods (setUp and tearDown).
■A variety of assert methods to make it easy to check the results of your tests.
■Integration with popular tools like Ant and Maven, and popular IDEs like Eclipse, IntelliJ, and JBuilder.
Without further ado, let’s turn to listing 1.4 and see what the simple Calculator test looks like when written with JUnit.
Listing 1.4 The TestCalculator program written with JUnit
import junit.framework.TestCase;
public class TestCalculator extends TestCase
{
public void testAdd()
{
Calculator calculator = new Calculator(); double result = calculator.add(10, 50); assertEquals(60, result, 0);
}
}
b c
d e
f
Pretty simple, isn’t it? Let’s break it down by the numbers.
In listing 1.4 at b, you start by extending the test class from the standard JUnit junit.framework.TestCase. This base class includes the framework code that JUnit needs to automatically run the tests.
At c, you simply make sure that the method name follows the pattern testXXX(). Observing this naming convention makes it clear to the framework

14CHAPTER 1
JUnit jumpstart
that the method is a unit test and that it can be run automatically. Following the testXXX naming convention is not strictly required, but it is strongly encouraged as a best practice.
At d, you start the test by creating an instance of the Calculator class (the “object under test”), and at e, as before, you execute the test by calling the method to test, passing it two known values.
At f, the JUnit framework begins to shine! To check the result of the test, you call an assertEquals method, which you inherited from the base TestCase. The Javadoc for the assertEquals method is:
/**
*Asserts that two doubles are equal concerning a delta. If the
*expected value is infinity then the delta value is ignored. */
static public void assertEquals(double expected, double actual,
double delta)
In listing 1.4, you passed assertEquals these parameters:
■expected = 60
■actual = result
■delta = 0
Since you passed the calculator the values 10 and 50, you tell assertEquals to expect the sum to be 60. (You pass 0 as you are adding integer numbers, so there is no delta.) When you called the calculator object, you tucked the return value into a local double named result. So, you pass that variable to assertEquals to compare against the expected value of 60.
Which brings us to the mysterious delta parameter. Most often, the delta parameter can be zero, and you can safely ignore it. It comes into play with calculations that are not always precise, which includes many floating-point calculations. The delta provides a plus/minus factor. So if the actual is within the range (expected-delta) and (expected+delta), the test will still pass.
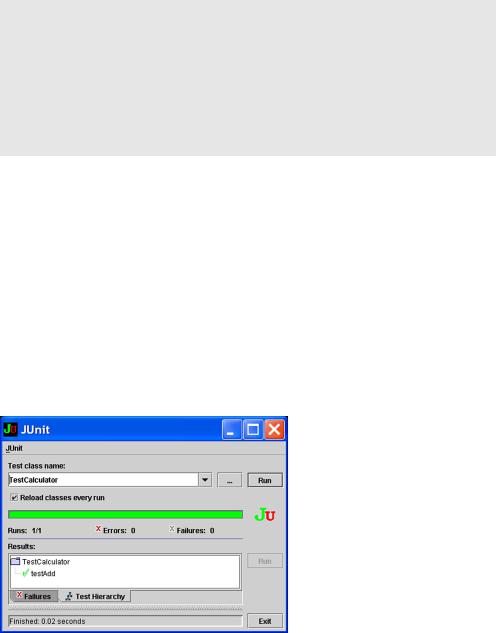
If you want to enter the test program from listing 1.4 into your text editor or IDE, you can try it using the graphical test runner. Let’s assume you have entered the code from listings 1.1 and 1.4 in the C:\junitbook\jumpstart directory (/opt/ junitbook/jumpstart on UNIX). Let’s first compile the code by opening a shell prompt in that directory and typing the following (we’ll assume you have the javac executable on your PATH):
Testing with JUnit |
15 |
|
|
JUnit Design Goals
The JUnit team has defined three discrete goals for the framework:
■The framework must help us write useful tests.
■The framework must help us create tests that retain their value over time.
■The framework must help us lower the cost of writing tests by reusing code.
In listing 1.4, we tried to show how easy it can be to write tests with JUnit. We’ll return to the other goals in chapter 2.
Windows:
javac -cp ..\..\junit3.8.1\junit.jar *.java
UNIX:
javac -cp ../../junit3.8.1/junit.jar *.java
You are now ready to start the Swing test runner, by typing the following:
Windows:
java -cp .;..\..\junit3.8.1\junit.jar
junit.swingui.TestRunner TestCalculator
UNIX:
java -cp .:../../junit3.8.1/junit.jar
junit.swingui.TestRunner TestCalculator
The result of the test is shown in figure 1.4.
Figure 1.4
Execution of the first JUnit test
TestCalculator using the Swing test runner