

Determining how good tests are |
79 |
|
|
4.3.2Generating test coverage reports
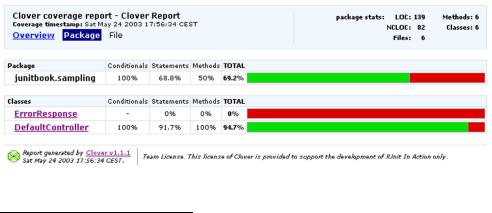
Tools are available for JUnit that can analyze your application and provide an exact report of your application’s test coverage. Figure 4.7 shows one such report generated by the Clover tool (http://www.thecortex.net/clover/).2 It is the result of applying Clover on the Controller sample from chapter 3.
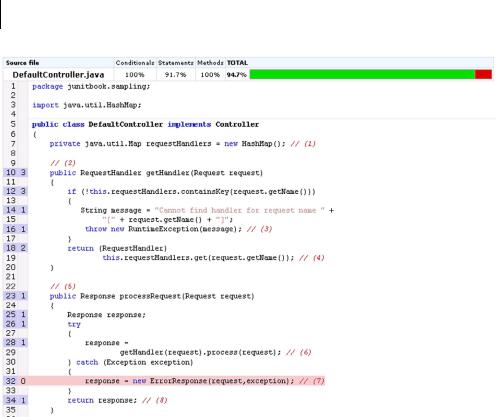
Knowing what classes are tested (DefaultController) and what classes are not tested (ErrorResponse) is useful information. However, it’s even better to know why the DefaultController has only 94.7% test coverage. Fortunately, Clover is able to drill down at the level of the method implementation, as shown in figure 4.8.
The report shown in figure 4.8 itemizes how many times a given line of source code has been executed by our tests (this is the number in the second column from the left—for example, the getHandler method at line 10 has been called three times). But more important, the report shows the lines of code that have not been tested. In our example, the case when an Exception is thrown by processRequest is not being tested (line 32).
Knowing what code is untested is good. However, a good test-coverage tool (such as Clover) should also provide historical reports showing the progression (or regression) of tests across development iterations and integration with your favorite build system (such as Ant). It should have the ability to stop the build if coverage criteria are not met—for example, if the coverage for such a package is below 70%.
On our own projects, we like to check the coverage percentage after a development iteration (say, every two weeks). We adjust the build failure criteria so that the next iteration must have at least the same coverage percentage as the previous iteration. This strategy helps to ensure that our test coverage steadily improves.
Figure 4.7 A class coverage report generated by the popular Clover product
2Clover is a commercial application that is free for noncommercial activities (especially the open source community).
80CHAPTER 4
Examining software tests
Figure 4.8 A Clover report showing how many times lines of code have been tested and what portion of the code has not been tested (line 32)
Although they’re both helpful and interesting, the reports we have shown do not tell you how “good” your tests are. They only tell you which methods are being tested and which are not. Your tests could be faulty and not test anything at all, and the reports would still be the same! Ascertaining the quality of tests is difficult, and tools such as Jester (http://jester.sourceforge.net) can help. Jester works by performing random mutations to the code being tested; it then verifies if your tests still pass. If they do, it means they were not good enough. Jester does this over several iterations and then produces a report showing the quality of the tests.
What is important to remember is that 100% test coverage does not guarantee that your application is 100% tested. Your test coverage is only as good as your tests! If your tests are poorly conceived, your application will be inadequately tested, no matter how many tests you have.

Test-Driven Development |
81 |
|
|
4.3.3Testing interactions
So, if we can achieve higher test coverage with white box unit tests, and we can generate some fancy reports to prove it, do we need to bother with black box tests at all?
If you think about the differences between figure 4.5 and figure 4.6, there’s more going on than how many methods are being tested. The black box tests in figure 4.5 are testing the interactions between objects. The white box unit tests in figure 4.6, by definition, do not test object interactions. If a white box test does interact with another object, that object is usually a stub or a mock object (see chapters 6 and 7), designed to produce specific test behavior.
If you want to fully test your application, including how the runtime objects interact with each other, you need to include black box integration tests as part of your regimen. Each type of test has its own place in the scheme of things.
4.4Test-Driven Development
In chapter 3, you designed an application controller and quickly wrote some tests to prove your design. As you wrote the tests, the tests helped improve the initial design. As you write more unit tests, positive reinforcement encourages you to write them earlier. Pretty soon, as you design the implementation, it becomes natural to wonder about how you will test a class. Following this methodology, more developers are making the quantum leap from test-friendly designs to Test-Driven Development.3
DEFINITION Test-Driven Development (TDD)—Test-Driven Development is a programming practice that instructs developers to write new code only if an automated test has failed, and to eliminate duplication. The goal of TDD is “clean code that works.”
4.4.1Tweaking the cycle
When you develop code, you design an application programming interface (API) and then implement the behavior promised by the interface. When you unit-test code, you verify the promised behavior through a method’s API. The test is a client of the method’s API, just as your domain code is a client of the method’s API.
3 Kent Beck, Test Driven Development: By Example (Boston: Addison-Wesley, 2003).

82CHAPTER 4
Examining software tests
The conventional development cycle goes something like this: [code, test, (repeat), commit]. Developers practicing TDD make a seemingly slight but surprisingly effective adjustment: [test, code, (repeat), commit]. (More on this later.) The test drives the design and becomes the method’s first client.
Listing 4.3 illustrates how unit tests can help design the implementation. The testGetBalanceOk method shows that the getBalance method of Account returns the account balance as a long and that this balance can be set in the Account constructor. At this point, the implementation of Account is purely hypothetical, but writing the unit tests allows you to focus on the design of the code. As soon as you implement the class, you can run the test to prove that the implementation works. If the test fails, then you can continue working on the implementation until it passes the test. When the test passes, you know that your contract is fulfilled and that the code works as advertised.
Listing 4.3 Unit tests as a design guide
import junit.framework.TestCase;
public class TestAccount extends TestCase
{
public void testGetBalanceOk ()
{
long balance = 1000;
Account account = new Account(balance); long result = account.getBalance(); assertEquals(balance, result);
}
}
When you use the test as the method’s first client, it becomes easier to focus purely on the API. Writing the tests first provides the following:
■Means to design the code
■Documentation as to how the code works
■Unit tests for the code (waddyaknow)
Someone new to the project can understand the system by studying the functional test suite (with the help of some high-level UML diagrams, for example). To analyze a specific portion of the application in detail, someone can drill down into individual unit tests.

Test-Driven Development |
83 |
|
|
4.4.2The TDD two-step
Earlier, we said that TDD tweaks the development cycle to go something like [test, code, (repeat), ship]. The problem with this chant is that it leaves out a key step. It should go more like this: [test, code, refactor, (repeat), ship].
The core tenets of TDD are to:
1Write a failing automatic test before writing new code
2Eliminate duplication4
The eliminate duplication step ensures that you write code that is not only testable but also maintainable. When you eliminate duplication, you tend to increase cohesion and decrease dependency. These are hallmarks of code that is easier to maintain over time.
Other coding practices have encouraged us to write maintainable code by anticipating change. In contrast, TDD encourages us to write maintainable code by eliminating duplication. Developers following this practice have found that testbacked, well-factored code is, by its very nature, easy and safe to change. TDD gives us the confidence to solve today’s problems today and tomorrow’s problems tomorrow. Carpe diem!
JUnit best practice: test first (never write a line of new code without a failing test)
If you take the TDD development pattern to heart, an interesting thing happens: Before you can write any code, you must write a test that fails. Why does it fail? Because you haven’t written the code to make it succeed.
Faced with a situation like this, most of us begin by writing a simple implementation to let the test pass. Now that the test succeeds, you could stop and move on to the next problem. Being a professional, you would take a few minutes to refactor the implementation to remove redundancy, clarify intent, and optimize the investment in the new code. But as long as the test succeeds, technically, you’re done.
The end game? If you always test first, you will never write a line of new code without a failing test.
4 Ibid.