- •contents
- •preface
- •acknowledgments
- •about this book
- •Special features
- •Best practices
- •Design patterns in action
- •Software directory
- •Roadmap
- •Part 1: JUnit distilled
- •Part 2: Testing strategies
- •Part 3: Testing components
- •Code
- •References
- •Author online
- •about the authors
- •about the title
- •about the cover illustration
- •JUnit jumpstart
- •1.1 Proving it works
- •1.2 Starting from scratch
- •1.3 Understanding unit testing frameworks
- •1.4 Setting up JUnit
- •1.5 Testing with JUnit
- •1.6 Summary
- •2.1 Exploring core JUnit
- •2.2 Launching tests with test runners
- •2.2.1 Selecting a test runner
- •2.2.2 Defining your own test runner
- •2.3 Composing tests with TestSuite
- •2.3.1 Running the automatic suite
- •2.3.2 Rolling your own test suite
- •2.4 Collecting parameters with TestResult
- •2.5 Observing results with TestListener
- •2.6 Working with TestCase
- •2.6.1 Managing resources with a fixture
- •2.6.2 Creating unit test methods
- •2.7 Stepping through TestCalculator
- •2.7.1 Creating a TestSuite
- •2.7.2 Creating a TestResult
- •2.7.3 Executing the test methods
- •2.7.4 Reviewing the full JUnit life cycle
- •2.8 Summary
- •3.1 Introducing the controller component
- •3.1.1 Designing the interfaces
- •3.1.2 Implementing the base classes
- •3.2 Let’s test it!
- •3.2.1 Testing the DefaultController
- •3.2.2 Adding a handler
- •3.2.3 Processing a request
- •3.2.4 Improving testProcessRequest
- •3.3 Testing exception-handling
- •3.3.1 Simulating exceptional conditions
- •3.3.2 Testing for exceptions
- •3.4 Setting up a project for testing
- •3.5 Summary
- •4.1 The need for unit tests
- •4.1.1 Allowing greater test coverage
- •4.1.2 Enabling teamwork
- •4.1.3 Preventing regression and limiting debugging
- •4.1.4 Enabling refactoring
- •4.1.5 Improving implementation design
- •4.1.6 Serving as developer documentation
- •4.1.7 Having fun
- •4.2 Different kinds of tests
- •4.2.1 The four flavors of software tests
- •4.2.2 The three flavors of unit tests
- •4.3 Determining how good tests are
- •4.3.1 Measuring test coverage
- •4.3.2 Generating test coverage reports
- •4.3.3 Testing interactions
- •4.4 Test-Driven Development
- •4.4.1 Tweaking the cycle
- •4.5 Testing in the development cycle
- •4.6 Summary
- •5.1 A day in the life
- •5.2 Running tests from Ant
- •5.2.1 Ant, indispensable Ant
- •5.2.2 Ant targets, projects, properties, and tasks
- •5.2.3 The javac task
- •5.2.4 The JUnit task
- •5.2.5 Putting Ant to the task
- •5.2.6 Pretty printing with JUnitReport
- •5.2.7 Automatically finding the tests to run
- •5.3 Running tests from Maven
- •5.3.2 Configuring Maven for a project
- •5.3.3 Executing JUnit tests with Maven
- •5.3.4 Handling dependent jars with Maven
- •5.4 Running tests from Eclipse
- •5.4.1 Creating an Eclipse project
- •5.4.2 Running JUnit tests in Eclipse
- •5.5 Summary
- •6.1 Introducing stubs
- •6.2 Practicing on an HTTP connection sample
- •6.2.1 Choosing a stubbing solution
- •6.2.2 Using Jetty as an embedded server
- •6.3 Stubbing the web server’s resources
- •6.3.1 Setting up the first stub test
- •6.3.2 Testing for failure conditions
- •6.3.3 Reviewing the first stub test
- •6.4 Stubbing the connection
- •6.4.1 Producing a custom URL protocol handler
- •6.4.2 Creating a JDK HttpURLConnection stub
- •6.4.3 Running the test
- •6.5 Summary
- •7.1 Introducing mock objects
- •7.2 Mock tasting: a simple example
- •7.3 Using mock objects as a refactoring technique
- •7.3.1 Easy refactoring
- •7.3.2 Allowing more flexible code
- •7.4 Practicing on an HTTP connection sample
- •7.4.1 Defining the mock object
- •7.4.2 Testing a sample method
- •7.4.3 Try #1: easy method refactoring technique
- •7.4.4 Try #2: refactoring by using a class factory
- •7.5 Using mocks as Trojan horses
- •7.6 Deciding when to use mock objects
- •7.7 Summary
- •8.1 The problem with unit-testing components
- •8.2 Testing components using mock objects
- •8.2.1 Testing the servlet sample using EasyMock
- •8.2.2 Pros and cons of using mock objects to test components
- •8.3 What are integration unit tests?
- •8.4 Introducing Cactus
- •8.5 Testing components using Cactus
- •8.5.1 Running Cactus tests
- •8.5.2 Executing the tests using Cactus/Jetty integration
- •8.6 How Cactus works
- •8.6.2 Stepping through a test
- •8.7 Summary
- •9.1 Presenting the Administration application
- •9.2 Writing servlet tests with Cactus
- •9.2.1 Designing the first test
- •9.2.2 Using Maven to run Cactus tests
- •9.2.3 Finishing the Cactus servlet tests
- •9.3 Testing servlets with mock objects
- •9.3.1 Writing a test using DynaMocks and DynaBeans
- •9.3.2 Finishing the DynaMock tests
- •9.4 Writing filter tests with Cactus
- •9.4.1 Testing the filter with a SELECT query
- •9.4.2 Testing the filter for other query types
- •9.4.3 Running the Cactus filter tests with Maven
- •9.5 When to use Cactus, and when to use mock objects
- •9.6 Summary
- •10.1 Revisiting the Administration application
- •10.2 What is JSP unit testing?
- •10.3 Unit-testing a JSP in isolation with Cactus
- •10.3.1 Executing a JSP with SQL results data
- •10.3.2 Writing the Cactus test
- •10.3.3 Executing Cactus JSP tests with Maven
- •10.4 Unit-testing taglibs with Cactus
- •10.4.1 Defining a custom tag
- •10.4.2 Testing the custom tag
- •10.5 Unit-testing taglibs with mock objects
- •10.5.1 Introducing MockMaker and installing its Eclipse plugin
- •10.5.2 Using MockMaker to generate mocks from classes
- •10.6 When to use mock objects and when to use Cactus
- •10.7 Summary
- •Unit-testing database applications
- •11.1 Introduction to unit-testing databases
- •11.2 Testing business logic in isolation from the database
- •11.2.1 Implementing a database access layer interface
- •11.2.2 Setting up a mock database interface layer
- •11.2.3 Mocking the database interface layer
- •11.3 Testing persistence code in isolation from the database
- •11.3.1 Testing the execute method
- •11.3.2 Using expectations to verify state
- •11.4 Writing database integration unit tests
- •11.4.1 Filling the requirements for database integration tests
- •11.4.2 Presetting database data
- •11.5 Running the Cactus test using Ant
- •11.5.1 Reviewing the project structure
- •11.5.2 Introducing the Cactus/Ant integration module
- •11.5.3 Creating the Ant build file step by step
- •11.5.4 Executing the Cactus tests
- •11.6 Tuning for build performance
- •11.6.2 Grouping tests in functional test suites
- •11.7.1 Choosing an approach
- •11.7.2 Applying continuous integration
- •11.8 Summary
- •Unit-testing EJBs
- •12.1 Defining a sample EJB application
- •12.2 Using a façade strategy
- •12.3 Unit-testing JNDI code using mock objects
- •12.4 Unit-testing session beans
- •12.4.1 Using the factory method strategy
- •12.4.2 Using the factory class strategy
- •12.4.3 Using the mock JNDI implementation strategy
- •12.5 Using mock objects to test message-driven beans
- •12.6 Using mock objects to test entity beans
- •12.7 Choosing the right mock-objects strategy
- •12.8 Using integration unit tests
- •12.9 Using JUnit and remote calls
- •12.9.1 Requirements for using JUnit directly
- •12.9.2 Packaging the Petstore application in an ear file
- •12.9.3 Performing automatic deployment and execution of tests
- •12.9.4 Writing a remote JUnit test for PetstoreEJB
- •12.9.5 Fixing JNDI names
- •12.9.6 Running the tests
- •12.10 Using Cactus
- •12.10.1 Writing an EJB unit test with Cactus
- •12.10.2 Project directory structure
- •12.10.3 Packaging the Cactus tests
- •12.10.4 Executing the Cactus tests
- •12.11 Summary
- •A.1 Getting the source code
- •A.2 Source code overview
- •A.3 External libraries
- •A.4 Jar versions
- •A.5 Directory structure conventions
- •B.1 Installing Eclipse
- •B.2 Setting up Eclipse projects from the sources
- •B.3 Running JUnit tests from Eclipse
- •B.4 Running Ant scripts from Eclipse
- •B.5 Running Cactus tests from Eclipse
- •references
- •index
114CHAPTER 5
Automating JUnit
Figure 5.11
Source paths and build output folder for the sampling project
Figure 5.12
Libraries definition for the sampling project
5.4.2Running JUnit tests in Eclipse
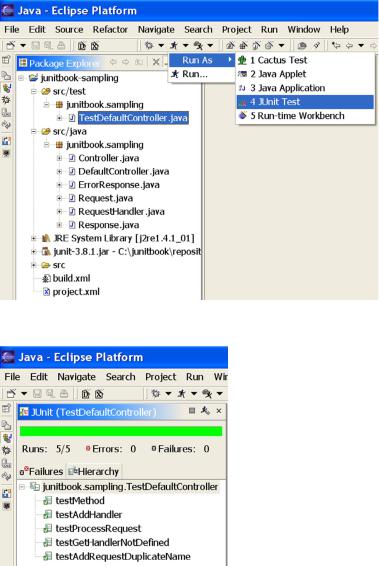
Now you can run the JUnit TestDefaultController test case from Eclipse. Open
the Java Perspective and click the TestDefaultController class. In the toolbar, select the Run icon and then Run As→JUnit Test, as shown in figure 5.13. The
result of the execution is shown in figure 5.14.
Running tests from Eclipse |
115 |
|
|
Figure 5.13 Running the TestDefaultController JUnit test case
Figure 5.14
Result of executing the
TestDefaultController test case
If a test fails, you can jump back to the editing window, make some changes, compile the class, and run the test again—all without leaving the Eclipse environment.
116CHAPTER 5
Automating JUnit
5.5Summary
An essential element of a unit test is that, someday, it may fail. To realize the full value of your tests, you should run them continually, even when you don’t expect anything to fail. Unit tests expect the unexpected.
Using the sampling project from chapter 3, we walked through compiling the project and running JUnit test cases using three popular products: Ant, Maven, and Eclipse. Ant and Maven are automation tools, and Eclipse is a productivity tool (an IDE).
These products all require very little effort to set up a stable unit-testing environment. The example is quite simple, but the same automation techniques apply equally well to larger and more complex projects.
However, the unit-testing techniques we’ve shown so far do not scale as well. As the classes we need to test become more complex and intertwined, we need better strategies to create tests.
In the second part of this book, we’ll look at some of the strategies and tools we can use to test applications piece by piece. Or, as Julius Caesar said, Divide et impera: We must divide and conquer.
Part 2
Testing strategies
Part 1 was about learning the basics of unit-testing with JUnit. However, just knowing how JUnit works and how to use it on simple examples is not enough when it comes to testing a real application. For that, JUnit alone is not enough; you need to develop testing strategies that allow you to unit-test a full-fledged application. The main issue is testing in isolation. When you’re writing unit tests, you want to test your application bit by bit. How do you separate bits of functionality so that they can be tested separately? Part 2 answers this crucial question.
Chapter 6 presents the stub strategy, which allows you to test relatively coarse-grained portions of code in isolation. In chapter 7, you’ll learn about a relatively new technique called mock objects, which permits fine-grained testing in isolation. With mock objects, you’ll discover not only a new way of unittesting your code but also a new way of writing it. Chapter 8 takes you into the realm of unit-testing your code when it runs in its container (in-container testing). Nowadays, almost all code runs in some kind of container with which it interacts. You’ll discover a strategy to unit-test J2EE code when it runs in its container, and you’ll learn about the pros and cons of this strategy when compared with the mock-objects approach.
After reading part 2, you’ll be familiar with these three strategies to unit-test code in isolation. You’ll be ready to tackle the last step of our journey: unittesting all types of J2EE components (servlets, filters, JSPs, taglibs, code accessing the database, and EJBs).
Coarse-grained6testing
with stubs
This chapter covers
■Introducing stubs
■Using an embedded server in place of a real web server
■Unit-testing an HTTP connection sample with stubs
119