


124CHAPTER 6
Coarse-grained testing with stubs
c d Read the content until there is nothing more to read.
eIf an error occurs, you return null. One might argue that a better implementation might instead return a runtime exception (or a checked exception). How-
ever, for testing purposes, returning null is good enough.
6.2.1Choosing a stubbing solution
There are two possible scenarios in the sample application: the remote web server (see figure 6.1) could be located outside of the development platform (such as on a partner site), or it could be part of the platform where your application is deployed. However, in both cases, you need to introduce a server into your development platform in order to be able to unit-test the WebClient class. One relatively easy solution would be to install an Apache test server and drop some test web pages in its document root. This is a typical, widely used stubbing solution. However, it has several drawbacks:
■Reliance on the environment—You need to be sure the full environment is up and running before the test. If the web server is down, and the test is executed, it will fail! You will then try to debug why it is failing. Next, you will discover that the code is working fine—it was only an environmental issue generating a false warning. This kind of thing is time consuming and annoying. When you’re unit testing, it is important to be able to control as much as possible of the environment in which the test executes, so that test results are reproducible.
■Separated test logic—The test logic is scattered in two separate places: in the JUnit test case and in the test web page. Both types of resources need to be kept in sync for the test to succeed.
■Tests that are difficult to automate—Automating the execution of the tests is difficult because it involves automatically deploying the web pages on the web server, automatically starting the web server, and then only running the unit tests.
Fortunately, there is an easier solution that consists of using an embedded server. You are testing in Java, so the easiest option would be to use a Java web server that you could embed in the test case class. Such a nice beast exists; it’s called Jetty. For the purpose of this book, we will use Jetty to set up stubs. For more information about Jetty in general, visit http://jetty.mortbay.org/jetty/index.html.
Why Jetty? Because it’s fast (important when running tests), it’s lightweight (a single jar file to put in the classpath), and it can be completely controlled in Java
Practicing on an HTTP connection sample |
125 |
|
|
from your test case, which means you can tell it how to behave for the purpose of your tests. Additionally, it is a very good web/servlet container that you can use in production. This is not specifically needed for your tests, but it is always nice to use best-of-breed technology.
Using Jetty allows you to eliminate the drawbacks: The server is started from the JUnit test case, the tests are all written in Java in one location, and automating the test suite is a nonissue. Thanks to Jetty’s modularity, the real point of the exercise is only to stub the Jetty handlers and not the whole server from the ground up.
6.2.2Using Jetty as an embedded server
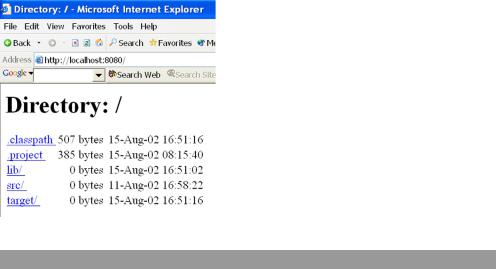
In order to better understand how to set up and control Jetty from your tests, let’s implement a simple example that starts Jetty from your Java code. Listing 6.2 shows how to start it from Java and how to define a document root (/) from which to start serving files. Figure 6.3 shows the result when you run the application and open a browser on the URL http://localhost:8080.
Figure 6.3
Testing the JettySample in a browser. These are the results when you run listing 6.2 and open a browser on http://localhost:8080.
Listing 6.2 Starting Jetty in embedded mode—JettySample class
package junitbook.coarse;
import org.mortbay.http.HttpContext; import org.mortbay.http.HttpServer; import org.mortbay.http.SocketListener;
import org.mortbay.http.handler.ResourceHandler;
public class JettySample
{
public static void main(String[] args) throws Exception
126CHAPTER 6
Coarse-grained testing with stubs
{ |
|
b |
|
|
|
HttpServer server = new HttpServer(); |
|
|
|||
SocketListener listener = new SocketListener(); |
|
c |
|||
|
|||||
listener.setPort(8080); |
|
|
|
|
|
server.addListener(listener); |
|
|
|
|
|
|
|
|
|
||
HttpContext context = new HttpContext(); |
|
d |
|
|
|
|
|
|
|||
context.setContextPath("/"); |
|
|
|
|
|
context.setResourceBase("./"); |
|
|
|
|
|
|
e |
|
|
||
context.addHandler(new ResourceHandler()); |
|
|
|
||
server.addContext(context); d |
|
|
|
|
|
server.start(); |
f |
|
|
|
|
}
}
b Create the Jetty HttpServer object.
cAttach a listener on port 8080 to the HttpServer object so that it can receive HTTP requests.
dCreate an HttpContext that processes the HTTP requests and passes them to the different handlers. You map the context to the root (/) URL with setContextPath. The
setResourceBase method sets the document root from which to serve resources.
eAdd a resource handler to the HttpContext in order to be able to serve files from the filesystem.
fStart the server.
6.3Stubbing the web server’s resources
Now that you know how to easily start and configure Jetty, let’s focus on the HTTP connection sample unit test. You will write a first test that verifies you can call a valid URL and get its content.
6.3.1Setting up the first stub test
To verify that the WebClient works with a valid URL, you need to start the Jetty server before the test, which you can implement in a setUp method inside a JUnit test case. You can also stop the server in a tearDown method. Listing 6.3 shows the code.

Stubbing the web server’s resources |
127 |
|
|
Listing 6.3 Skeleton of the first test to verify that the WebClient works with a valid URL package junitbook.coarse.try1;
import java.net.URL;
import junit.framework.TestCase;
public class TestWebClientSkeleton extends TestCase
{
protected void setUp()
{
//Start Jetty and configure it to return "It works" when
//the http://localhost:8080/testGetContentOk URL is
//called.
}
protected void tearDown()
{
// Stop Jetty.
}
public void testGetContentOk() throws Exception
{
WebClient client = new WebClient();
String result = client.getContent(new URL( "http://localhost:8080/testGetContentOk"));
assertEquals ("It works", result);
}
}
In order to implement the setUp and tearDown methods, you have two solutions. You can prepare a static page containing the text It works that you put in your document root (controlled by the call to context.setResourceBase(String) in listing 6.2). Alternatively, you can configure Jetty to use your own custom Handler that returns the string directly instead of getting it from a file in the filesystem. This is a much more powerful technique, because it lets you unit-test the case when the remote HTTP server throws an error code at your WebClient client application.
Creating a Jetty handler
Listing 6.4 shows how to create a Jetty Handler that returns It works.

128CHAPTER 6
Coarse-grained testing with stubs
Listing 6.4 Create a Jetty Handler that returns It works when called
private class TestGetContentOkHandler extends AbstractHttpHandler |
|
b |
||||||
{ |
|
|
|
|
|
|
|
|
public void handle(String pathInContext, String pathParams, |
|
|
|
|||||
HttpRequest request, HttpResponse response) |
|
|
|
|
|
|
||
throws IOException |
|
|
|
|
|
|
|
|
{ |
|
|
|
|
|
|
|
|
OutputStream out = response.getOutputStream(); |
|
c |
|
|
|
|||
|
|
|
|
|||||
ByteArrayISO8859Writer writer = |
|
|
|
|
|
|
||
new ByteArrayISO8859Writer(); |
|
|
|
|
|
|
||
|
|
|
|
|
|
|||
writer.write("It works"); |
|
d |
|
|
|
|
|
|
|
|
|
|
|
|
|
||
writer.flush(); |
|
|
|
|
|
|
|
|
response.setIntField(HttpFields.__ContentLength, |
|
|
|
e |
||||
|
|
|
||||||
writer.size()); |
|
|
|
|
|
|||
|
|
|
|
|
|
|
|
|
writer.writeTo(out); |
|
|
|
|
|
|
|
|
out.flush(); |
|
|
|
|
|
|
|
|
request.setHandled(true); |
f |
|
|
|
|
|
|
|
} |
|
|
|
|
|
|
|
|
|
|
|
|
|
|
|
|
|
|
|
|
|
|
|
|
|
|
bHandlers are easily created by extending the Jetty AbstractHttpHandler class, which defines a single handle method you need to implement. This method is
called by Jetty when the incoming request is forwarded to your handler.
cUse the ByteArrayISO8859Writer class that Jetty provides to make it easy to send back your string in the HTTP response (d).
eSet the response content length to be the length of the string you wrote to the output stream (this is required by Jetty), and then send the response.
fTell Jetty that the request has been handled and does not need to be passed to any further handler.
Now that this handler is written, you can tell Jetty to use it by calling context.addHandler(new TestGetContentOkHandler()).
You are almost ready to run your test. The last issue to solve is the one involving setUp/tearDown methods. The solution shown in listing 6.3 isn’t great, because it means the server will be started and stopped for every single test. Although Jetty is very fast, this process is still not necessary. A better solution is to start the server only once for all the tests. Fortunately, JUnit supports doing this with the notion of TestSetup, which lets you wrap a whole suite of tests and have global setUp and tearDown methods for the suite.

Stubbing the web server’s resources |
129 |
|
|
Isolating each test vs. performance considerations
In previous chapters, we went to great lengths to explain why each test should run in a clean environment (even to the extent of using a new classloader instance). However, sometimes there are other considerations to take into account. Performance is a typical one. In the present case, even if starting Jetty takes only 1 second, once you have 300 tests, it will add an overtime of 300 seconds (5 minutes). Test suites that take a long time to execute are a handicap; you will be tempted not to execute them often, which negates the regression feature of unit testing. You must be aware of this tradeoff. Depending on the situation, you may choose to have longer-running tests that execute in a clean environment, or instead tune the tests for performance by reusing some parts of the environment. In the example at hand, you use different handlers for different tests, and you can be pretty confident they will not interfere with one another. Thus, going for faster running tests is probably the best option.
Starting and stopping Jetty once per test suite
Listing 6.5 shows the TestSetup with the methods to start and stop Jetty. It also configures Jetty with the TestGetContentOkHandler from listing 6.4.
Listing 6.5 Extending TestSetup to configure, start, and stop Jetty once per test suite
package junitbook.coarse.try1;
import java.io.IOException; import java.io.OutputStream;
import org.mortbay.http.HttpContext; import org.mortbay.http.HttpFields; import org.mortbay.http.HttpRequest; import org.mortbay.http.HttpResponse; import org.mortbay.http.HttpServer; import org.mortbay.http.SocketListener;
import org.mortbay.http.handler.AbstractHttpHandler; import org.mortbay.util.ByteArrayISO8859Writer;
import junit.extensions.TestSetup; |
|
|
|
|
|
|
Extend TestSetup to |
|
|
|
|
|
|
||
import junit.framework.Test; |
|
|
|
|
|
|
provide global |
public class TestWebClientSetup1 extends TestSetup b |
|
setUp and tearDown |
|||||
|
|||||||
{ |
|
|
|
|
|
|
|
protected static HttpServer server; |
c |
|
Save Jetty server |
||||
|
|||||||
|
|
|
|
|
object for use in |
||
public TestWebClientSetup1(Test suite) |
|
|
|
|
tearDown |
||
{ |
|
|
|
|
|
|
|
super(suite); |
|
|
|
|
|
|
|
} |
|
|
|
|
Configure and |
||
|
|
|
|
||||
protected void setUp() throws Exception |
d |
|
start Jetty |
||||
|
|||||||

130CHAPTER 6
Coarse-grained testing with stubs
{
server = new HttpServer();
SocketListener listener = new SocketListener(); listener.setPort(8080); server.addListener(listener);
HttpContext context1 = new HttpContext(); context1.setContextPath("/testGetContentOk"); context1.addHandler(new TestGetContentOkHandler()); server.addContext(context1);
server.start();
} |
|
|
|
protected void tearDown() throws Exception |
e Stop Jetty |
||
{ |
|
|
|
server.stop(); |
|
|
|
} |
|
|
|
private class TestGetContentOkHandler extends |
|
f |
Implement Jetty |
|
|||
AbstractHttpHandler |
|
|
Handler as an |
{ |
|
|
inner class |
|
|
||
public void handle(String pathInContext, String pathParams, HttpRequest request, HttpResponse response)
throws IOException
{
OutputStream out = response.getOutputStream(); ByteArrayISO8859Writer writer =
new ByteArrayISO8859Writer(); writer.write("It works"); writer.flush();
response.setIntField(HttpFields.__ContentLength, writer.size());
writer.writeTo(out);
out.flush(); request.setHandled(true);
}
}
}
bBy extending TestSetup, you need to implement a setUp method and a tearDown method. They are called at the beginning of the execution of the test suite and at
its end.
dIn the setUp method, you start Jetty and save a reference to the Jetty HttpServer object (c) for later use in the tearDown method.
e In the tearDown method, you stop the running server.
fImplement the content handler that returns It works when called as an inner class of TestSetup. (You use an inner class because the handler is strongly linked to the
Stubbing the web server’s resources |
131 |
|
|
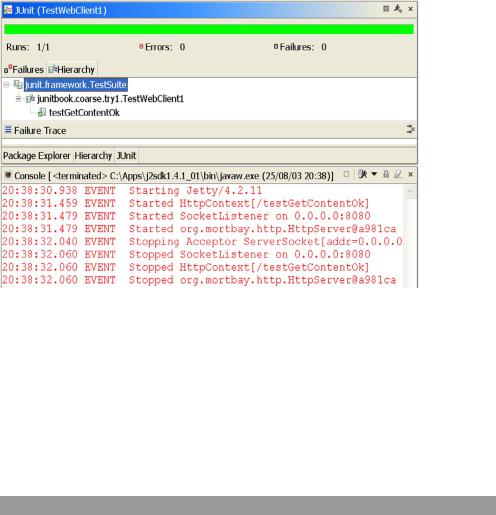
Figure 6.4 Result of the first working test using a Jetty stub. Jetty is automatically started before the test and stopped at the end.
Jetty configuration that is performed in the setUp method. However, you can implement it as a separate class, which may become cleaner should the number of handlers increase dramatically.)
Writing the Test class
The Test class can now be easily written using this TestWebClientSetup1 class, as demonstrated in listing 6.6. When you execute it, you now get the result shown in figure 6.4.
Listing 6.6 Putting it all together
package junitbook.coarse.try1;
import java.net.URL;
import junit.framework.Test; import junit.framework.TestCase; import junit.framework.TestSuite;
public class TestWebClient1 extends TestCase
{
public static Test suite()
{