

- •GENERAL SERVICE INFORMATION
- •VEHICLE IDENTIFICATION
- •SAFETY PRECAUTIONS AND WARNINGS
- •BODY DIAGNOSTIC PROCEDURES
- •WATER LEAKS
- •VISUAL INSPECTION BEFORE WATER LEAK TESTS
- •WATER LEAK TESTS
- •WATER LEAK DETECTION
- •MIRROR INSPECTION METHOD
- •BRIGHT LIGHT LEAK TEST METHOD
- •PRESSURIZED LEAK TEST METHOD
- •WIND NOISE
- •VISUAL INSPECTION BEFORE TESTS
- •ROAD TESTING WIND NOISE
- •PAINT
- •INTRODUCTION
- •PAINT AND TRIM CODE DESCRIPTIONS
- •POWER SUNROOF
- •GENERAL INFORMATION
- •LUBRICATION
- •DRAIN TUBES
- •GLASS VERTICAL HEIGHT ADJUSTMENT
- •GLASS VERTICAL ADJUSTMENT (FIG. 1)
- •WIND DEFLECTOR
- •WIND DEFLECTOR REMOVAL (FIG. 2)
- •WIND DEFLECTOR INSTALLATION
- •WIND DEFLECTOR ADJUSTMENT (FIG. 2)
- •GLASS PANEL
- •GLASS PANEL REMOVAL
- •GLASS PANEL INSTALLATION
- •ADJUSTMENT BRACKET
- •ADJUSTMENT BRACKET REMOVAL (FIG. 3)
- •ADJUSTMENT BRACKET INSTALLATION
- •DRAIN CHANNEL
- •DRAIN CHANNEL REMOVAL
- •DRAIN CHANNEL INSTALLATION
- •DRIVE CABLE LOCATORS
- •DRIVE CABLE LOCATORS REMOVAL (FIG. 4)
- •DRIVE CABLE LOCATORS INSTALLATION
- •MOTOR AND DRIVE GEARS
- •MOTOR AND DRIVE GEAR REMOVAL (FIG. 5)
- •MOTOR AND DRIVE GEAR INSTALLATION
- •DRIVE CABLES
- •DRIVE CABLES REMOVAL (FIG. 6)
- •DRIVE CABLES INSTALLATION
- •SUNSHADE
- •SUNSHADE REMOVAL (FIG. 7)
- •SUNSHADE INSTALLATION
- •GUIDE ASSEMBLY
- •GUIDE ASSEMBLY REMOVAL (FIG. 8)
- •GUIDE ASSEMBLY INSTALLATION
- •WINDSHIELD
- •SAFETY PRECAUTIONS AND WARNINGS
- •WINDSHIELD REMOVAL
- •WINDSHIELD INSTALLATION
- •GRILLE
- •REMOVAL (FIG. 1)
- •INSTALLATION
- •HOOD AND HINGES
- •HOOD REMOVAL (FIG. 2)
- •HOOD INSTALLATION
- •HOOD HINGE REMOVAL (FIG. 3)
- •HOOD HINGE INSTALLATION
- •HOOD LATCH AND RELEASE CABLE
- •HOOD LATCH REMOVAL (FIG. 4)
- •HOOD LATCH INSTALLATION
- •HOOD LATCH RELEASE CABLE REMOVAL (FIG. 5)
- •COWL COVER
- •REMOVAL (FIG. 6)
- •INSTALLATION
- •FRONT END SPLASH SHIELDS
- •TRANSAXLE SPLASH SHIELD REMOVAL (FIG. 7)
- •TRANSAXLE SPLASH SHIELD INSTALLATION
- •FRONT FENDER
- •REMOVAL (FIG. 9)
- •INSTALLATION
- •FRONT DOOR TRIM PANEL
- •DOOR TRIM PANEL WITH POWER WINDOWS REMOVAL (FIG. 10)
- •DOOR TRIM PANEL WITH POWER WINDOWS INSTALLATION
- •DOOR TRIM PANEL WITH MANUAL WINDOWS REMOVAL (FIG. 11)
- •DOOR TRIM PANEL WITH MANUAL WINDOWS INSTALLATION
- •FRONT DOOR SILENCER AND WATER SHIELD
- •REMOVAL (FIG. 12)
- •INSTALLATION
- •FRONT DOOR AND HINGE
- •FRONT DOOR REMOVAL (FIG. 13)
- •FRONT DOOR INSTALLATION
- •FRONT DOOR HINGE REMOVAL (FIG. 14)
- •FRONT DOOR HINGE INSTALLATION
- •OUTSIDE FRONT DOOR LATCH RELEASE HANDLE
- •OUTSIDE FRONT DOOR LATCH RELEASE HANDLE REMOVAL (FIG. 14)
- •FRONT DOOR LATCH
- •REMOVAL (FIG. 15)
- •INSTALLATION
- •FRONT DOOR SIDE VIEW MIRROR
- •REMOVAL (FIG. 16)
- •INSTALLATION
- •FRONT DOOR GLASS
- •REMOVAL (FIG. 17)
- •INSTALLATION
- •GLASS CHANNEL AND RUN WEATHERSTRIP REMOVAL (FIG. 19)
- •GLASS CHANNEL AND RUN WEATHERSTRIP INSTALLATION
- •FRONT DOOR GLASS RUN LOWER CHANNEL
- •FRONT OR REAR LOWER CHANNEL REMOVAL (FIG. 20)
- •MANUAL WINDOW REGULATOR REMOVAL (FIG. 21)
- •POWER WINDOW REGULATOR REMOVAL (FIG. 22)
- •POWER WINDOW REGULATOR INSTALLATION
- •FRONT POWER DOOR LOCK ACTUATOR
- •REMOVAL (FIG. 23)
- •INSTALLATION
- •REAR DOOR TRIM PANEL
- •DOOR TRIM PANEL WITH POWER WINDOWS REMOVAL (FIG. 24)
- •DOOR TRIM PANEL WITH POWER WINDOWS INSTALLATION
- •DOOR TRIM PANEL WITH MANUAL WINDOWS REMOVAL (FIG. 25)
- •DOOR TRIM PANEL WITH MANUAL WINDOWS INSTALLATION
- •REAR DOOR SILENCER AND WATER SHIELD
- •REMOVAL (FIG. 26)
- •INSTALLATION
- •REAR DOOR AND HINGE
- •REAR DOOR REMOVAL (FIG. 27)
- •REAR DOOR INSTALLATION
- •REAR DOOR HINGE REMOVAL (FIG. 27)
- •REAR DOOR HINGE INSTALLATION
- •OUTSIDE REAR DOOR LATCH RELEASE HANDLE
- •REMOVAL (FIG. 28)
- •INSTALLATION
- •REAR DOOR LATCH
- •REMOVAL (FIG. 29)
- •INSTALLATION
- •REAR POWER DOOR LOCK ACTUATOR
- •REMOVAL (FIG. 30)
- •INSTALLATION
- •REAR DOOR GLASS
- •REMOVAL (FIG. 31)
- •INSTALLATION
- •REAR DOOR GLASS RUN WEATHERSTRIP
- •REMOVAL (FIG. 33)
- •INSTALLATION
- •REAR DOOR GLASS STATIONARY GLASS MODULE
- •STATIONARY GLASS MODULE REMOVAL (FIG. 34)
- •STATIONARY GLASS MODULE INSTALLATION
- •MANUAL WINDOW REGULATOR REMOVAL (FIG. 35)
- •POWER WINDOW REGULATOR REMOVAL (FIG. 36)
- •POWER WINDOW REGULATOR INSTALLATION
- •DOOR OPENING WEATHERSTRIPS
- •BODY SIDE MOULDING AND APPLIQUE
- •WHEEL OPENING AND BODY SIDE MOULDING REMOVAL AND INSTALLATION (FIG. 38)
- •COWL PANEL TRIM AND SCUFF PLATES
- •COWL PANEL AND DOOR OPENING SCUFF PLATE REMOVAL (FIG. 39)
- •COWL PANEL AND DOOR OPENING SCUFF PLATE INSTALLATION
- •REAR DOOR ROOF RAIL MOULDING REMOVAL (FIG. 39)
- •QUARTER TRIM PANEL
- •REMOVAL (FIG. 39)
- •INSTALLATION
- •QUARTER EXTENSION TRIM PANEL
- •REMOVAL (FIG. 39)
- •INSTALLATION
- •REAR SHELF TRIM PANEL
- •REMOVAL (FIG. 39)
- •INSTALLATION
- •FRONT SEAT BELTS
- •REAR SEAT BELTS
- •FRONT SEATS
- •REMOVAL (FIG. 42 OR 43)
- •INSTALLATION
- •REAR SEATS
- •REAR SEAT CUSHION REMOVAL
- •REAR SEAT CUSHION INSTALLATION
- •REAR SEAT BACK REMOVAL (FIG. 44)
- •REAR SEAT BACK INSTALLATION
- •SEAT BACK BOLSTER CUSHION REMOVAL (FIG. 44)
- •FRONT CENTER CONSOLE
- •REMOVAL (FIG. 45)
- •INSTALLATION
- •FLOOR CARPET
- •REMOVAL (FIG. 46)
- •INSTALLATION
- •OVERHEAD CONSOLE
- •REMOVAL (FIG. 47)
- •INSTALLATION
- •HEAD LINING
- •REMOVAL (FIG. 48)
- •INSTALLATION
- •SUN ROOF WEATHERSTRIP
- •REMOVAL (FIG. 49)
- •INSTALLATION
- •SUN ROOF AIR DEFLECTOR
- •REMOVAL (FIG. 49)
- •INSTALLATION
- •SUN ROOF DRAIN TUBES
- •REMOVAL (FIG. 49)
- •INSTALLATION
- •VINYL ROOF BONNET
- •REMOVAL (FIG. 50)
- •INSTALLATION
- •REAR DECK FILLER PANEL
- •REMOVAL (FIG. 51)
- •INSTALLATION
- •REAR WINDOW GLASS
- •REMOVAL (FIG. 52)
- •INSTALLATION
- •TRUNK LID
- •REMOVAL (FIG. 53)
- •INSTALLATION
- •TRUNK LID HINGE
- •REMOVAL (FIG. 54)
- •INSTALLATION
- •TRUNK LID TORSION BAR
- •REMOVAL (FIG. 54)
- •INSTALLATION
- •TRUNK LID LATCH
- •REMOVAL (FIG. 55)
- •INSTALLATION
- •TRUNK LID LOCK
- •REMOVAL (FIG. 56)
- •INSTALLATION
- •REMOVAL (FIG. 56)
- •INSTALLATION
- •TRUNK OPENING WEATHERSTRIP
- •INSTALLATION
- •TRUNK LINING
- •REMOVAL (FIG. 58)
- •INSTALLATION
- •TRUNK LID LUGGAGE RACK
- •REMOVAL (FIG. 59)
- •INSTALLATION
- •FUEL FILL DOOR
- •REMOVAL (FIG. 60)
- •INSTALLATION
- •GRILLE REMOVAL (FIG. 1)
- •GRILLE INSTALLATION
- •GRILLE EXTENSION MOULDING
- •REMOVAL (FIG. 1)
- •INSTALLATION
- •GRILLE OPENING PANEL REMOVAL (FIG. 2)
- •GRILLE OPENING PANEL INSTALLATION
- •GRILLE REMOVAL (FIG. 3)
- •GRILLE INSTALLATION
- •HOOD ORNAMENT REMOVAL (FIG. 3)
- •HOOD ORNAMENT INSTALLATION
- •REMOVAL (FIG. 4)
- •INSTALLATION
- •HOOD AND HINGES
- •HOOD REMOVAL (FIG. 5)
- •HOOD INSTALLATION
- •HOOD HINGE REMOVAL (FIG. 6)
- •HOOD HINGE INSTALLATION
- •HOOD LATCH AND RELEASE CABLE
- •HOOD LATCH REMOVAL (FIG. 7)
- •HOOD LATCH INSTALLATION
- •HOOD LATCH RELEASE CABLE
- •REMOVAL (FIG. 8)
- •INSTALLATION
- •FRONT END SPLASH SHIELDS
- •FRONT WHEELHOUSE SPLASH SHIELD REMOVAL (FIG. 9)
- •FRONT WHEELHOUSE SPLASH SHIELD INSTALLATION
- •TRANSAXLE SPLASH SHIELD REMOVAL (FIG. 9)
- •TRANSAXLE SPLASH SHIELD INSTALLATION
- •ENGINE DRIVE BELT SPLASH SHIELD REMOVAL (FIG. 10)
- •ENGINE DRIVE BELT SPLASH SHIELD INSTALLATION
- •FRONT DOOR TRIM PANEL
- •TRIM PANEL REMOVAL (FIG. 11)
- •TRIM PANEL INSTALLATION
- •SIDE VIEW MIRROR TRIM COVER
- •REMOVAL
- •INSTALLATION
- •DOOR FRAME TRIM MOULDING
- •REMOVAL (FIG. 11)
- •INSTALLATION
- •FRONT DOOR WATER SHIELD
- •REMOVAL
- •INSTALLATION
- •FRONT DOOR AND HINGE
- •FRONT DOOR REMOVAL (FIG. 12)
- •FRONT DOOR INSTALLATION
- •FRONT DOOR HINGE REMOVAL (FIG. 12)
- •FRONT DOOR HINGE INSTALLATION
- •OUTSIDE DOOR HANDLE
- •REMOVAL (FIG. 13)
- •INSTALLATION
- •FRONT DOOR LATCH
- •REMOVAL (FIG. 14)
- •INSTALLATION
- •FRONT DOOR WINDOW REGULATOR
- •REMOVAL (FIG. 15 OR 16)
- •INSTALLATION
- •FRONT DOOR GLASS
- •REMOVAL
- •INSTALLATION
- •REAR DOOR TRIM PANEL
- •REMOVAL (FIG. 17)
- •INSTALLATION
- •REAR DOOR FRAME TRIM MOULDING
- •TRIM MOULDING REMOVAL (FIG. 17)
- •TRIM MOULDING INSTALLATION
- •REAR DOOR SILENCER AND WATER SHIELD
- •REAR DOOR WATER SHIELD REMOVAL
- •REAR DOOR SILENCER AND WATER SHIELD INSTALLATION
- •REAR DOOR AND HINGE
- •REAR DOOR REMOVAL (FIG. 18)
- •REAR DOOR INSTALLATION
- •REAR DOOR HINGE REMOVAL (FIG. 18)
- •REAR DOOR HINGE INSTALLATION
- •REAR DOOR OUTSIDE HANDLE
- •REMOVAL
- •INSTALLATION
- •REAR DOOR LATCH
- •REMOVAL
- •INSTALLATION
- •REAR DOOR GLASS
- •REMOVAL (FIG. 19)
- •INSTALLATION
- •REAR DOOR WINDOW REGULATOR
- •REMOVAL
- •INSTALLATION
- •REAR DOOR GLASS LIFT PLATE AND GUIDE BAR
- •REMOVAL
- •INSTALLATION
- •OVERHEAD CONSOLE
- •REMOVAL (FIG. 20)
- •INSTALLATION
- •HEAD LINING
- •REMOVAL (FIG. 21)
- •INSTALLATION
- •COWL PANEL TRIM AND SCUFF PLATES
- •COWL PANEL AND DOOR OPENING SCUFF PLATE REMOVAL (FIG. 22)
- •COWL PANEL AND DOOR OPENING SCUFF PLATE INSTALLATION
- •REAR DOOR OPENING SCUFF PLATE REMOVAL (FIG. 22)
- •REAR DOOR OPENING SCUFF PLATE INSTALLATION
- •REAR DOOR ROOF RAIL MOULDING REMOVAL (FIG. 22)
- •REAR DOOR ROOF RAIL MOULDING INSTALLATION
- •REMOVAL (FIG. 22)
- •INSTALLATION
- •QUARTER TRIM PANEL
- •REMOVAL (FIG. 22)
- •INSTALLATION
- •REAR SHELF TRIM PANEL
- •REMOVAL (FIG. 22)
- •INSTALLATION
- •FRONT SEAT BELTS
- •REAR SEAT BELTS
- •FRONT SEATS
- •REMOVAL (FIG. 25 OR 26)
- •INSTALLATION
- •REAR SEATS
- •REAR SEAT CUSHION REMOVAL
- •REAR SEAT CUSHION INSTALLATION
- •REAR SEAT BACK REMOVAL
- •REAR SEAT BACK INSTALLATION
- •BODY MOULDINGS
- •REAR WHEEL OPENING MOULDING REMOVAL
- •VINYL ROOF BONNET
- •REMOVAL (FIG. 27)
- •INSTALLATION
- •REAR DECK FILLER PANEL
- •REMOVAL (FIG. 28)
- •INSTALLATION
- •REAR WINDOW GLASS
- •REMOVAL (FIG. 29)
- •INSTALLATION
- •TRUNK LID
- •REMOVAL (FIG. 30)
- •INSTALLATION
- •TRUNK LID HINGE
- •REMOVAL
- •INSTALLATION
- •TRUNK LID TORSION BAR
- •REMOVAL
- •INSTALLATION
- •CLOSURE PANEL SIGHT SHIELD
- •REMOVAL (FIG. 1)
- •INSTALLATION
- •HOOD AND HINGES
- •HOOD REMOVAL (FIG. 2)
- •HOOD INSTALLATION
- •HOOD HINGE REMOVAL (FIG. 3)
- •HOOD HINGE INSTALLATION
- •HOOD LATCH AND RELEASE CABLE
- •HOOD LATCH REMOVAL (FIG. 4)
- •HOOD LATCH INSTALLATION
- •HOOD LATCH RELEASE CABLE REMOVAL (FIG. 5)
- •HOOD LATCH SAFETY CATCH
- •REMOVAL (FIG. 6)
- •INSTALLATION
- •HOOD APPLIQUE
- •REMOVAL (FIG. 7)
- •INSTALLATION
- •COWL COVER
- •REMOVAL (FIG. 8)
- •INSTALLATION
- •FRONT END SPLASH SHIELDS
- •REMOVAL (FIG. 9)
- •INSTALLATION
- •TRANSAXLE SPLASH SHIELD REMOVAL (FIG. 9)
- •TRANSAXLE SPLASH SHIELD INSTALLATION
- •ENGINE DRIVE BELT SPLASH SHIELD REMOVAL (FIG. 10)
- •ENGINE DRIVE BELT SPLASH SHIELD INSTALLATION
- •FRONT FENDER
- •REMOVAL (FIG. 11)
- •INSTALLATION
- •DOOR TRIM PANEL
- •REMOVAL (FIG. 12)
- •INSTALLATION
- •FRONT DOOR SILENCER AND WATER SHIELD
- •REMOVAL (FIG. 13)
- •INSTALLATION
- •FRONT DOOR AND HINGE
- •FRONT DOOR REMOVAL (FIG. 14)
- •FRONT DOOR INSTALLATION
- •FRONT DOOR HINGE REMOVAL (FIG. 14)
- •FRONT DOOR HINGE INSTALLATION
- •DOOR LATCH
- •REMOVAL
- •INSTALLATION
- •MANUAL WINDOW REGULATOR
- •REMOVAL
- •INSTALLATION
- •POWER WINDOW REGULATOR
- •REMOVAL (FIG. 15)
- •INSTALLATION
- •MANUAL WINDOW REGULATOR
- •REMOVAL (FIG. 16)
- •INSTALLATION
- •MANUAL WINDOW LIFT PLATE AND GUIDE
- •REMOVAL (FIG. 16)
- •INSTALLATION
- •DOOR GLASS
- •REMOVAL (FIG. 17)
- •INSTALLATION
- •GLASS RUN WEATHERSTRIP
- •REMOVAL
- •INSTALLATION
- •OUTSIDE DOOR LATCH RELEASE HANDLE
- •REMOVAL (FIG. 18)
- •INSTALLATION
- •INSIDE LATCH RELEASE HANDLE
- •REMOVAL
- •INSTALLATION
- •POWER DOOR LOCK ACTUATOR
- •REMOVAL (FIG. 19)
- •INSTALLATION
- •SIDE VIEW MIRROR
- •REMOVAL (FIG. 20)
- •INSTALLATION
- •DOOR GLASS OPENING MOULDING
- •REMOVAL
- •INSTALLATION
- •DOOR OPENING WEATHERSTRIPS
- •REMOVAL
- •INSTALLATION
- •BODY SIDE MOULDINGS
- •BODY SIDE APPLIQUE
- •REMOVAL (FIG. 23)
- •INSTALLATION
- •DOOR OPENING SCUFF PLATES
- •REMOVAL (FIG. 24)
- •INSTALLATION
- •LOWER QUARTER TRIM PANEL
- •REMOVAL (FIG. 24)
- •INSTALLATION
- •UPPER QUARTER TRIM PANEL
- •REMOVAL (FIG. 24)
- •INSTALLATION
- •LOWER TAIL PANEL TRIM COVER
- •REMOVAL (FIG. 24)
- •INSTALLATION
- •LIFT GATE TRIM
- •REMOVAL (FIG. 25)
- •INSTALLATION
- •FRONT SEAT BELTS
- •INBOARD BUCKLE REMOVAL (FIG. 26)
- •INBOARD BUCKLE INSTALLATION
- •REAR SEAT BELTS
- •REAR INBOARD BUCKLE REMOVAL (FIG. 27)
- •REAR INBOARD BUCKLE INSTALLATION
- •FRONT SEATS
- •REMOVAL (FIG. 28 OR 29)
- •INSTALLATION
- •REAR SEATS
- •REMOVAL (FIG. 30)
- •INSTALLATION
- •FRONT CENTER CONSOLE
- •REMOVAL (FIG. 31)
- •INSTALLATION
- •FLOOR CARPET
- •REMOVAL (FIG. 32)
- •INSTALLATION
- •OVERHEAD CONSOLE
- •REMOVAL (FIG. 33)
- •INSTALLATION
- •HEAD LINING
- •REMOVAL
- •INSTALLATION
- •SUNROOF LIFT CONTROL
- •REMOVAL (FIG. 34)
- •INSTALLATION
- •REAR WINDOW GLASS
- •REMOVAL (FIG. 35)
- •INSTALLATION
- •QUARTER GLASS MODULE
- •REMOVAL (FIG. 36)
- •INSTALLATION
- •ROOF SEAM MOLDING
- •REMOVAL (FIG. 37)
- •INSTALLATION
- •QUARTER PANEL SPOILER
- •REMOVAL (FIG. 38)
- •INSTALLATION
- •LIFT GATE SPOILER
- •REMOVAL (FIG. 39)
- •INSTALLATION
- •LIFT GATE PROP CYLINDER
- •REMOVAL (FIG. 40)
- •INSTALLATION
- •LIFT GATE
- •REMOVAL (FIG. 41)
- •INSTALLATION
- •LIFT GATE LATCH AND STRIKER
- •LIFT GATE LATCH REMOVAL (FIG. 42)
- •LIFT GATE STRIKER INSTALLATION
- •LIFT GATE LOCK CYLINDER
- •REMOVAL (FIG. 43)
- •INSTALLATION
- •FUEL FILL DOOR
- •REMOVAL (FIG. 44)
- •INSTALLATION
- •LIFT GATE AND FUEL FILL DOOR RELEASE CABLES
- •LIFT GATE AND FUEL FILL DOOR CABLES REMOVAL (FIG. 45)
- •LIFT GATE AND FUEL FILL DOOR CABLES INSTALLATION
- •TAIL LAMP CLOSURE PANEL
- •REMOVAL
- •INSTALLATION
- •GRILLE
- •REMOVAL (FIG. 1)
- •INSTALLATION
- •GRILLE OPENING PANEL
- •REMOVAL (FIG. 1)
- •INSTALLATION
- •HOOD AND HINGES
- •HOOD REMOVAL (FIG. 2)
- •HOOD INSTALLATION
- •HOOD HINGE REMOVAL (FIG. 3)
- •HOOD HINGE INSTALLATION
- •HOOD LATCH AND RELEASE CABLE
- •HOOD LATCH REMOVAL (FIG. 4)
- •HOOD LATCH INSTALLATION
- •HOOD LATCH RELEASE CABLE REMOVAL
- •COWL COVER
- •REMOVAL (FIG. 5)
- •INSTALLATION
- •FRONT END SPLASH SHIELDS
- •FRONT WHEELHOUSE SPLASH SHIELD REMOVAL (FIG. 6)
- •FRONT WHEELHOUSE SPLASH SHIELD INSTALLATION
- •TRANSAXLE SPLASH SHIELD REMOVAL (FIG. 6)
- •TRANSAXLE SPLASH SHIELD INSTALLATION
- •ENGINE DRIVE BELT SPLASH SHIELD REMOVAL (FIG. 7)
- •ENGINE DRIVE BELT SPLASH SHIELD INSTALLATION
- •DOOR TRIM PANEL
- •REMOVAL (FIG. 8)
- •INSTALLATION
- •FRONT DOOR SILENCER AND WATER SHIELD
- •REMOVAL (FIG. 9)
- •INSTALLATION
- •FRONT DOOR AND HINGE
- •FRONT DOOR REMOVAL (FIG. 10)
- •FRONT DOOR INSTALLATION
- •FRONT DOOR HINGE REMOVAL (FIG. 10)
- •FRONT DOOR HINGE INSTALLATION
- •DOOR LATCH
- •REMOVAL
- •INSTALLATION
- •WINDOW REGULATOR
- •REMOVAL
- •INSTALLATION
- •DOOR GLASS
- •REMOVAL
- •INSTALLATION
- •DOOR GLASS LIFT PLATE AND GUIDE POST
- •REMOVAL
- •INSTALLATION
- •REMOVAL
- •INSTALLATION
- •OUTSIDE DOOR LATCH RELEASE HANDLE
- •REMOVAL (FIG. 11)
- •INSTALLATION
- •INSIDE LATCH RELEASE HANDLE
- •REMOVAL
- •INSTALLATION
- •POWER DOOR LOCK ACTUATOR
- •REMOVAL
- •INSTALLATION
- •COWL PANEL TRIM AND SCUFF PLATES
- •COWL PANEL AND DOOR OPENING SCUFF PLATE REMOVAL (FIG. 12)
- •COWL PANEL AND DOOR OPENING SCUFF PLATE INSTALLATION
- •QUARTER TRIM PANEL
- •QUARTER TRIM PANEL REMOVAL (FIG. 12)
- •QUARTER TRIM PANEL INSTALLATION
- •QUARTER EXTENSION TRIM PANEL
- •REMOVAL (FIG. 13)
- •INSTALLATION
- •REAR SHELF TRIM PANEL
- •REMOVAL (FIG. 13)
- •INSTALLATION
- •FRONT SEAT BELTS
- •INBOARD SEAT BELT BUCKLE REMOVAL (FIG. 14)
- •INBOARD SEAT BELT BUCKLE INSTALLATION
- •REAR SEAT BELTS
- •FRONT SEATS
- •FRONT SEAT REMOVAL (FIG. 16 OR 17)
- •FRONT SEAT INSTALLATION
- •REAR SEATS
- •REAR SEAT CUSHION REMOVAL
- •REAR SEAT CUSHION INSTALLATION
- •REAR SEAT BACK REMOVAL (FIG. 18)
- •REAR SEAT BACK INSTALLATION
- •FRONT CENTER CONSOLE
- •REMOVAL (FIG. 19)
- •INSTALLATION
- •FLOOR CARPET
- •REMOVAL (FIG. 20)
- •INSTALLATION
- •OVERHEAD CONSOLE
- •REMOVAL (FIG. 21)
- •INSTALLATION
- •HEAD LINING
- •REMOVAL
- •INSTALLATION
- •SUN ROOF WEATHERSTRIP
- •REMOVAL (FIG. 22)
- •INSTALLATION
- •SUN ROOF AIR DEFLECTOR
- •REMOVAL (FIG. 22)
- •INSTALLATION
- •SUN ROOF DRAIN TUBES
- •REMOVAL (FIG. 22)
- •INSTALLATION
- •REAR WINDOW GLASS
- •REMOVAL (FIG. 23)
- •INSTALLATION
- •TRUNK LID
- •REMOVAL (FIG. 24)
- •INSTALLATION
- •TRUNK LID HINGE
- •REMOVAL
- •INSTALLATION
- •TRUNK LID TORSION BAR
- •REMOVAL
- •INSTALLATION
- •TRUNK LID LATCH
- •REMOVAL
- •INSTALLATION
- •TRUNK LID LOCK
- •REMOVAL
- •INSTALLATION
- •TRUNK OPENING WEATHERSTRIP
- •REMOVAL (FIG. 25)
- •INSTALLATION
- •TRUNK LID LUGGAGE RACK
- •REMOVAL (FIG. 26)
- •INSTALLATION
- •TRUNK LID AND FUEL FILL DOOR RELEASE CABLES
- •REMOVAL (FIG. 27)
- •INSTALLATION
- •FUEL FILL DOOR
- •REMOVAL (FIG. 28)
- •INSTALLATION
- •QUARTER GLASS MODULE
- •REMOVAL (FIG. 29)
- •INSTALLATION
- •ADJUSTMENT PROCEDURES
- •DOWEL PIN ADJUSTMENTS (FIG. 1)
- •LATCH HOOK ADJUSTMENT (FIG. 1)
- •FRONT TO CENTER RAIL ADJUSTMENT (FIG. 2)
- •TOP FRAME CAM ADJUSTMENT (FIG. 3)
- •CONTROL LINK ADJUSTMENT (FIG. 4)
- •CONVERTIBLE TOP DIMENSIONS
- •HYDRAULIC SYSTEMS
- •HYDRAULIC SYSTEM TESTS
- •HYDRAULIC PUMP ASSEMBLY
- •HYDRAULIC PUMP REMOVAL (FIG. 5)
- •HYDRAULIC PUMP INSTALLATION
- •HYDRAULIC CYLINDER
- •HYDRAULIC CYLINDER REMOVAL
- •HYDRAULIC CYLINDER INSTALLATION
- •HYDRAULIC PUMP LINE SEALS
- •HYDRAULIC PUMP LINE SEALS REMOVAL
- •HYDRAULIC CYLINDER LINE SEALS
- •REMOVAL
- •INSTALLATION
- •QUARTER WINDOW
- •REMOVAL
- •INSTALLATION
- •REAR SEAT BELT RETRACTORS
- •REMOVAL (FIG. 8)
- •INSTALLATION
- •GRILLE
- •REMOVAL (FIG. 1)
- •INSTALLATION
- •GRILLE OPENING PANEL
- •REMOVAL (FIG. 1)
- •INSTALLATION
- •HOOD AND HINGES
- •HOOD REMOVAL (FIG. 2)
- •HOOD INSTALLATION
- •HOOD HINGE REMOVAL (FIG. 3)
- •HOOD HINGE INSTALLATION
- •HOOD LATCH AND RELEASE CABLE
- •HOOD LATCH REMOVAL (FIG. 4)
- •HOOD LATCH INSTALLATION
- •HOOD LATCH RELEASE CABLE REMOVAL (FIG. 5)
- •FRONT END SPLASH SHIELDS
- •TRANSAXLE SPLASH SHIELD REMOVAL (FIG. 6)
- •TRANSAXLE SPLASH SHIELD INSTALLATION
- •DOOR TRIM PANEL REMOVAL (FIG. 8)
- •DOOR TRIM PANEL INSTALLATION
- •FRONT DOOR WATER SHIELD
- •REMOVAL
- •INSTALLATION
- •FRONT DOOR AND HINGE
- •FRONT DOOR REMOVAL (FIG. 9)
- •FRONT DOOR INSTALLATION
- •FRONT DOOR HINGE REMOVAL (FIG. 9)
- •FRONT DOOR HINGE INSTALLATION
- •OUTSIDE FRONT DOOR LATCH RELEASE HANDLE
- •REMOVAL (FIG. 10)
- •INSTALLATION
- •FRONT DOOR LATCH
- •REMOVAL (FIG. 11)
- •INSTALLATION
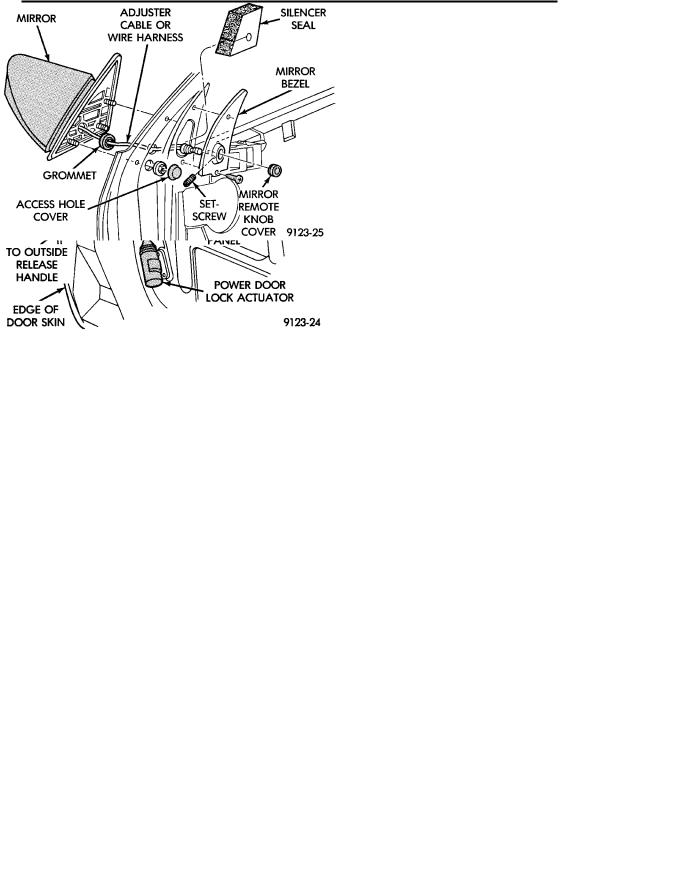
- •FRONT DOOR SIDE VIEW MIRROR
- •REMOVAL (FIG. 12)
- •INSTALLATION
- •FRONT DOOR GLASS
- •REMOVAL (FIG. 13)
- •INSTALLATION
- •FRONT POWER DOOR LOCK ACTUATOR
- •REMOVAL (FIG. 14)
- •INSTALLATION
- •BELT MOULDING AND WEATHERSTRIP REMOVAL
- •BELT MOULDING AND WEATHERSTRIP INSTALLATION
- •FRONT DOOR GLASS CHANNEL AND RUN WEATHERSTRIP
- •GLASS CHANNEL AND RUN WEATHERSTRIP REMOVAL (FIG. 15)
- •GLASS CHANNEL AND RUN WEATHERSTRIP INSTALLATION
- •FRONT DOOR GLASS RUN LOWER CHANNELS
- •FRONT OR REAR LOWER CHANNEL REMOVAL (FIG. 16)
- •FRONT OR REAR LOWER CHANNEL INSTALLATION
- •MANUAL WINDOW REGULATOR REMOVAL (FIG. 17)
- •POWER WINDOW REGULATOR REMOVAL (FIG. 18)
- •POWER WINDOW REGULATOR INSTALLATION
- •REAR DOOR TRIM PANEL
- •REMOVAL (FIG. 19)
- •INSTALLATION
- •REAR DOOR SILENCER AND WATER SHIELD
- •REMOVAL (FIG. 20)
- •INSTALLATION
- •REAR DOOR AND HINGE
- •REAR DOOR REMOVAL (FIG. 21)
- •REAR DOOR INSTALLATION
- •REAR DOOR HINGE REMOVAL (FIG. 21)
- •REAR DOOR HINGE INSTALLATION
- •OUTSIDE REAR DOOR LATCH RELEASE HANDLE
- •REMOVAL (FIG. 22)
- •INSTALLATION
- •REAR DOOR LATCH
- •REMOVAL (FIG. 23)
- •INSTALLATION
- •REAR POWER DOOR LOCK ACTUATOR
- •REMOVAL (FIG. 24)
- •INSTALLATION
- •REAR DOOR GLASS
- •REMOVAL (FIG. 25)
- •INSTALLATION
- •REMOVAL
- •INSTALLATION
- •REAR DOOR GLASS RUN WEATHERSTRIP
- •REMOVAL
- •INSTALLATION
- •REAR DOOR STATIONARY GLASS
- •STATIONARY GLASS REMOVAL
- •STATIONARY GLASS INSTALLATION
- •MANUAL WINDOW REGULATOR REMOVAL (FIG. 26)
- •POWER WINDOW REGULATOR REMOVAL
- •POWER WINDOW REGULATOR INSTALLATION
- •DOOR OPENING WEATHERSTRIPS
- •FRONT OR REAR DOOR OPENING WEATHERSTRIP REMOVAL (FIG. 27)
- •QUARTER GLASS WINDOW
- •REMOVAL (FIG. 28)
- •INSTALLATION
- •QUARTER GLASS WEATHERSTRIP
- •REMOVAL (FIG. 29)
- •INSTALLATION
- •BODY SIDE MOULDING AND APPLIQUE
- •APPLIQUE MOULDING AND RETAINER REMOVAL
- •APPLIQUE MOULDING AND RETAINER INSTALLATION
- •COWL PANEL TRIM AND SCUFF PLATES
- •COWL PANEL AND DOOR OPENING SCUFF PLATE REMOVAL (FIG. 30 OR 31)
- •COWL PANEL AND DOOR OPENING SCUFF PLATE INSTALLATION
- •REMOVAL (FIG. 30)
- •INSTALLATION
- •REMOVAL (FIG. 30)
- •INSTALLATION
- •REMOVAL (FIG. 30)
- •INSTALLATION
- •REMOVAL (FIG. 31)
- •INSTALLATION
- •FRONT INBOARD BUCKLE REMOVAL (FIG. 32)
- •FRONT INBOARD BUCKLE INSTALLATION
- •FRONT INBOARD BUCKLE REMOVAL (FIG. 33)
- •FRONT INBOARD BUCKLE INSTALLATION
- •REA R SEAT BELTS
- •FRONT SEATS
- •REMOVAL (FIG. 35 OR 36)
- •INSTALLATION
- •REAR SEATS
- •REAR SEAT CUSHION REMOVAL
- •REAR SEAT CUSHION INSTALLATION
- •REAR SEAT BACK REMOVAL (FIG. 37)
- •REAR SEAT BACK INSTALLATION
- •SEAT BACK BOLSTER CUSHION REMOVAL (FIG. 37)
- •FRONT CENTER CONSOLE
- •REMOVAL (FIG. 38)
- •INSTALLATION
- •FLOOR CARPET
- •REMOVAL (FIG. 39)
- •INSTALLATION
- •OVERHEAD CONSOLE
- •REMOVAL (FIG. 40)
- •INSTALLATION
- •HEAD LINING
- •REMOVAL (FIG. 41)
- •INSTALLATION
- •SUN ROOF WEATHERSTRIP
- •REMOVAL (FIG. 42)
- •INSTALLATION
- •SUN ROOF AIR DEFLECTOR
- •REMOVAL (FIG. 42)
- •INSTALLATION
- •SUN ROOF DRAIN TUBES
- •REMOVAL (FIG. 42)
- •INSTALLATION
- •LIFT GATE REMOTE RELEASE CABLE
- •REMOVAL
- •INSTALLATION
- •REAR WINDOW GLASS
- •REMOVAL (FIG. 43)
- •INSTALLATION
- •LIFT GATE LUGGAGE RACK
- •REMOVAL (FIG. 44)
- •INSTALLATION
- •GENERAL INFORMATION
- •WINDSHIELD HEADER MOULDING
- •REMOVAL (FIG. 1)
- •INSTALLATION
- •WINDSHIELD HEADER LINING
- •REMOVAL (FIG. 1)
- •INSTALLATION
- •REMOVAL (FIG. 2)
- •INSTALLATION
- •ROOF RAIL WEATHERSTRIP
- •REMOVAL (FIG. 3)
- •INSTALLATION
- •TOP HEADER TRIM COVER
- •REMOVAL (FIG. 4)
- •INSTALLATION
- •TOP LATCH
- •REMOVAL (FIG. 5)
- •INSTALLATION
- •CONVERTIBLE TOP HEADER
- •REMOVAL
- •INSTALLATION
- •SECOND ROOF BOW AND LINKAGE
- •REMOVAL
- •INSTALLATION
- •THIRD ROOF BOW
- •REMOVAL
- •INSTALLATION
- •FOURTH ROOF BOW AND SLAT
- •REMOVAL (FIG. 11)
- •INSTALLATION
- •FORWARD ROOF RAIL
- •REMOVAL
- •INSTALLATION
- •ROOF LINKAGE
- •REMOVAL (FIG. 12)
- •INSTALLATION
- •REAR ROOF RAIL
- •REMOVAL (FIG. 13)
- •INSTALLATION
- •REMOVAL (FIG. 14)
- •INSTALLATION
- •TOP LIFT ASSIST CYLINDER
- •REMOVAL (FIG. 16)
- •INSTALLATION
- •REAR WINDOW
- •REMOVAL (FIG. 17)
- •INSTALLATION
- •TOP COVER
- •REMOVAL (FIG. 18)
- •INSTALLATION
- •REMOVAL
- •INSTALLATION
- •TOP FRAME
- •REMOVAL
- •INSTALLATION
- •FRONT DOOR GLASS
- •REMOVAL
- •INSTALLATION
- •FRONT DOOR STATIONARY GLASS AND DIVISION CHANNEL
- •REMOVAL
- •INSTALLATION
- •FRONT DOOR STATIONARY GLASS CHANNEL WEATHERSTRIP
- •REMOVAL
- •INSTALLATION
- •DOOR GLASS REAR CHANNEL
- •REMOVAL (FIG. 25)
- •INSTALLATION
- •REMOVAL (FIG. 26)
- •INSTALLATION
- •FRONT DOOR STRIKER GUIDE SOCKET
- •REMOVAL (FIG. 27)
- •INSTALLATION
- •REAR SEAT BACK
- •REMOVAL (FIG. 28)
- •INSTALLATION
- •QUARTER TRIM PANEL
- •REMOVAL (FIG. 29)
- •INSTALLATION
- •DOOR STRIKER GUIDE
- •REMOVAL (FIG. 30)
- •INSTALLATION
- •FRONT SEAT BELT RETRACTOR
- •REMOVAL (FIG. 31)
- •INSTALLATION
- •REAR SEAT BELT RETRACTOR
- •REMOVAL (FIG. 32)
- •INSTALLATION
- •QUARTER PANEL BELT MOULDING
- •REMOVAL (FIG. 33)
- •INSTALLATION
- •TRUNK LID LINING
- •REMOVAL (FIG. 34)
- •INSTALLATION
- •TRUNK LID APPLIQUE
- •REMOVAL (FIG. 35)
- •INSTALLATION
- •TRUNK OPENING WEATHERSTRIP
- •REMOVAL (FIG. 36)
- •INSTALLATION
- •TRUNK LID
- •REMOVAL (FIG. 37)
- •INSTALLATION
- •TRUNK HINGE LID
- •REMOVAL (FIG. 38)
- •INSTALLATION
- •CONVERTIBLE TOP ADJUSTMENTS
- •DOOR GLASS ALIGNMENT
- •DIVISION BAR ALIGNMENT
- •CONVERTIBLE TOP LATCH HOOKS
- •ROOF RAIL WEATHERSTRIP RETAINER
- •QUARTER GLASS AND ROLLER BRACKET
- •QUARTER GLASS
- •ROLLER BRACKET
- •FOURTH ROOF BOW SLAT
- •REAR TENSIONER PLATE
- •REMOVAL (FIG. 1)
- •INSTALLATION
- •REMOVAL (FIG. 2)
- •INSTALLATION
- •REMOVAL (FIG. 2)
- •INSTALLATION
- •REMOVAL (FIG. 3)
- •INSTALLATION
- •REMOVAL (FIG. 4)
- •INSTALLATION
- •HOOD AND HINGES
- •HOOD REMOVAL (FIG. 5)
- •HOOD INSTALLATION
- •HOOD HINGE REMOVAL (FIG. 6)
- •HOOD HINGE INSTALLATION
- •HOOD LATCH AND RELEASE CABLE
- •HOOD LATCH REMOVAL (FIG. 7)
- •HOOD LATCH INSTALLATION
- •HOOD LATCH RELEASE CABLE REMOVAL (FIG. 8)
- •FRONT END SPLASH SHIELDS
- •FRONT WHEELHOUSE SPLASH SHIELD REMOVAL (FIG. 9)
- •FRONT WHEELHOUSE SPLASH SHIELD INSTALLATION
- •TRANSAXLE SPLASH SHIELD REMOVAL (FIG. 9)
- •TRANSAXLE SPLASH SHIELD INSTALLATION
- •ENGINE DRIVE BELT SPLASH SHIELD REMOVAL (FIG. 10)
- •ENGINE DRIVE BELT SPLASH SHIELD INSTALLATION
- •FRONT DOOR TRIM PANEL
- •TRIM PANEL REMOVAL (FIG. 11)
- •TRIM PANEL INSTALLATION
- •SIDE VIEW MIRROR TRIM COVER
- •REMOVAL
- •INSTALLATION
- •DOOR FRAME TRIM MOULDING
- •REMOVAL (FIG. 11)
- •INSTALLATION
- •FRONT DOOR SILENCER AND WATER SHIELD
- •REMOVAL
- •INSTALLATION
- •FRONT DOOR AND HINGE
- •FRONT DOOR REMOVAL (FIG. 12)
- •FRONT DOOR INSTALLATION
- •FRONT DOOR HINGE REMOVAL (FIG. 12)
- •FRONT DOOR HINGE INSTALLATION
- •OUTSIDE DOOR HANDLE
- •REMOVAL (FIG. 13)
- •INSTALLATION
- •FRONT DOOR LATCH
- •REMOVAL (FIG. 14)
- •INSTALLATION
- •FRONT DOOR WINDOW REGULATOR
- •REMOVAL (FIG. 15 OR 16)
- •INSTALLATION
- •FRONT DOOR GLASS
- •REMOVAL
- •INSTALLATION
- •REAR DOOR TRIM PANEL
- •REMOVAL (FIG. 17)
- •INSTALLATION
- •REAR DOOR FRAME TRIM MOULDING
- •TRIM MOULDING REMOVAL
- •TRIM MOULDING INSTALLATION
- •REAR DOOR SILENCER AND WATER SHIELD
- •REMOVAL
- •INSTALLATION
- •REAR DOOR AND HINGE
- •REAR DOOR REMOVAL (FIG. 18)
- •REAR DOOR INSTALLATION
- •REAR DOOR HINGE REMOVAL (FIG. 18)
- •REAR DOOR HINGE INSTALLATION
- •REAR DOOR OUTSIDE HANDLE
- •REMOVAL
- •INSTALLATION
- •REAR DOOR LATCH
- •REMOVAL
- •INSTALLATION
- •REAR DOOR GLASS
- •REMOVAL (FIG. 19)
- •INSTALLATION
- •REAR DOOR WINDOW REGULATOR
- •REMOVAL
- •INSTALLATION
- •REAR DOOR GLASS LIFT PLATE AND GUIDE BAR
- •REMOVAL (FIG. 19)
- •INSTALLATION
- •REMOVAL (FIG. 20)
- •INSTALLATION
- •REMOVAL (FIG. 21)
- •INSTALLATION
- •REAR DOOR FIXED WINDOW MODULE
- •REMOVAL (FIG. 22)
- •INSTALLATION
- •OVERHEAD CONSOLE
- •REMOVAL (FIG. 23)
- •INSTALLATION
- •HEAD LINING
- •REMOVAL (FIG. 24)
- •INSTALLATION
- •COWL PANEL TRIM AND SCUFF PLATES
- •COWL PANEL AND DOOR OPENING SCUFF PLATE REMOVAL (FIG. 25)
- •COWL PANEL AND DOOR OPENING SCUFF PLATE INSTALLATION
- •REAR DOOR ROOF RAIL MOULDING REMOVAL (FIG. 25)
- •REMOVAL (FIG. 25)
- •INSTALLATION
- •QUARTER TRIM PANEL
- •REMOVAL (FIG. 25)
- •INSTALLATION
- •REAR SHELF TRIM PANEL
- •REMOVAL (FIG. 25)
- •INSTALLATION
- •FRONT SEAT BELTS
- •REAR SEAT BELTS
- •FRONT SEATS
- •REMOVAL (FIG. 28 OR 29)
- •INSTALLATION
- •REAR SEATS
- •REAR SEAT CUSHION REMOVAL
- •REAR SEAT CUSHION INSTALLATION
- •REAR SEAT BACK REMOVAL
- •REAR SEAT BACK INSTALLATION
- •BODY MOULDINGS
- •FRONT WHEEL OPENING MOULDING REMOVAL
- •FRONT WHEEL OPENING MOULDING INSTALLATION
- •REAR WHEEL OPENING MOULDING REMOVAL
- •REAR WHEEL OPENING MOULDING INSTALLATION
- •VINYL ROOF BONNET
- •REMOVAL (FIG. 30)
- •INSTALLATION
- •REAR DECK FILLER PANEL
- •REMOVAL (FIG. 31)
- •INSTALLATION
- •REAR WINDOW GLASS
- •REMOVAL (FIG. 32)
- •INSTALLATION
- •TRUNK LID
- •REMOVAL (FIG. 33)
- •INSTALLATION
- •TRUNK LID HINGE
- •REMOVAL
- •INSTALLATION
- •TRUNK LID TORSION BAR
- •REMOVAL
- •INSTALLATION
Ä
OUTSIDE FRONT DOOR LATCH RELEASE HANDLE
REMOVAL (FIG. 10)
(1)Remove front door trim panel, silencer pad, and water shield.
(2)Raise door glass to full up position.
(3)Disconnect security alarm switch and illuminated entry switch from back of outside front door latch release handle, if equipped. For additional information refer to Group 8Q, Vehicle Theft Security System
(4)Disconnect lock rod and latch release rod from door latch assembly.
(5)Remove nuts holding outside door latch handle to retainer bracket and separate bracket from door.
(6)Swing lock rod upward, parallel to back of latch handle, and separate latch handle from door panel.
INSTALLATION
Reverse the preceding operation.
Fig. 10 Outside Front Door Latch Release
HandleÐTypical
FRONT DOOR LATCH
REMOVAL (FIG. 11)
(1)Remove front door trim panel, silencer pad and water shield.
(2)Raise door glass to full up position.
(3)Disconnect all actuator rods from door latch assembly.
(4)Remove screws holding door latch assembly to inner door rear panel and separate latch from door.
INSTALLATION
Reverse the preceding operation.
FRONT DOOR SIDE VIEW MIRROR
REMOVAL (FIG. 12)
(1) Remove front door trim panel.
AP-BODY 23 - 95
Fig. 11 Front Door LatchÐTypical
(2)Remove side view mirror remote adjusting knob cover, if equipped.
(3)Remove screws holding mirror bezel to door frame and separate bezel from door. Loosen set-screw holding bezel to mirror adjuster cable, if equipped.
(4)Remove silencer seal from door frame behind mirror bezel.
(5)Disconnect power mirror wire connector, if equipped.
(6)Remove access hole cover.
(7)Remove nuts holding mirror to door frame and separate mirror from door.
INSTALLATION
Reverse the preceding operation.
Fig. 12 Front Door Side View MirrorÐTypical