


Chapter 4
Embracing Tracks and Regions
In This Chapter
\Understanding how tracks and regions work \Adjusting your tempo and time signature \Saving track settings for instant recall \Editing and looping regions
Tracks and regions are the basic building blocks of your project. You can have up to 255 audio tracks and 255 software instrument tracks in a proj-
ect, so it’s safe to say that you won’t ever run out of tracks.
Each track gives you independent control over the sound and placement of a single sound source. These days, multitrack recording might not seem like
such a big deal because your iPhone has similar capabilities, but it wasn’t that long ago when multitrack recording didn’t exist. Now we have nondestructive recording and editing with 200 steps of undo history. It’s tempting to say with a straight face that you can record better than The Beatles.
Regions are objects on your tracks that you create, edit, and manipulate until your ear is content. Regions are versatile containers for your creative ideas.
In this chapter, you find out about several track types and region types as well as gain some basic region editing skills.
Knowing Your Track Types
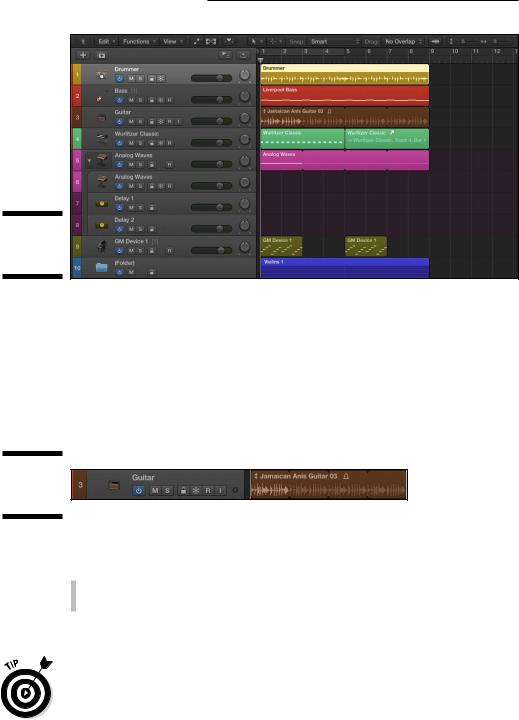
As described in Chapter 3, the tracks you create are added to the vertical track list to the left of the tracks area, as shown in Figure 4-1. You create more tracks by clicking the new tracks (plus sign) icon at the top of the track list or by choosing Tracks New Tracks. You can also create specific track types with key commands and with the Tracks menu.
In this section, you discover what the different track types do and how to create them.
62 |
Part I: Leaping into Logic Pro X |
Figure 4-1:
The track list.
Audio track
An audio track, like the one shown in Figure 4-2, can contain audio regions, audio Apple loops, and imported audio files. You use an audio track when you want to record a live instrument or a microphone, as described in Chapter 6. You can also import prerecorded audio files and loops into your project, as described in Chapter 8.
Figure 4-2:
An audio track.
\\
To create an audio track, do one of the following:
\\Press Option- -A.
\\Choose Track New Audio Track.
You can edit audio tracks by using the audio track editor or the audio file editor. For more on editing audio, see Chapter 14.
\You can spot an audio track by the audio waveforms in the track’s regions, as
shown in Figure 4-2.
Chapter 4: Embracing Tracks and Regions |
63 |
Software instrument track
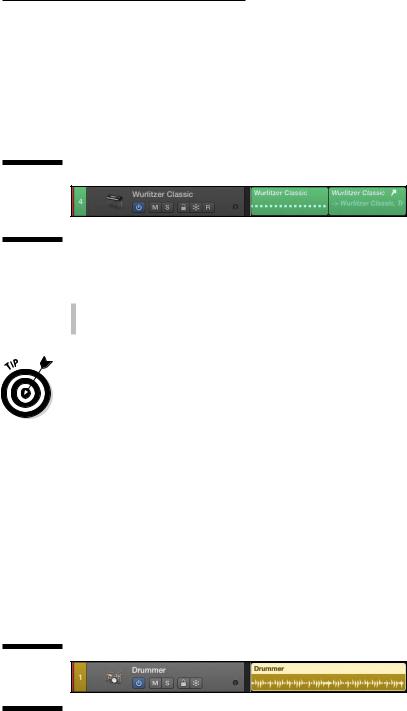
A software instrument track, shown in Figure 4-3, can contain MIDI regions, MIDI Apple loops, and imported MIDI files. You use a software instrument track when you want to record one of Logic Pro’s software instruments or a third-party software instrument that you’ve installed.
Figure 4-3:
A software instrument track.
\\
To create a new software instrument track, do one of the following:
\\Press Option- -S.
\\Choose Track New Software Instrument Track.
\Logic Pro is compatible with third-party Audio Unit (AU) instruments. Audio Units are Apple’s own plug-in format. The marketplace for Audio Unit instru-
ments and effects is massive. Lots of great developers are out there to help you bring your imagination into reality.
You record MIDI data on software instrument tracks, which are covered in Chapter 6. You can edit software instrument tracks by using the piano roll editor, score editor, and step editor, which you will learn about in Chapter 15.
Drummer track
A drummer track is used when you want to add a virtual drummer to your project. The drummer track, shown in Figure 4-4, won’t let you play its drums (sounds like a lot of drummers I know); the only way to control a drum-
mer track is in the dedicated drummer editor, which you’ll learn about in Chapter 9.
Figure 4-4:
A drummer track.
\\
64 |
Part I: Leaping into Logic Pro X |
To create a drummer track, choose Track New Drummer Track. Logic Pro doesn’t have a built-in key command for this option, so why not create one now? I chose Shift-Option- -D for my key command. (For information on creating key commands, see Chapter 3.)
You learn how to make beats with Drummer in Chapter 9. Drummer, which is new to Logic Pro X, plays and sounds amazing. Because Drummer was created using human drummers and recording engineers, it sounds natural. It can even respond to a track of your choosing. Artificial intelligence has arrived and it’s got rhythm.
\ |
|
You can have only one drummer track per project. If you would like to add |
|
|
a second drummer track, you can convert the first drummer track to MIDI |
|
|
regions, but you will no longer be able to use the drummer editor and you’ll |
|
|
have to use the regular MIDI editors to control the performance. All this is |
|
|
|
|
|
discussed in Chapter 9. |
External MIDI track
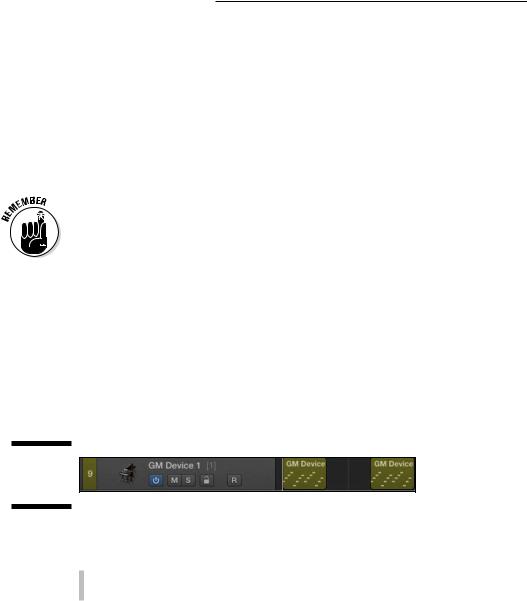
An external MIDI track, shown in Figure 4-5, can contain MIDI regions. Use an external MIDI track when you need to send MIDI data to an external device such as a synthesizer or a drum machine. External MIDI tracks make no sound of their own, so you must send the MIDI data out to your MIDI device and receive the audio signal from your MIDI device on a separate audio track.
Figure 4-5:
An external
MIDI track.
\\
To create a new external MIDI track, do one of the following:
\\Press Option- -X.
\\Choose Track New External MIDI Track.
In the tracks area, external MIDI tracks look and behave a lot like software instrument tracks, because they both contain MIDI data. But if you open the inspector (press I), you’ll see that the channel strip of an external MIDI track looks very different than a software instrument track. The external MIDI track has no audio capabilities and no plug-ins. A MIDI channel strip, covered in Chapter 16, is used to route MIDI data through a MIDI port on a MIDI channel. Using different MIDI ports and MIDI channels allows you to build a project that can communicate with many different external instruments, up to 16 channels per instrument.
|
|
|
|
Chapter 4: Embracing Tracks and Regions |
65 |
|
|
|
|
||
\ |
|
|
External MIDI tracks only send MIDI data out of Logic Pro. If you want to |
|
|
|
|
|
receive the audio signal from the external MIDI device, you must create a sepa- |
|
|
|
|
|
rate audio track to monitor or record the audio. |
|
|
|
|
|
|
||
Track stacks
Track stacks, an innovation in Logic Pro X, help you organize your tracks by placing them as subtracks within a main track. You expand and collapse the track stack by using the disclosure triangle, as shown in Figure 4-6.
Figure 4-6:
A track stack.
Two types of track stacks are available:
\\Folder stack: A folder stack can control the volume of all the tracks in
the track stack. All the tracks can be automated, soloed, muted, and grouped as a whole. But folder stacks can’t be saved as patches and you can’t add effects to the entire group or control their audio output as a group.
\\Summing stack: This stack routes audio, saves all tracks and their set-
tings, and can be saved as a patch for later recall. All tracks in a summing stack send their audio outputs to a collective auxiliary track. You find out more about audio routing and auxiliary tracks in Chapter 16.
|
To create a track stack, follow these steps: |
\ |
1.\ Select the tracks you want to include in the track stack. |
\ |
To select more than one track at a time, hold down the key while |
|
making your selections. |
\ |
2.\ Press Shift- -D or choose Track Create Track Stack. |
\ |
3.\ Select the type of track stack you want to create. |
\ |
Your choices are Folder Stack or Summing Stack. |

66 |
Part I: Leaping into Logic Pro X |
\4.\ Click Create.
\ |
The tracks are now grouped in a track stack. |
|
You can remove the tracks from a track stack by selecting the track stack and |
|
choosing Track Flatten Stack or pressing Shift- -U. |
|
As mentioned previously in this section, summing track stacks can be saved |
|
as a patch for instant recall. For example, you can build an entire orches- |
|
tral project with dozens of software instrument tracks (as described in |
|
Chapter 12) and save the tracks as a patch. Your orchestral track stack is |
|
then available for all your projects. Like smart controls, track stacks deliver a |
|
more productive workflow. |
|
To save a summing track stack as a patch, follow these steps: |
\ |
1.\ Select the summing track stack in the track list. |
\2.\ Open the library by pressing Y or by choosing View Show Library.
\3.\ Click the Save button at the bottom of the library and name your
patch.
\4.\ Click Save.
\ |
Your patch is now saved in the library. |
To load a patch on a selected track, simply select the patch in the library.
Folder track
A folder track is similar to a track stack, but folder tracks are focused more on regions. Track stacks organize tracks; folders organize regions. A folder track, shown in Figure 4-7, can contain multiple tracks and their regions but doesn’t have its own channel strip.
Figure 4-7:
Afolder
\track.\