

Chapter 9: Making Beats with Drummer and Ultrabeat 141
Converting drummer regions to MIDI regions
If you need absolute control over a drummer region, you can convert it to a MIDI region. Two methods are available for converting a drummer region to MIDI:
\\Drag any drummer region to MIDI track. The region will automatically
\\ -click a drummer region and choose Convert Convert to MIDI Region.convert to a MIDI region.
The region will convert to MIDI, and the drummer editor will no longer be available.
\You can convert a MIDI region on a drummer track back to a drummer region by -clicking the region and choosing Convert Convert to Drummer Region.
However, any edits you made to the MIDI region will not be saved after the conversion.
Creating Beats with Ultrabeat
Ultrabeat is a 25-voice drum synth and pattern sequencer that operates similarly to a traditional hardware drum machine. Drum voices 1–24 are assigned to the first 24 MIDI keys (C1 to B2), and the 25th drum voice is assigned to the 25th MIDI key and above (beginning at C3), so it can be played chromatically, making it ideal for bass sounds, pads, or leads.
Ultrabeat is capable of doing a lot more than drumbeats and bass lines. Each of the 25 voices is a complete synth and gives you flexible control over each voice. In this section, you discover how to design drum sounds and patterns and incorporate Ultrabeat into your projects.
Exploring the Ultrabeat interface
To open Ultrabeat, follow these steps:
\1.\ Choose Track Create New Software Instrument Track.
\ |
A new software instrument track is added to the track list. |
\ |
2.\ Choose View Show Inspector (I) to display the inspector. |
\ |
The inspector opens on the left side of the tracks area. |
142 Part III: Making Music with Virtual Instruments
\3.\ Click the right side of the instrument slot and then select Ultrabeat
(Drum Synth).
\ |
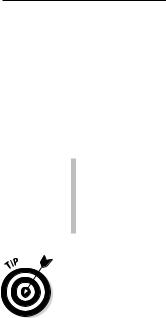
The Ultrabeat interface opens in a new window, as shown in Figure 9-9. |
Figure 9-9:
The Ultrabeat interface.
The Ultrabeat interface is divided into three sections:
\\Assignment: The left side of Ultrabeat is where you, select, mix, and
assign drum sounds.
\\Synthesizer: The largest area of Ultrabeat is where you design the cur-
rently selected drum sound.
\\Step Sequencer: The bottom section of Ultrabeat is where you create
drum patterns for the currently selected drum and control the Ultrabeat sequencer.

Chapter 9: Making Beats with Drummer and Ultrabeat 143
At the top of the Ultrabeat interface is a menu with several functions:
\\Voice auto select: Turning on voice auto select allows you to select
drum voices with your MIDI controller. This feature is useful when you’re going back and forth between two sounds. You can use one hand to select the drum voice with your MIDI controller while editing the synth section with your other hand.
\\Import: Click the Import button to import sounds and sequences from
other Ultrabeat drum kits as well as EXS24 sampler instruments. For more on the EXS24 sampler, see Chapter 11.
\\MIDI controller assignment: You can assign MIDI controllers to the four
controller slots, which allows you to modulate the synthesizer section.
Choosing sounds in the assignment section
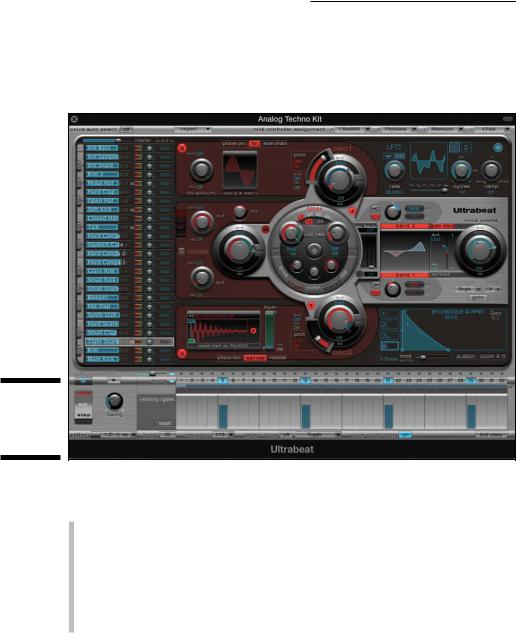
You use the assignment section, shown in Figure 9-10, to select and mix drum sounds. Here’s a description of the assignment section parameters:
\\Master volume slider: This slider, which is at the top of the assignment
section, controls the volume of the entire drum kit.
\\Keyboard: The vertical keyboard is playable; each key lights when a
drum voice is played.
\\Volume slider: You can drag the blue slider on each drum voice left and
right to lower and raise, respectively, the volume of the sound. Controlclick the volume slider to display a menu where you can copy and paste voices and sequences as well as initialize the drum sound to one of several default sounds.
\\Sequence: If the drum sound is associated with a sequence, you see a
sequence indicator next to the drum sound number.
\\Mute and solo icons: Click the mute (M) icon to silence the drum sound.
Click the solo (S) icon to silence all other drum sounds.
\\Pan knob: Use the pan knob to place the drum sound in the stereo
spectrum.
\\Output menu: To the right of the pan knob is the output menu. Click
the menu and choose the output of the drum voice. The options change depending on whether you load a stereo or multi-output instance of Ultrabeat.
144 Part III: Making Music with Virtual Instruments
Figure 9-10:
The Ultrabeat assignment section.
\\
Drum voices can be dragged and dropped. If you drag one voice onto another voice, the drum voices and synth settings are swapped. If you hold while dragging and dropping the drum voice, the sequences are also swapped. Option-drag to copy (not swap) the sound but not the synth or sequencer settings. Hold down Optionwhile dragging to copy the sound as well as the sequences.
\ |
Don’t have a magnifying glass around? You can increase the size of the inter- |
|
face for easier viewing by selecting a higher number on the View drop-down |
|
menu at the top of the software instrument interface. |
Shaping sounds in the synthesizer section
You shape the currently selected drum sound in the synthesizer section, as shown in Figure 9-11. The synthesizer signal flow moves from left to right. Don’t let all the buttons and knobs intimidate you. At the most basic level, you generate sounds at the far left, filter sounds in the middle, and shape the envelope and volume of sounds at the far right.
Chapter 9: Making Beats with Drummer and Ultrabeat 145
Figure 9-11:
The Ultrabeat synthesizer section.
\\
Here’s a brief description of the Ultrabeat sound generators:
\\Oscillator 1: The top sound generator is called oscillator 1. You turn
it on and off with the power button in the upper left. You can choose between a phase oscillator, FM synthesis, or external side-chain input. As you choose each synthesis mode, the oscillator 1 parameters change to give you further tone-shaping capabilities.
\\Oscillator 2: The bottom sound generator is called oscillator 2. You
turn it on or off with the power button in the lower left. You can choose between a phase oscillator, a sampler, or component modeling. Choosing each synthesis type updates the oscillator 2 parameters.
\\Noise generator: The middle section is a noise generator, and you can
turn it on or off by the power button at the left. There are no additional parameters aside from what you are given.
The scope of this book couldn’t possibly touch on every parameter in each of the sound generators. However, I don’t want to leave you hanging, so here are a few things you can try with each tone generator:
\\Oscillator 1 is great for synth sounds. Set it to Phase Osc, turn the Slope
knob and Saturation slider all the way down, and turn the Asym (asymmetry) slider all the way up. Depending on the envelope parameter
146 Part III: Making Music with Virtual Instruments
settings, you should have a useful synth bass sound. If you -click the drum voice name in the assignment section and choose Init Bass, Ultrabeat will produce a bass synth that you can begin tweaking.
\\Oscillator 2 works great as a sampler. Set it to Sample, click the Sample
Name display, and choose Load on the drop-down menu. Navigate to an audio file on your hard drive and the sample will load, allowing you to play it from your MIDI controller. Alternately, you can -click the drum voice name in the assignment section and choose Init Sample; Ultrabeat will set the oscillator to a pre-loaded sample that you can shape or replace.
\ |
\The noise generator is great for creating snare sounds, and it’s also |
|
useful when combined with the other oscillators. To hear a noise genera- |
|
tor in action, -click the drum voice name in the assignment section and |
|
choose Init Snare. Turn off oscillator 1 and notice how much of a snare |
|
sound is generated by noise. |
|
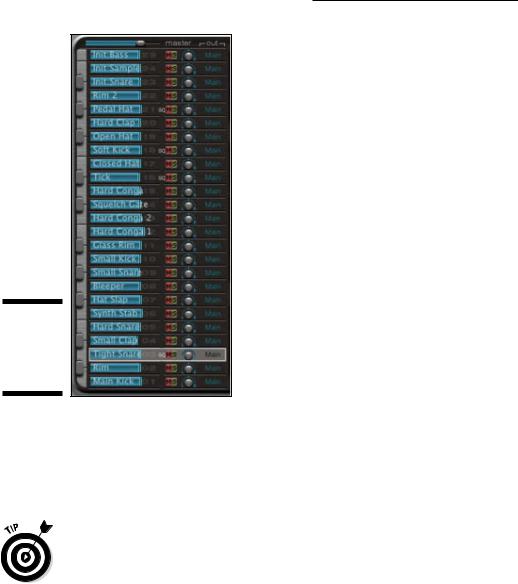
The rounded filter section in the center of Ultrabeat, shown in Figure 9-12, |
|
gives you more tonal-shaping capabilities. The top half of the filter section is |
|
dedicated to the filter while the bottom half controls a distortion circuit. |
Figure 9-12:
The
Ultrabeat
filter
section.
\\
Here’s a brief description of the parameters you can use to adjust your sound:
\\Filter on/off: Click the filter name at the top of the filter section to turn
the entire filter section on or off.
\\Filter type: Click the filter type buttons to change the filter type to LP
(low pass), HP (high pass), BP (band pass), or BR (band rejection).

Chapter 9: Making Beats with Drummer and Ultrabeat 147
\\Filter slope: Click the filter slope buttons to change the filter slope to 12 dB
or 24 dB. The higher the filter slope, the more extreme the filtering.
\\Cutoff: Rotate the cutoff knob to adjust the cutoff frequency of the differ-
ent filter types. Rotate the knob to the left to lower the frequency and to the right to raise the frequency.
\\Resonance: Rotate the resonance knob to adjust how the cutoff fre-
quency affects the filters.
\\Mod and Via menus: Click the Mod parameters to choose a modulation
source for the cutoff and resonance parameters. Click the Via parameters to select a MIDI controller assignment or velocity to control the modulation source.
\\Crush button: Click the crush button to turn on the bit crusher. The
bit crusher lowers the digital resolution of the sound, creating a digital distortion effect. If the crush button is engaged, the distortion button is disengaged.
\\Distortion button: Click the distortion button to distort your sound
by using an analog-modeled overdrive effect. If the distortion button is engaged, the crush button is disengaged.
\\Drive knob: Rotate the drive knob to adjust the amount of distortion.
\\Color knob: Rotate the color knob to change the tone of the distortion.
Rotate it to the right to make the sound brighter, and rotate it to the left to make the sound darker.
\\Level knob: Rotate the level knob to set the level of distortion while in
distortion mode. If crush mode is engaged, this knob sets the threshold before bit crushing begins.
The right section of the Ultrabeat interface, shown in Figure 9-13, is dedicated to amplifying the drum sound, modulating the drum sound, and shaping the envelope of the drum sound. Here’s a brief description of the three sections on the right side of the Ultrabeat synthesizer:
\\Output: The middle area is where you change the volume, two-band EQ,
and stereo panning of the drum sound.
\\LFO: The top area is where you change how sound parameters are mod-
ulated by the LFOs (low frequency oscillators), envelope generators, velocity, and MIDI controllers.
\\Envelope: The bottom area is where you adjust the ADSR (attack, decay,
sustain, and release) envelope for the drum sound.

148 Part III: Making Music with Virtual Instruments
Figure 9-13:
The Ultrabeat output, LFO, and envelope section.
\\
Here’s how you can shape your sound with the output section:
\\Use the two-band EQ to brighten or darken the sound. Each EQ has two
types available: a shelving EQ and a peak EQ. Use the shelving button to remove frequencies above or below the level set in the Frequency (Hz) field. Use the peak EQ to raise or lower the frequencies around the level set in the Frequency (Hz) field. Set the Q field to change the width of the EQ boost or cut. Use the level knob to set the amount of EQ boost or cut. Finally, click either EQ band names to turn the EQ on or off.
\\Use Pan Mod (modulation) or Spread to adjust the drum sound in the
stereo field. (Only one of them can be selected at a time.) Clicking the name of the Pan Mod or Spread parameter either turns it on or off or toggles between the two options while displaying the parameters.
\\Use the envelope section to graphically shape the attack, decay, sustain,
and release (ADSR) of the drum sound. Each sound has four envelopes numbered 1 through 4, with 4 hardwired to the sound’s volume. The other three envelopes can be modulated by various Ultrabeat sound parameters. Click any envelope number and then drag the envelope graphic handles to shape the envelope.
As you can see, Ultrabeat is a beast of a drum synth. It’s safe to say that most Ultrabeat users get a lot out of it without ever touching most of the parameters. The easiest way to find sounds that you like is to load different presets
Chapter 9: Making Beats with Drummer and Ultrabeat 149
from the top of the software instrument interface. Ultrabeat comes with dozens of kits that sound amazing without any tweaking. But if you feel like tweaking drum sounds, Ultrabeat will keep you thoroughly entertained.
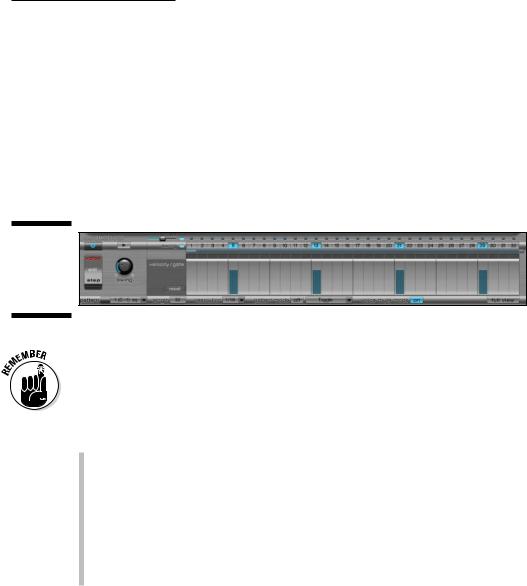
Sequencing patterns in the step sequencer
The Ultrabeat step sequencer, shown in Figure 9-14, is used to edit patterns for the currently selected drum sound and to control entire Ultrabeat sequences.
Figure 9-14:
The Ultrabeat step sequencer.
\ |
|
You don’t have to use the integrated step sequencer in Ultrabeat. You can play |
|
|
Ultrabeat’s drum sounds from MIDI regions just like other software instruments. |
|
|
But if you enjoy step sequencing, you’ll like using Ultrabeat’s sequencer. As you |
|
|
see in this section, exporting beats into the tracks area is easy. |
|
|
The left side of the step sequencer contains the following global parameters:
\\On/off icon: Click the on/off icon to turn the pattern sequencer on or off.
\\Edit mode toggle button: Click the edit mode button to toggle between
voice mode and step mode. While in the default voice mode, any edit you make to a drum’s sound is global. While in step mode, you can automate the sound parameters with each step of the pattern sequencer.
\\Play icon: Click the play icon to start and stop the pattern sequencer.
\\Swing knob: The Swing knob adjusts the amount of shuffle feel for any
drum sound that has swing enabled.

150 Part III: Making Music with Virtual Instruments
To the right of the global parameters is a small section for the following pattern parameters:
\\Pattern menu: Click the menu to choose one of 24 patterns. If a pattern
slot has a pattern available, it will be marked with the letters sq. You can copy, paste, and clear patterns by Control-clicking the menu.
\\Length field: Double-click the length field to enter the length of the
pattern.
\\Length bar: The length bar spans the entire length of the top of the pat-
tern sequencer. Drag the right edge of the bar to change the length of the pattern.
\\Resolution menu: The resolution menu determines the note length
value of the pattern. A setting of 1/8 means that each step of the grid represents an eighth note and 1/16 represents a sixteenth note. Other available resolutions are 1/12 (triplet), 1/24 (sextuplet), and 1/32 (thirtysecond note).
\\Accent button: Click the Accent button to turn on the accent function.
When accents are on, clicking the accent buttons above the pattern steps globally accent that beat in the pattern.
\\Accent slider: Drag the Accent slider to the right to raise the level of the
accents.
\\Swing enable button: The Swing button turns the swing function on or
off for individual sounds.
The largest area of the pattern sequencer is dedicated to the step grid, which plays the drum patterns. The step grid has the following parameters:
\\Trigger row: The trigger row contains numbers that identify the beat.
Click the number buttons to play the currently selected sound on that beat. Click the button again to turn the sound off. Control-click the trigger row to display a menu of available functions for automatically creating beats as well as copy, paste, and clear functions.
\\Velocity/Gate row: The Velocity/Gate row sets the length and velocity of
the note. Drag the height to set the note velocity and the width to set the length. Control-click the Velocity/Gate row to display a menu of velocity functions, including a randomize feature.
\\Accent row: The Accent row is above the trigger row. Click the beats
you want to accent.
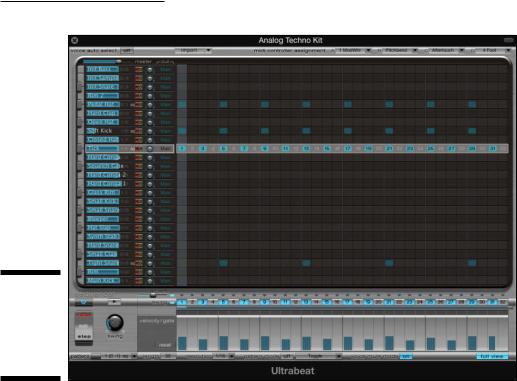
\Click the Full View button on the bottom right of the pattern sequencer to turn the entire Ultrabeat interface into a pattern sequencer, as shown in
Figure 9-15. Click any area of the grid to turn a drum sound on or off on that beat. Visualizing the entire pattern with all the drum sounds makes programming beats a breeze.
Chapter 9: Making Beats with Drummer and Ultrabeat 151
Figure 9-15:
The Ultrabeat step grid in full-view mode.
\\
Controlling patterns with MIDI
You can trigger the Ultrabeat patterns by using MIDI. Along the bottom row of parameters in the step sequencer is the Pattern Mode on/off button and playback mode menu. To trigger the patterns:
\1.\ Turn on the Ultrabeat pattern sequencer.
\2.\ Turn on pattern mode.
\ |
3.\ Play the key associated with the pattern. |
\ |
The pattern will begin playing. To find the key associated with the pat- |
|
tern, click the pattern menu to see the list of patterns and corresponding |
|
MIDI keys. |
You can decide how the patterns behave when triggered from the pattern mode menu. Choosing One-Shot Trigger plays the pattern once through. Choosing Sustain plays the pattern only while the key is sustained. Choosing

152 Part III: Making Music with Virtual Instruments
Toggle plays the pattern repeatedly until the key is played again. Choosing Toggle on Step 1 is similar to Toggle except the pattern won’t stop until the pattern has completed.
\Click the Voice Mute Mode button to mute single drum sounds with MIDI keys. Use the two octaves above the pattern trigger keys (C1–B2) to mute and
unmute drum sounds. Muting drum voices is useful for remixing and adding interest in your drum arrangements.
|
Exporting patterns into the tracks area |
|
The Ultrabeat pattern sequencer is a lot of fun and a great tool for building |
|
beats. But sometimes you might want more control over the MIDI patterns. |
|
Exporting your Ultrabeat pattern into the tracks area is simple. |
|
Drag the pattern icon from the bottom of the global parameters section |
|
into the tracks area. A MIDI region the length of the pattern will be added to |
|
the tracks area. If you’re going to trigger the Ultrabeat sounds from a MIDI |
|
region instead of the pattern sequencer, make sure you turn off the pattern |
|
sequencer in Ultrabeat. For a video that details how to make beats and pat- |
|
terns with Ultrabeat (and Drummer), visit http://logicstudiotraining. |
|
com/lpxfordummies. |
\ |
Software instrument tracks with Ultrabeat get their own set of smart controls. |
|
Wow. Drums are a big deal. And Logic Pro X puts a lot of resources into |
|
making beats and banging drums. But more importantly, the intuitive inter- |
|
faces and raw power of Logic Pro X make it easy for you to give your drums |
|
the attention they deserve. You can have control over the smallest detail, or |
|
you can have Drummer and Ultrabeat play for you. |
|
Go play! |

Chapter 10
Playing Virtual Vintage
Instruments
In This Chapter
\Loading and playing the vintage instruments \Editing instrument sounds and effects \Producing classic and creative tones
\Understanding keyboard and synthesizer fundamentals
The vintage instruments included in Logic Pro might make you want to put drink rings and cigarette burns on your laptop because these clas-
sic keyboards can evoke the sounds of yesteryear. But they also can freshen the music of today — you’d be hard-pressed to throw a dart at the Billboard charts and not find one or more of these instruments somewhere in the track.
The sounds of these vintage keyboards are heard in almost all musical genres. Music producers depend on them and musicians adore playing them. And what’s not to love? They’re simple to use, and their tonal capabilities are limitless. Perhaps best of all, you can get great sounds with these software instruments without the hassle of vintage gear upkeep and the two or three strong bodies required to transport them.
In this chapter, I show you how to load, edit, and play the vintage software instruments in Logic Pro X. You find out how to use them creatively so they can meet your demands. You also pick up some tips on making them sound authentic and classic. If a client ever craves a vintage keyboard, you’ll be able to deliver the right sound.