


154 Part III: Making Music with Virtual Instruments
Taking Stock of Vintage Instruments
Logic Pro X gives you four virtual vintage software instruments:
\\Vintage B3: This software instrument is modeled on a Hammond B3 organ
and Leslie speaker. The Hammond B3 is an electric organ that generates its sound from tonewheels, spinning discs that determine the pitch and transmit the signal to a magnetized rod and coil. The Leslie speaker contains two speakers: The top passes the sound through a rotating horn, and the bottom passes the sound through a rotating drum.
\\Vintage Clav: This instrument is a modeled on a Hohner Clavinet D6
keyboard. The Clavinet (Clav for short) has guitar-like strings that are struck by a hammer. Magnetic pickups transmit the signal through a filter section to shape your sound.
\\Vintage electric piano: This one is a simulation of three famous electric
pianos — Fender Rhodes, Wurlitzer, and Hohner Electra-Piano. These electric pianos have hammers that strike metal tines or reeds. All three electric pianos are similar in sound and have metallic bell-like qualities.
\\Retro Synth: It’s four classic synthesizers in one — analog, sync, wave
table, and FM. Each type of synthesis gives you a completely different sound.
Loading and playing vintage instruments
To use the vintage instruments in Logic Pro X, you must first create a software instrument track: On the main menu, choose Track New Software Instrument Track. The default software instrument is the vintage electric piano. You can add a vintage instrument to the selected software instrument track in two ways:
\\On the main menu, choose View Library and select a preset (called a
patch in Logic Pro X) from the list of vintage instruments.
\ |
Choosing Retro Synth from the library can be tricky because all synthe- |
|
sizers in Logic Pro are grouped into a single Synthesizer menu. It’s faster |
|
to choose Retro Synth by using the next method. Later in the chapter, |
|
I show you how to save your own patches so you can quickly call up |
|
Retro Synth from the library. |
\\Choose View Show Inspector and select the vintage instrument in the
software instrument slot. (See the section on the inspector in Chapter 3 for details.)
Chapter 10: Playing Virtual Vintage Instruments 155
To play your software instrument, connect your MIDI controller (as described in Chapter 1), select the track, and start playing your MIDI controller. If you don’t have a MIDI controller connected, you can choose View Show Musical Typing to input notes with your computer keyboard or View Show Keyboard to input notes with your mouse or trackpad.
Choosing vintage instrument presets
Every software instrument has a preset menu at the top of its interface.
These presets enable you to load and save your instrument settings.
\ |
|
A preset saves only the software instrument settings. Other settings on the |
|
|
track’s channel strip, such as volume and effects, are not saved. If you want to |
|
|
save the entire channel strip, including the software instrument settings, save |
|
|
your settings as a patch in the library (see Chapter 4). |
|
|
\When editing a factory preset, it’s best to make your changes to a copy. I like to keep factory presets in their original state and make my own edits on copies.
Also, the user presets you create appear on the main menu and not on a submenu, saving you a click down the road.
\Save your default preset for instant recall when loading instruments. On the preset drop-down menu at the top of the software instrument interface, choose
Save as Default. I have a starting position that I use on my real Hammond B3 that I’ve copied over to the vintage B3 and saved as my default. Now, whenever I call up the vintage B3, it’s exactly the way I like it.
Spinning Your Tonewheels with the Vintage B3
The Hammond B3 is an important part of music history, and with the vintage B3, you can put its sonic stamp on your own music. Since the Hammond B3 organ is found in country, gospel, reggae, rock, jazz, pop, and more, it’s safe to say that you’ll want to use the vintage B3.
A Hammond B3 is almost always paired with a Leslie speaker. The Leslie’s rotating design throws the organ sound throughout a room to make it sound bigger and omnipresent, like a pipe organ. The vintage B3 has a built-in rotor cabinet, which is an emulation of the Leslie speaker (built by Don Leslie).
The vintage B3 software instrument and rotor cabinet simulation emulate the real thing to the point that you can edit the age of a single component to make your organ sound fresh from the factory or 50 years old.

156 Part III: Making Music with Virtual Instruments
For the love of Hammond! |
||
Every instrument has a story. The tale of my first |
the Beatles. The owner chopped it in half so |
|
Hammond organ is a journey through a blizzard |
it could be transported easily. But there was |
|
in whiteout conditions. On the way home, with |
nothing easy about carrying those giant chunks |
|
hundreds of pounds of organ in the back of my |
of organ up three flights of stairs into my tiny |
|
Chevy Bronco and less than 10 feet of visibility, I |
studio apartment. |
|
almost drove into the wrong lane of an on ramp |
Tubes and tonewheels are worth the pain. |
|
on the opposite side of the highway. |
||
Today, I have a Hammond B3 and Leslie 122 |
||
Looking back, I don’t think I’d do anything dif- |
||
in my living room, and each day I say “Good |
||
ferently. You couldn’t keep me from taking |
morning!” to them while I’m having my first cup |
|
that organ home where it belonged. It was |
of coffee. I’m biased, but I don’t think it’s pos- |
|
a Hammond L-100 with a Leslie 122 speaker, |
sible to have too much organ in your tracks. A |
|
both painted white to mimic ones owned by |
Hammond B3 is always just right. |
|
|
|
|
|
|
|
|
In this section, I show you how use the vintage B3 drawbars and other organ |
|
parameters to shape your sound. You set up your default organ settings just |
|
like a professional B3 player. You also learn how to play the vintage B3 with |
|
multiple keyboard controllers for an authentic Hammond playing experience. |
|
Understanding drawbars |
|
Before I show you how to tweak the sound you can get from the vintage B3 |
|
organ, you should create a new instrument track and select a preset for the |
|
vintage B3, as follows: |
\ |
1.\ On the main menu, choose Track New Software Instrument Track. |
\ |
A new track appears in the main window track list. |
\2.\ Choose View Show Library.
\ |
The Library window appears. |
\ |
3.\ Click the Vintage B3 Organ menu and select a preset. |
\ |
For example, select Classic Rock Organ to create a sound similar to what |
|
organists used in 60s and 70s rock music. |
\4.\ Access controls for the vintage B3 in one of two ways:
•Choose View Show Smart Controls to access a set of drawbars, rotor cabinet controls, and effects controls.
•Choose ViewInspector and click the center of the instrument slot to see the full software instrument interface.
|
|
|
|
Chapter 10: Playing Virtual Vintage Instruments 157 |
|
|
|
|
|
\ |
|
|
Your drawbars are your main tools for tone shaping. You can always get to |
|
|
|
|
them quickly by using your track’s smart controls or by clicking the Main |
|
|
|
|
button, which is on the top control bar of the vintage B3 organ interface. |
|
|
|
|
||
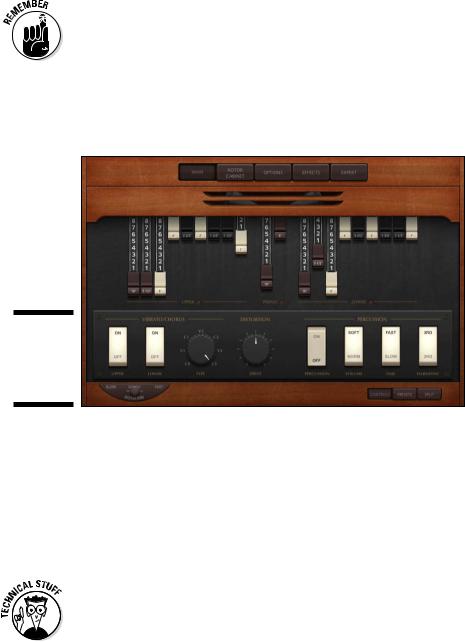
Take a look at your three sets of drawbars — Upper, Pedals, and Lower — as shown in Figure 10-1. Pull the drawbar out (by pulling down) to make the drawbar louder, and push the drawbar in (by pushing up) to make the drawbar quieter or silent. Drawbars are like mixer faders but in reverse.
Figure 10-1:
Main window of the vintage B3 Organ.
\\
The upper and lower nine drawbars correspond to the upper and lower keyboards of a Hammond B3 organ. These two keyboards are called manuals. B3 players usually play bass lines and rhythm parts on the lower manual and solos and melodies on the upper manual, though anything goes in the hands of a skilled musician. The pedal drawbars correspond to the B3 foot pedals. Each set of drawbars control the volume of different aspects of the pitch you are playing.
|
Sine waves and the harmonic series |
\ |
The Hammond B3 tonewheel was designed to create a pure sine wave, the |
|
simplest sound in existence. Playing a key on the B3 spins a tonewheel that |
|
generates a pure pitch. Every pitch corresponds to a frequency, which is the |
|
number of cycles that the sound completes in one second. All sounds except |
|
a pure sine wave contain different frequencies based on the mathematical har- |
|
monic series. |
158 Part III: Making Music with Virtual Instruments
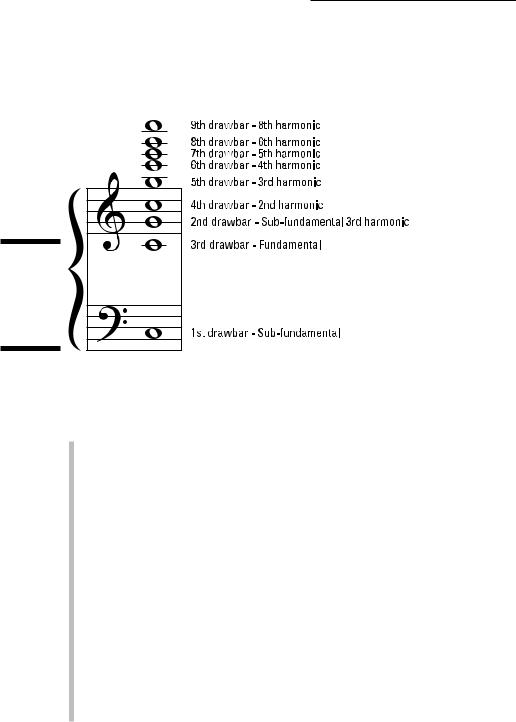
The third drawbar of the Hammond B3 is close to a pure sine wave. The other drawbars are frequencies of the harmonic series, as shown in Figure 10-2, and control the complexity of the sound so that you can create and mold sounds similar to a flute, an oboe, a trumpet, or even a string section.
Figure 10-2:
The drawbars in relation to the harmonic series.
\\
You can think of the drawbars in two sets of divisions that outline how you use them to shape the sound of the organ. The first set is divided by function and moves from left to right:
\\Subdrawbars: The first two drawbars control the volume of frequencies
below the fundamental pitch you are playing.
\ |
Technically, the second drawbar controls the volume of a frequency |
|
above the pitch you’re playing, but it’s mathematically related to the |
|
first drawbar so they’re joined at the hip. These two subdrawbars are |
|
used to add bass to or take bass from the overall sound. |
\\Foundation drawbars: The next four drawbars control the volume of the
fundamental frequency and frequencies above it.
\ |
The third drawbar controls the volume of the fundamental pitch. Pull it |
|
out all the way by itself and you hear a single frequency, a simple sine |
|
wave. The third drawbar is almost always used to some degree. |
\ |
The fourth, fifth, and sixth drawbars control the second, third, and |
|
fourth harmonics. The fourth drawbar gets pulled out a lot in rock. The |
|
fifth through sixth drawbars are commonly used in gospel or whenever |
|
you want more upper harmonics in your sound. |
\\Brilliance: The seventh, eighth, and ninth drawbars control the fifth,
sixth, and eighth harmonics (the seventh harmonic is skipped).

|
|
|
|
Chapter 10: Playing Virtual Vintage Instruments 159 |
|
|
|
|
|
\ |
|
|
The ninth drawbar is often pulled out in jazz solos and gives your tone a |
|
|
|
|||
|
|
|
whistle. The other two drawbars are pulled out when you want extreme |
|
|
|
|
highs, as in a full organ sound. Another common setting called the squab- |
|
|
|
|
ble uses the last four drawbars pulled all the way out along the first |
|
|
|
|
drawbar. |
|
|
|
|
||
|
|
The second set is divided by color, with each color describing the function in |
||
|
|
the harmonic series: |
||
\\White (consonance): The white drawbars correspond to consonant har-
monics, which are perfect octaves of the fundamental pitch. Pulling all the white drawbars out gives you a tall sound of four stacked octaves.
\\Black (dissonance): The black drawbars correspond to the dissonant
harmonics, which include fifths and a major third. Don’t let the name dissonance fool you. Adding these harmonics makes the sound big and rich.
\\Brown (sub): The brown drawbars correspond to the subharmonics.
These subfrequencies, especially the octave below the fundamental, are used frequently because they allow you to get the quintessential B3 bass sound that is played with the left hand on the lower manual.
\ |
Even though the second brown drawbar is considered a subtone, it’s a |
|
fifth higher than the fundamental pitch you’re playing. Pull this drawbar |
|
out all the way for great solo sounds. It’s often pushed in about halfway |
|
for chordal accompaniment and bass lines. |
Common drawbar setups
Drawbar notation is simple to understand. There are nine drawbars and each has eight increments of volume. A drawbar setting that includes only the third drawbar (the fundamental pitch) would look like this: 008000000. If you also pulled out the first drawbar, the setting would be 808000000.
Following are some classic drawbar settings below.
\\Lower manual: 848000000. Use this drawbar setting for playing bass
lines with your left hand and accompaniment with your right. You can experiment with the level of the second drawbar until it sounds good to you. You can also pull out the ninth drawbar to 1 or 2 to add just a touch of brightness. This drawbar setting is versatile.
\\Upper manual: 888000000. This setting is a subtle variation on the
lower manual setting but it makes a big difference. Having the first three drawbars all the way out gives the upper manual just enough volume to cut through the lower manual as well as a full band. Pull out the last drawbar to between 2 and 4 to add a high whistle tone and cut through the mix even more. If you need more volume and presence to cut through the mix, pull out the fourth drawbar all the way to 8 as well.

160 Part III: Making Music with Virtual Instruments
\\Pedals: 80. The pedals have only two drawbars, and the second drawbar
isn’t used much. Most organists push in both pedal drawbars all the way when a bass player is present. However, when there’s no bass player, pull out the first bass drawbar to between 6 and 8 and blend it with the rest of the organ and band. Because you play the pedals with your feet, it’s uncommon to hear intricate and fluid lines coming from them unless you’re one of the few living virtuosos. For authenticity, keep your pedal bass lines simple.
Get the vintage vibe with vibrato/chorus and percussion
In addition to the drawbars, the B3 has two blocks of effects that you can apply to your sound: vibrato/chorus and percussion.
Vibrato/chorus
Vibrato introduces pulsating pitch variation to varying degrees, with V1 the slowest and V3 the fastest. Chorus is created by mixing the vibrato with the unaffected tone. Chorus has three settings, C1 through C3, which correspond to the three vibrato settings.
You can control the vintage B3 vibrato/chorus in two ways:
\\Software instrument interface: Click the Main button at the top of the
vintage B3 interface and then click the Controls button at the bottom. A panel opens with the vibrato/chorus controls on the left and percussion controls on the right. In the center of the panel is a Drive knob that works only if you have distortion turned on in the Effects panel of the vintage B3.
\ |
Use the toggle buttons to turn on or off the vibrato/chorus effect on the |
|
upper or lower manual. Choose the vibrato/chorus setting (V1 through |
|
C3) with the rotary knob. |
\\Smart controls: To display smart controls in the tracks area of the Logic
Pro main window, click the Smart Controls button at the top of the main window or choose View Show Smart Controls. Or if you want smart controls in a separate window, choose Window Open Smart Controls. The smart controls have a toggle button that turns vibrato/chorus on or off for the upper manual. For a smart controls refresher, refer to Chapter 3.
Chorus is used more than vibrato, but the warbly vibrato makes some classic movie-theater organ sounds. The C3 chorus setting probably has the most followers because it fattens up your organ tone.
Chapter 10: Playing Virtual Vintage Instruments 161
\Using the chorus effect with the Leslie Rotor Cabinet gives you a sound with a lot of motion. I usually start with the Leslie set to spin slow or set to brake, so
it doesn’t spin at all. I play with the chorus set to C3 for a fat sound with lots of motion. Then when I kick the Leslie on fast, I get a powerful shift with dramatic effects. It’s a great technique for building musical climaxes.
Percussion
The percussion effect is a unique bell tone on top of the organ sound. Percussion is monophonic, which means it plays only one note at a time. You have to let go of the first key if you want the percussion to sound on the second key. This effect works well with a short, staccato playing style but
it can also sound great at the beginning of phrases that are connected and legato.
You need to know a couple things about the percussion effect as it relates to a real Hammond B3. On a real B3, percussion works only on the upper manual. The software replicates this characteristic, but you can remove this limitation by clicking the Options button on the vintage B3 interface and changing the Perc On Preset parameter to All. Also, on a real B3, turning on the percussion turns off the ninth drawbar. The software doesn’t re-create this behavior, so if you’re a Hammond B3 player looking for authenticity, you’ll have to turn off the ninth drawbar when you turn on percussion.
\ |
If a jazz musician has percussion turned on, it’s usually the third harmonic set |
|
to fast and soft. You can create a cool piano effect pushing in all the drawbars |
|
and playing the second harmonic set to slow and normal. Try it out. |
Playing with presets
The real Hammond B3 has a lower octave of reverse-colored keys on both the upper and lower manual that select hardwired drawbar presets. This function is duplicated on the vintage B3. Click the Presets button on the bottom of the vintage B3 interface and you’ll see the drawbar presets laid out like a keyboard octave. You can use your keyboard controller to select these presets. The lowest note, C, clears all the drawbar settings and no sound is heard. Keys C# through B choose presets that instantly change your drawbars. You can also select these presets manually by clicking them.
Edit the drawbar presets by selecting a preset and adjusting the drawbars. Note that these presets only store and recall the drawbar positions and not vintage B3 effects or other parameters. The original B3 has presets that emulate strings, flute, clarinet, and other acoustic instruments. You can get an amazing assortment of sounds with the vintage B3 as well just by playing with the presets. If you want a vintage B3 patch with the original Hammond B3 presets, visit http://logicstudiotraining.com/b3patch and I’ll hook you up.
162 Part III: Making Music with Virtual Instruments
Spinning the Leslie
The Leslie speaker is a huge part of the Hammond B3 sound and experience. The rotor cabinet in the vintage B3 instrument is an amazing emulation of the iconic Leslie speaker.
You can control rotor cabinet parameters in the smart controls and in the vintage B3 software instrument interface:
\\Smart controls: To access the smart controls in the tracks area, choose
View Show Smart Controls. You can choose the rotor cabinet’s rotation speed with the lever in the lower-left corner of the smart controls.
\\Software instrument interface: Click the Rotor Cabinet button on the
top control bar of the vintage B3 interface to control the Leslie speaker options.
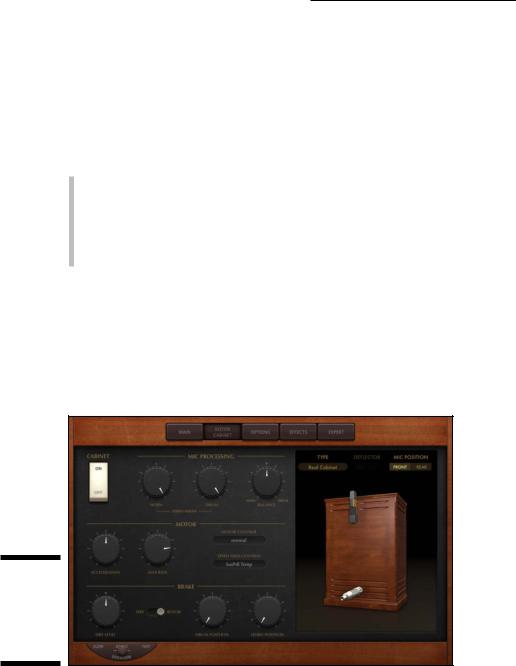
A Leslie speaker has a rotating horn at the top and a rotating drum at the bottom. At the bottom left of the interface, click the Rotation toggle switch to change the rotation speed to Slow, Brake (off), or Fast. At the far right of the interface, switch the mic position to Rear to see the horn and drum animated in real time as you adjust the speed settings. You’ll also hear a big variation in the different mic positions. If you want to mellow the sound, set mic position to Front, as shown in Figure 10-3.
Figure 10-3:
The vintage B3 Rotor Cabinet options panel.
\\

Chapter 10: Playing Virtual Vintage Instruments 163
You can also change the cabinet type to other Leslie models. The Proline cabinet is a black Tolex-covered cabinet, similar to a guitar amp, and has a more open sound. Click the mics and you’ll be given a few mono and stereo mic choices. It’s common to record the drum mono and horn stereo. Because the drum carries the low frequencies, a stereo spread isn’t as dramatic and can take up too much bass energy in a mix.
Choose the stereo width and balance of your mics on the left side of the Rotor Cabinet control panel. Edit the motor acceleration speed to customize the transition from slow to fast. The Motor Control setting enables you to spin the horn and drum independently.
Going deep into expert options
Three more panels of controls (Options, Effects, and Expert) give you ways to customize the B3 that would be difficult to achieve with the Hammond B3. The Options and Expert panels let you customize how the B3 sounds and behaves, and the Effects panel adds perfectly paired effects to your sound as follows:
\\Options: These settings control the tuning, volume, and expression level
|
of the vintage B3. |
\ |
A key characteristic of the B3 is the volume pedal. You’ll find your- |
|
self constantly adjusting the volume during a performance, and the |
|
Expression knob lets you adjust the sensitivity of your connected |
|
expression pedal. |
\ |
Another important part of the B3 sound is the key click. On the vin- |
|
tage B3, you can adjust several aspects of its sound in the Options and |
|
Expert panels. The Options panel also gives you finer control of percus- |
|
sion and vibrato/chorus. |
\ |
The Morph function allows you to smoothly switch between two pre- |
|
sets, much like an organist would achieve with a hand pushing and pull- |
|
ing drawbars. You can adjust the Morph characteristics on the Options |
|
panel, and you can control it from the Presets area of the Main panel. |
\\Expert: These settings turn your B3 into a factory-fresh classic or a
used-and-abused road warrior. You can adjust the age of the filters, the amount of drawbar leak, and the key click color. You can further adjust pitch and sustain, and choose your hardware controller.
\ |
The organ model options let you adjust balance between pedals, lower |
|
manual, and upper manual. The shape slider changes your organ from |
|
a B3 to a Farfisa, Solina, or Yamaha organ. You can also adjust the bass |
|
filter and add another octave to the low end of the upper and lower |