


312 Part V: Mixing, Mastering, and Sharing Your Music
After your mix is stable, take a pass through the project, focusing on each of the core mixing concepts described in Chapter 16. Automate the levels,
panning, EQ changes, effects, and dynamics. If you plan your automation this way, the final result will be an elevated and interesting mix.
Choosing Your Automation Mode
To automate a track, you need to display the track’s automation in the tracks area. Choose Mix Show Automation or press A. The track headers will sport an automation icon and additional parameters, as shown in Figure 17-1. To enable automation for a track, click the automation icon in the track header.
Figure 17-1:
Track automation in the tracks area.
\\
After you’ve enabled automation on a track, you can choose between the following four automation modes on the menu:
\\Read: Automation is played back but not recorded.
\\Touch: Automation is recorded during playback while the parameter is
being touched; when the parameter is released, it returns to the previous value. Touch mode is useful when you’re automating a temporary change in the parameter that you want to return to the previous value.
\\Latch: Automation is recorded during playback while the parameter
is being touched; after the parameter is released, automation stops at that last touched value. Latch mode is useful when you’re automating a parameter to a new value that you want to keep.
Chapter 17: Automating Your Mix 313
\\Write: Automation is recorded during playback, and existing automation
is erased as the playhead passes over it. Write mode is useful when you want to simultaneously record and erase automation.
\You can also turn on automation and select automation mode from the auto-
mation slot in the mixer.
Adding Automation to Your Tracks
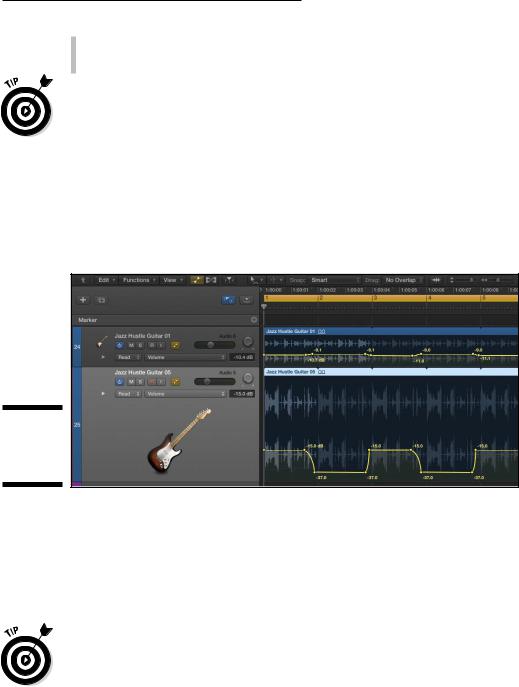
After you enable automation, adding it to your track is as simple as clicking a location on a region with the pointer tool. A control point is added with the current parameter’s value, as shown in Figure 17-2.
Figure 17-2:
Track automation control points.
\\
The parameter you automate is chosen in the automation parameter dropdown menu on the track header. You can display multiple lanes of automation by clicking the disclosure triangle to the left of the automation parameters. You can quickly add an automation point at the playhead position for the volume, pan, and sends by choosing Mix Create Automation Create 1 Automation Point Each for Volume, Pan, and Sends.
\If you know that the parameter value you’re automating will return to its original value, you’ll save time by creating an automation point at the beginning
and ending of regions. Choose Mix Create Automation Create 1 Automation Point at Region Borders.
314 Part V: Mixing, Mastering, and Sharing Your Music
Adjusting automation points
The fastest way to adjust automation points is to select them with the pointer tool and drag them up, down, left, or right. You can select multiple points by Shift-clicking them. You can delete selected points by pressing Delete.
To create smooth curves between automation points, use the automation curve tool. Drag left, right, up, or down on the automation line with the automation curve tool to create automation curves. You can temporarily switch from the pointer tool to the automation curve tool by holding down ShiftControl while dragging the automation line.
Moving regions with or without automation
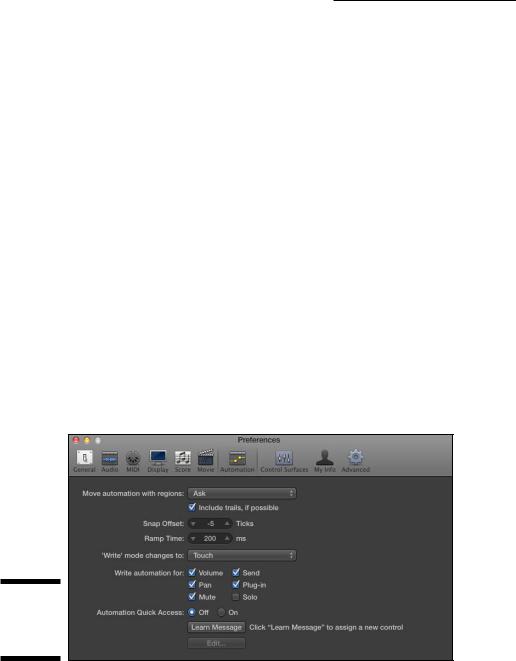
You may end up needing to make an edit to a track or to your song arrangement after you’ve started automating your mix. Moving regions with automation can cause complications if you don’t do it right. That’s why Logic Pro’s default state is to ask you whether you really want to move regions that have automation. You can change this behavior in the automation system preferences, shown in Figure 17-3. Choose Logic Pro X Preferences Automation to open the automation preferences, and then choose the default behavior from the Move Automation with Regions menu. You can choose the default behavior also on the Mix Move Automation with Regions menu.
Figure 17-3:
The automation preferences.
\\
Chapter 17: Automating Your Mix 315
Editing automation with MIDI draw
You can automate MIDI regions in multiple ways. In addition to adding automation points in the tracks area, you can use MIDI draw to automate MIDI controller events. Here’s how to use MIDI draw in the tracks area:
\1.\ Turn off automation in the tracks area by clicking the automation
icon.
\ |
You can’t simultaneously edit automation data and MIDI draw data. |
\2.\ Select a MIDI track, choose View MIDI Draw, and then choose a MIDI
|
parameter. |
\ |
The MIDI draw lane is overlaid on the MIDI region, as shown in Figure 17-4. |
|
You can edit the automation points by using MIDI draw, as described in |
|
Chapter 15. |
Figure 17-4:
MIDI draw in the tracks area.
\You can also automate MIDI parameters using MIDI draw in all the MIDI edi-
tors, including the score editor.
Recording Live Automation
The most precise way to automate your mix is by inputting automation data in the tracks area or by using MIDI draw on MIDI regions, as you learn in this chapter. But when automation was created on hardware mixing consoles, the automation was performed in real time as the project was playing. Recording live automation is an enjoyable experience because you get to perform along with your track, and perhaps create some magic along the way. Here’s how to record live automation:

316 Part V: Mixing, Mastering, and Sharing Your Music
\ |
1.\ Choose an automation mode on the tracks you want to automate. |
\ |
You can choose Touch, Latch, or Write, as described in the “Choosing |
|
Your Automation Mode” section, previously in this chapter. |
\ |
2.\ Play your project and adjust the parameters you want to automate. |
\ |
Automation data is added to the tracks. |
\3.\ When you’ve finished automating, stop the project and set the track’s
automation mode to Read.
\If you want to speed up the automation process, you can combine it with smart controls. You can use the smart controls to record live automation, and
you can also automate the smart controls from the tracks area. Because smart controls can control more than one parameter at a time, you can build some dynamic mixes quickly.