


Chapter 2: Examining Logic Pro Projects |
31 |
\If you’re collaborating with a Pro Tools user, add an empty MIDI track to your project and export it separately. That way, if you have marker data, it will be
exported along with the tempo information, and your Pro Tools user will have a marker and tempo map to import with the audio files. The Pro Tools user will thank you and treat you like a hero!
Exporting projects
Exporting a project as an AAF (Advanced Authoring Format) file is another option for collaborating with Pro Tools users. Choose File Export Project as AAF File. All the used regions will be exported, including their track and position references and volume automation.
To export a project as a Final Cut Pro XML file, choose File Export Project to Final Cut Pro XML. Software instruments and automation data are exported as audio, but MIDI tracks are ignored.
You can export your MIDI score as a MusicXML file if you want to edit the notation in a program such as Sibelius or Finale or in a music optical character recognition (OCR) application such as SmartScore or PhotoScore. Cubase and Sonar can also import MusicXML files. Select the MIDI you want to export, open the score editor by choosing Window Open Score Editor, and then choose File Export Score as MusicXML.
Tidying Up Your Project
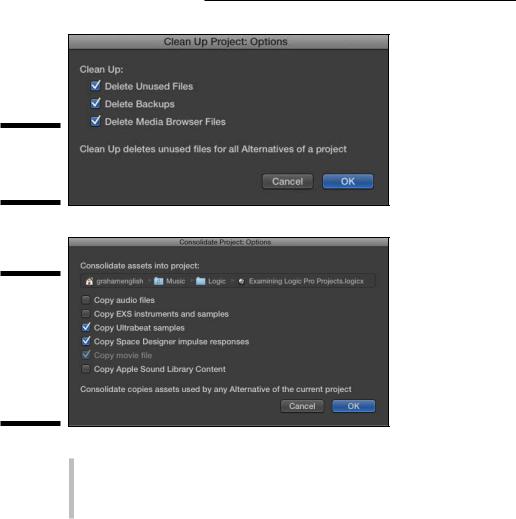
When you work on your projects, you’ll probably try lots of things, record takes that don’t make the mix, and basically add a bunch of audio and MIDI data that doesn’t need to be there when it comes time to share or archive your project. You should give your project a spring-cleaning to get it ready for the next season in its life. If you plan to send your project to a collaborator or archive it because it’s finished, you’ll appreciate the following useful tools in the File Project Management menu:
\\Clean Up: Deletes unused files, backups, and media browser files, as
shown in Figure 2-9. This function is safe to use because it deletes only unused data. However, it deletes media you may have shared with the media browser, so sharing with the media browser isn’t the best strategy if you want your media to be available for other projects or other applications in the future.
\\Consolidate: Creates a copy of all the assets you select and includes
them in the project, as shown in Figure 2-10. If you haven’t been including assets in your project up until now, this is your chance to pull everything into your project. This function is useful also when you want to share the project for collaboration because the Logic Pro user you’re sharing with might not have the same samples or content installed.
32 |
Part I: Leaping into Logic Pro X |
Figure 2-9:
Delete unused project data.
\\
Figure 2-10:
The consolidate function copies and includes all used
assets in the project.
\\
\\Rename: Opens a dialog asking you to select your new project name.
(This function is similar to using the File Save As command.)
\\Show in Finder: Opens a Finder window with your project selected. Use
this function when you need to get to your project file quickly.
Now that your project is nice and tidy, it’s important to think about protecting it for the future. A good backup strategy can save you from downtime and avoidable, life-shortening stress. Hard drives fail, so back up your project files on CD or DVD and consider using a service that allows you to back up offsite. Also, because Logic Pro X will probably not be the final version of this amazing software, export your tracks as audio files so that you can import them into a version of Logic Pro down the line. Your future self will thank you.

Chapter 3
Exploring the Main Window
and Tracks Area
In This Chapter
\Navigating the windows \Playing and controlling the project \Exploring the tools and controls
\Saving time and speeding up your workflow
Logic Pro X has a simple single-window design that helps you be more productive and puts everything you need only a click away. You can do
most of what you need to do right in the main window. But you can also open windows separately and push windows to different displays. The program is as flexible as it is simple.
In this chapter, you discover how to navigate the Logic Pro interface. You also learn some timesaving tricks and smart ways to use key commands to accomplish the bulk of your work. Navigating Logic Pro X with speed and purpose will put your music out in the world and build your project catalog. You’ll be zipping around Logic Pro in no time.
Navigating Logic Pro
To get the most out of Logic Pro X, you should know the name and purpose of each area of the main window. Plus, if you ever need to contact the folks in product support, you’ll be able to communicate the problem with precision.
34 Part I: Leaping into Logic Pro X
Getting comfortable in the main window
The main window, shown in Figure 3-1, was called the arrange window in earlier versions of Logic Pro. The main window title makes more sense because you can use it to do a lot more than just arrange. The name also stresses the importance of this Logic Pro key element. As the highly effective Stephen Covey once said, “The main thing is to keep the main thing the main thing.”
Figure 3-1:
The Logic Pro X main window.
\\
The main window includes the tracks area and the control bar. It’s highly customizable and gives you all the tools you need to begin making music. To display the main window, choose View on the main menu bar.
Working in the tracks area
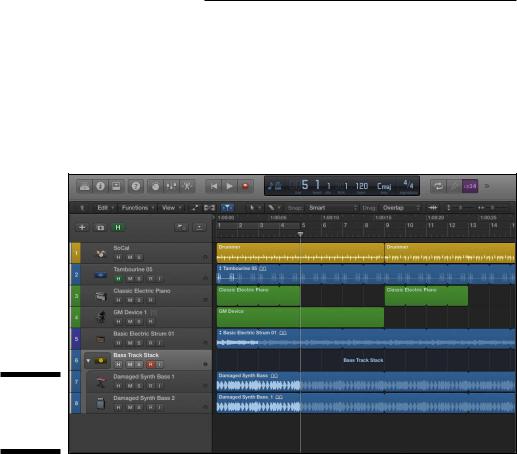
The tracks area, shown in Figure 3-2, contains your project’s tracks of audio and MIDI regions. When you create a project, Logic Pro asks you what type of track you would like to create. The tracks you create are added to the vertical track list to the left of the tracks area. To create more tracks, click the new tracks (plus sign) icon at the top of the track list or choose Tracks New Tracks. I cover the track list in more detail later in this chapter.
Chapter 3: Exploring the Main Window and Tracks Area |
35 |
Figure 3-2:
The tracks area in the main window.
\\
\ |
Download a Logic Pro X project template with several tracks and regions so |
|
you can follow along with the examples in this chapter. Visit http:// |
|
logicstudiotraining.com/lpxfordummies. |
The toolbar above the tracks area, shown in Figure 3-3, contains several menus to help you work.
Figure 3-3:
The tracks area toolbar.
Here’s an overview of what’s available in the menus:
\\The Edit menu gives you several functions that you can apply to your
regions, including basic functions such as copy and paste and regionspecific functions such as splitting, joining, and repeating. The options in this menu are almost identical to the options in the Edit submenu in the main application menu, so you have two places to execute commands. This feature is useful when you don’t have the main window open and are working in an editor in a separate window. For details on editing audio and MIDI, see Chapters 14 and 15.
\\The Functions menu gives you even more actions to take on your
regions, such as naming and coloring your tracks and regions, MIDI quantizing (snapping your MIDI events more precisely to the time grid)

36 |
Part I: Leaping into Logic Pro X |
and transforming, and removing silence from audio regions. When you want to do something to a region, check out the Functions and Edit menus first.
\\The View menu gives you more viewing options and useful tweaks to the
tracks area. If Advanced Editing is selected in the Advanced Preferences pane (see Chapter 1), you have a Link option to control the relationship between open windows. Selecting the secondary ruler is useful when you want to view your project ruler in clock time as well as in bars and beats. The marquee ruler gives you a visual indicator of selections you’ve made with the marquee tool. You can get rid of the grid in the tracks area if you’re working in free time or if it gets in the way visually. The Scroll in Play option continually scrolls the tracks area as you play.
\ |
I turn off the Scroll in Play option because I like my tracks area to snap |
|
when it reaches the end instead of continually scrolling. The tracks area |
|
behaves more like sheet music, where you have to turn a page when you |
|
get to the end, but Logic Pro is your personal page turner. I find it harder |
|
to follow the tracks area when it scrolls. |
\\To the right of the View menu are icons to display or hide automation
and futuristic flex modes (more on flex editing in Chapter 14) and catch the playhead, that is, the tracks area will follow (catch) the playhead instead of remaining still.
\ |
\In the center of the toolbar are two tool menus. The left tool menu is the |
|
currently selected tool that’s visible when your cursor is in the tracks |
|
area. The right tool menu selects the -tool that becomes available |
|
when your cursor is in the tracks area and you press the key. Both |
|
tool menus are described in detail later in the chapter. |
\\The snap function makes dragging regions easier. You can choose the
snap mode from the drop-down menu to the right of the tool menus. Smart mode is usually all you need until you’re trying to do something specific. At the top of the drop-down menu, you can choose a finer snap value if you need to move a region more precisely. If you snap a region to a relative value and the region doesn’t start exactly on the beat, it will move relative to its current position. That’s the default value and usually what you want, until you need to move something more precisely. To make use of snap modes, select Snap to Grid in the Edit menu.
\\To the right of the snap modes is your drag mode drop-down list. The
different drag modes allow you to overlap, not overlap, crossfade, or shuffle regions in a track. Overlap mode preserves the region borders of the selected region when you drag it on top of another region. No Overlap shortens the right boundary of the region on the left. X-Fade creates a crossfade the length of the overlapped area.
\ |
The shuffle modes move the regions in the direction of the particular |
|
shuffle mode selection; in addition, resizing a region resizes all the |
|
regions, and deleting a region moves the regions by the length of the |
|
deleted region. Shuffle is a complicated function that is used mostly in |
Chapter 3: Exploring the Main Window and Tracks Area |
37 |
audio situations such as editing voice-overs or audio interviews and not in musical settings. Only one audio region can be played at a time, so any part of a region that’s hidden won’t be heard.
\\Finally, on the far right of the toolbar are a zoom button that zooms your
audio waveforms and sliders that control the vertical and horizontal track zoom.
Controlling the control bar
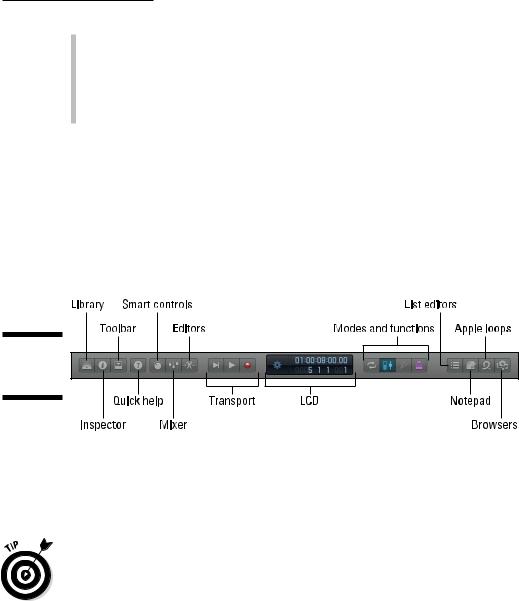
The control bar, which is shown in Figure 3-4, is located at the top of the main window. It contains view icons that show and hide windows, transport controls for playback and recording, an LCD display area for viewing important information about your project, and icons for different behavior modes and specific functions.
Figure 3-4:
The control bar.
You can customize the control bar by Control-clicking an empty area and choosing the Customize Control Bar option. On my 13-inch MacBook Air, I can’t see all the default control bar items, so I always customize it to show only what I need.
\After you customize the control bar the way you like it, save it as a template so you can recall it later. You can also import your customized control bar
from another project by importing the project’s screensets. You’ll learn more about screensets later in this chapter.
When you become comfortable using key commands to navigate Logic Pro, you may never need to click the control bar. But it still provides a good heads-up display, indicating whether certain functions are engaged.
The leftmost group of view icons displays the library, inspector, and toolbar.
To the right of the view icons are the Quick Help icon and the editor icons.
Here’s a brief description of what these icons allow you to do:

38 |
Part I: Leaping into Logic Pro X |
\\The library is where you load and save settings for recall later. It’s like
having a modular studio where you can save and load entire mixer setups, guitar amp settings, or even groups of software instruments. The library is one of the most powerful new features in Logic Pro X, and you find out about it throughout the book. The key command to open the Library is Y.
\\The inspector icon opens a dynamic editing window for the object or
objects currently selected in the tracks area. The inspector is more like three inspectors in one. It inspects the selected track, the channel strip where you adjust the track’s sound, and the selected region or regions. The key command to open the inspector is I.
\\The toolbar icon puts a customizable row of functions along the bottom
of your control bar. You can customize the toolbar by Control-clicking it and choosing Customize Toolbar. When you’re new to Logic Pro, displaying this toolbar is helpful. When you’ve memorized the key commands or need more screen real estate, however, you might want to hide the toolbar. You can do so by pressing Control-Option- -T.
\\The quick help icon is another good tool for new Logic Pro users. Click
this icon when the inspector is displayed, and you’ll see details for whatever your cursor is hovering over. If the inspector isn’t displayed, you’ll see a floating window with the same details. The quick help icon doesn’t have a key command, but you can create one for it. Details on creating key commands are provided later in the chapter.
\\The smart controls icon opens an editor that’s new in Logic Pro X. The
smart controls are displayed in the main window below the tracks area. The content of the smart controls editor depends on the selected track. Smart controls decide which parameters you need the most, and they do an almost perfect job. The key command to open the smart controls is B.
\\The mixer icon opens the pristine-sounding or dirty-sounding mixer,
depending on how you decide to mix it. The mixer is so versatile and great that it gets plenty of attention throughout this book, including an entire chapter on mixing (Chapter 16). Like the smart controls, the mixer appears at the bottom of the tracks area. The key command to open the mixer is X.
\\The editors icon displays the group of editors associated with the
selected region type. The editors open at the bottom of the tracks area; which editors you see depends on whether you have an audio, a MIDI, or a drummer region selected. All editors are covered in detail in Chapters 14 and 15. The key command to open the editors is E.
\\The transport is a collection of icons that provide basic controls for play-
ing, recording, pausing, stopping, forwarding, rewinding, and generally navigating your project. You can customize the control bar to contain your choice of 17 transport icons.

|
|
Chapter 3: Exploring the Main Window and Tracks Area |
39 |
|
|
||
\ |
Because all these functions are easily performed with key commands, I |
|
|
|
display only the most important controls on my transport. I always dis- |
|
|
|
play the stop, play, and record icons because when you click and hold |
|
|
|
down on them, you see additional options that you often need to adjust |
|
|
|
throughout your work. |
|
|
\\The LCD display indicates the current location of the playhead. You can
see your project in beats, time, or a customized display. To change the display mode, click the left section of the display and make a selection. A useful feature of the custom display options is to open a giant beats or time display in a separate floating window for viewing from afar.
\ |
You can enter data directly into the LCD display by double-clicking |
|
or click-dragging (for tempo and location). You edit other key project |
|
parameters, such as key and time signatures, by clicking the display and |
|
manually entering the data. |
\ |
During hard-drive- and processor-intensive work, such as recording and |
|
mixing, I like to show the load meters in the display so I know how far |
|
I’m pushing my computer. |
\ |
\To the right of the LCD display are several mode and function icons. You |
|
can customize the control bar so that is displays your most important |
|
modes and functions. |
\ |
A few mode icons, such as cycle mode, are useful to have available, even |
|
if you know the corresponding key command, because their pressed |
|
state lets you know quickly whether the mode is enabled. And some |
|
icons, such as the tuner, don’t have corresponding key commands so it’s |
|
handy to have them on the control bar. |
\\On the far right of the control bar is another group of view icons. The
list editors icon opens a window on the right side of the tracks area with four tabs: Event, Marker, Tempo, and Signature. Each tab gives you editing access to the smallest details of your project data. The Event tab updates its display depending on what you have selected. The Marker, Tempo, and Signature tabs show events that affect your project globally. The key command to open the list editors window is D.
\\The notepad icon opens a window on the right side of the tracks area
with two tabs of notes: Project and Track. I keep copious notes throughout my project, so I open these tabs a lot. The Project notes tab is a great place to write song lyrics. You could use the Track notes tab as
a change log, so you don’t forget what you’ve tried out or how you’ve edited your track. The key command to open the notepad is Option- -P.
\\The Apple loops icon opens a loop browser in a window on the right
side of the tracks area. You can filter your loops by using the descriptive icons or you can search for them directly in the search field. Selecting
a loop automatically auditions it. When you find one you like, drag it to the bottom of the tracks area, where you see the Drag Apple Loops Here text. The key command to open the Apple loop browser is O.
40 |
Part I: Leaping into Logic Pro X |
\\The browser icon opens a window on the right side of the tracks area
with three tabs: Project, Media, and All Files. The project browser shows you all the audio in your project. The media browser shows you all the media on your computer that is indexed by iTunes, GarageBand, and Logic Pro, as well as the movies in your User Movies folder. The all files browser works similarly to Finder; you can navigate to any location on your computer to import media. The key command to open the browser is F.
\\The master volume slider is a new feature in Logic Pro X and might be
familiar to GarageBand users. Because GarageBand doesn’t have a mixer, the master volume slider is the main way to turn your project volume up or down. In Logic Pro X, a master fader in the mixer serves the same function as the master volume slider on the control bar, so the slider isn’t necessary.
As you can see, the control bar gives you lots of, well, control. Even though most of these modes and functions are available as key commands, having them in your line of sight can help your workflow. For starters, you can click them. But more than that, they make great visual reminders of what you can do with Logic Pro. And if you’re up to the challenge, you can use them to help you memorize their key commands.
Polishing in the editors area
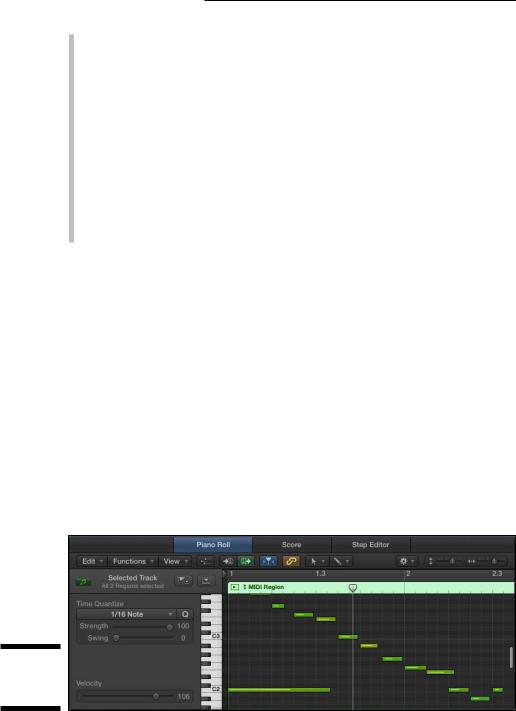
The control bar editor icons and corresponding key commands aren’t the only ways to open the various editors. Double-click an audio, a MIDI, or a drummer region and the corresponding editor will open at the bottom of the tracks area. An audio region defaults to the audio track editor. A MIDI
region defaults to the piano roll editor, shown in Figure 3-5. A drummer region defaults to the drummer editor.
Figure 3-5:
The editors area.
Chapter 3: Exploring the Main Window and Tracks Area |
41 |
In the audio and MIDI editor windows, you’ll see tabs for additional editors. The MIDI editor displays tabs for the score and step editors in addition to the piano roll editor. The audio editor shows a tab for the audio file editor in addition to the audio track editor.
Just like the tracks area, the editors area has a toolbar with edit, functions, and view menus; icons; tool menus; and snap and zoom settings. (You find out what the editors can do in Chapters 14 and 15.) When you learn how to navigate the tracks area, you’ll have a pretty easy time navigating the editors.
Investigating the inspector
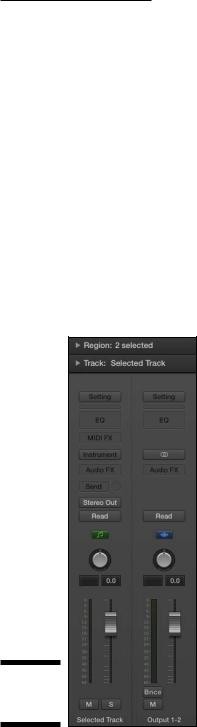
The inspector, shown in Figure 3-6, is an important tool, and you’ll quickly memorize its key command, I. (When you’ve memorized the key command, consider deleting the inspector icon on the control bar to free up space.) The inspector can take up a lot of space in the main window, but it’s integral to editing your tracks and shaping your sound.
Figure 3-6:
The inspector.
\\