

Chapter 3: Exploring the Main Window and Tracks Area |
55 |
Smart controls and the 80/20 rule
Vilfredo Pareto, an Italian economist, discovered that 80 percent of the income in Italy (and every country he studied afterwards) was in the hands of 20 percent of the population. Since his discovery, the 80/20 rule has been applied to just about everything: 80 percent of your business comes from 20 percent of your clients; 80 percent of your results come from 20 percent of your efforts.
And now I will make the connection between Logic Pro X and the 80/20 rule: Smart controls
give you 20 percent of the controls that you will use 80 percent of the time.
Use the 80/20 rule as a lever to get more accomplished and with better results. I use it to select my opportunities, schedule my time, and guide my songwriting. And when you find out that your tools are purposefully designed to give you 80/20 leverage, you can believe that the Logic Pro X designers want you to make more music.
Smart controls are your 80/20 lever.
\3.\ Click the external assignment disclosure triangle to display the assign-
ment name field.
\4.\ Click the Learn button.
\5.\ Move the control on your MIDI device that you want to pair with the
selected control on the layout.
\ |
As long as the Learn button is enabled, you can continue to select con- |
|
trols in your smart controls layout and move controls on your MIDI |
|
device to pair the hardware and software. |
\6.\ When you’re finished, click the Learn button.
You’ve just paired your MIDI controller with your smart controls and saved yourself time. You’re beginning to love Logic Pro X For Dummies, aren’t you? And we’re just getting started.
Navigating with Key Commands
The absolute fastest way to navigate Logic Pro is with key commands. I’ve talked about key commands quite a bit and don’t intend to stop. I sometimes talk about key commands on intimate dates and important holiday gatherings. I find them to be festive and captivating. And even if my date doesn’t agree that key commands are great conversation starters, I’m sure you will.
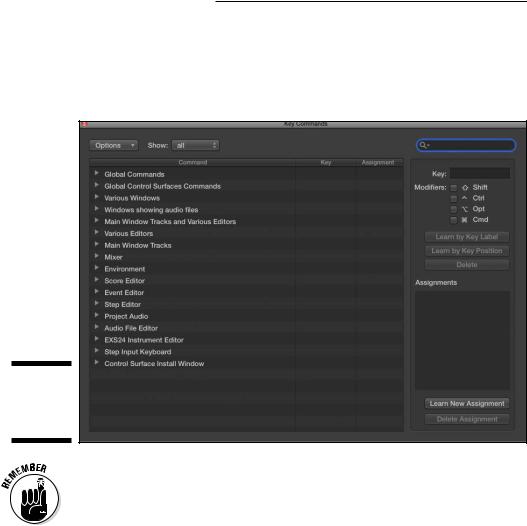
Learn any new key commands lately? Open the Key Commands window, shown in Figure 3-14, by pressing Option-K or by choosing Logic Pro X Key Commands Edit. Your cursor is automatically placed in the search field. Type the name of the command you’re looking for, even if you have to guess
56 Part I: Leaping into Logic Pro X
at the keywords, and your search results will be displayed in the key commands list. If you press Tab, your cursor will move to the key commands list and pressing any key combination will instantly take you to the associated command.
Figure 3-14:
The Key
Commands
window.
\ |
|
The key command to open the key commands is Option-K. If you can’t remem- |
|
|
ber which modifier key to use, it doesn’t hurt to try all the modifier keys until |
|
|
you get it right. Anything you do to your project you can undo. |
|
|
From the Key Commands window, you can create your own key commands:
\1.\ Search or browse for the command.
\ |
2.\ Select the command and then click the Learn by Key Label button. |
\ |
If you have a keyboard with a numeric keypad and you want to distin- |
|
guish between number keys on the alphanumeric keyboard or numeric |
|
keyboard, press the Learn by Key Position button instead. A full-size |
|
keyboard is a great tool for music production. The additional keypad can |
|
store a lot of key commands. |

|
|
Chapter 3: Exploring the Main Window and Tracks Area |
57 |
|
|
||
\ |
3.\ Press the key and modifier key or keys. |
|
|
\ |
If the key command is already in use, an alert will ask you to cancel the |
|
|
|
operation or replace the key command. |
|
|
\4.\ Click the Learn by Key Label button again to finish.
What’s the next best thing to being able to assign thought commands? How about assigning commands to your MIDI controller? Simply follow these steps:
\1.\ Search or Browse for the command.
\2.\ Click the Learn New Assignment button.
\ |
3.\ Press a button on your MIDI controller. |
\4.\ Click the Learn New Assignment button again to finish.
To delete a key command, select the command and click the Delete button.
To delete a controller assignment, select the command and click the Delete
Assignment button.
At the top of the Key Commands window is an Options drop-down menu with the following options:
\\Presets: Choose a key command preset for another language and, in
some instances, other presets installed on your computer.
\\Import Key Commands/Export Key Commands: If you have customized
key commands that you use regularly and have to work on a different computer, you can simply import your key commands from this menu. Be a good guest and back up the owner’s key commands first.
\\Copy Key Commands to Clipboard: This menu item is useful if you want
to print your key commands for reference, all 30 or so pages of them.
\\Expand All/Collapse All: So many key commands are available that it’s
necessary to group them into categories. Being able to expand and collapse the key command menus will help you browse all your choices.
\\Scroll to Selection: If you have a key command selected at the bottom of
the list but you’ve travelled to the top of the list looking for another key command, you can quickly jump to your selection using this command.
\\Initialize all Key Commands: This item resets all your key commands
to their original state, erasing all key command modifications you may have made. Fortunately, the original set of key commands is a great place to start.
To the right of the Options menu is an additional drop-down menu to show all, used, or unused key commands. Some functions are available only by using a key command. If you open the Key Commands window once a session and learn a new key command, it will be a valuable session.

58 Part I: Leaping into Logic Pro X
Saving Workspaces with Screensets
As you’ve discovered so far, Logic Pro X has lots of windows, inspectors, icons, and interfaces. You could probably imagine having two or three 30-inch displays with everything open all at once. So what do you do when you get your screen just the way you like it? You create a screenset, a snapshot of your current screen layout.
I love screensets. Whenever I move windows around and get them the way I like them for a particular job, I save it as a screenset. If I need to do a different job with a different focus, I create a new screenset. I give you some ideas about how you can use screensets later, but first let me show you exactly what screensets are and how they help you make more music.
You’re always using a screenset. The numbered menu to the right of the Window menu shows you what screenset is currently selected. Screensets store window size and placement, your control bar customization, your zoom level, and much more. You can import another project’s screensets by using the import project settings (see Chapter 2). You can assign screensets to all the number keys except 0, which makes them easy to navigate. You can also store double-digit screensets. Press Control for only the first digit of doubledigit screensets (but you still can’t use 0).
To create a screensets, do one of the following:
\\Press any number key from 1–9. If a screenset doesn’t already exist, one
is created. To create screensets higher than 9, press Control with the first digit.
\\Click the Screenset menu (the number in the main menu to the right
of Window) and choose Duplicate to make a copy of your current screenset. Name your screenset in the dialog that appears and press OK.
After you have a screenset exactly how you like it, you can lock it from the Screenset menu. You can also delete and rename screensets from the Screenset menu.
Screensets are easy to recall because all you have to do is use your number keys. Most projects don’t need more than 9 screensets, but it’s nice to know you can have as many as you want in case you need them for a specific workflow.
Following are some ideas for using screensets:
\\Open the score in a separate window from the main window to reference
the music notation while you record or edit.
\\Open the Mixer and Floating Transport windows when you’re focusing
on mixing.

Chapter 3: Exploring the Main Window and Tracks Area |
59 |
\\Audio and MIDI editing might need windows to be positioned just right
for a good workflow.
\\Software instruments and their interfaces can get their own screenset
for quick sound editing or playing.
\\Open a main window with no inspectors or editors so you can see your
full arrangement quickly. Don’t forget the Z key command, which zooms everything to fit in the main window.
\\If you work on a laptop and a desktop computer like I do, you can create
a set of screensets optimized for the display size and save them as a template for either starting projects or importing the screensets into current projects.
Here’s how I use screensets. I reserve screenset number 9 for project notes and number 8 for track notes. Both screensets have the Notes window open and set to the correct tab so I can quickly jot down ideas and references and keep a change log. Screenset number 1 is reserved as an ad hoc workspace where I can set up windows for specific workflows and then duplicate the screenset to its own name and number. Whenever I get the windows just right for what I’m about to do, I duplicate it as its own screenset and give it a descriptive name.
You’ve learned why Logic Pro X is a music producer’s powerhouse and timesaver. It’s capable not only of sounding great but also of bringing out the great in you.

60 |
Part I: Leaping into Logic Pro X |