

Chapter 13: Arranging Your Music 227
Stripping silence from audio regions
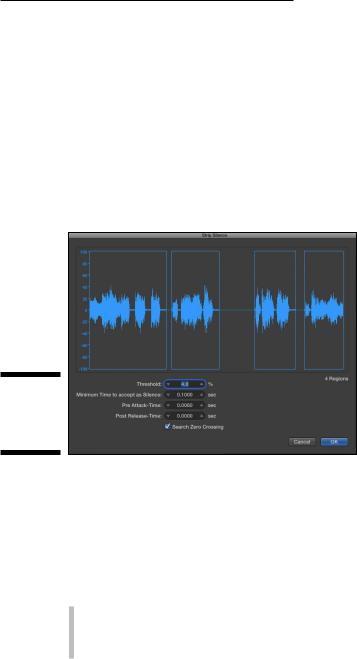
Sometimes you’ll record a take the entire length of a song but record audio only some of the time, for example, when recording background vocal tracks. You might be recording only a few notes every fourth bar, but you leave record on for the entire length of the song. You can quickly strip the silence from the long region to create many smaller regions. Control-click the region and choose Split Strip Silence (Control-X) on the pop-up menu. The Strip Silence window opens, as shown in Figure 13-20, and you can adjust the settings that determine the number of regions. Click OK and your big region becomes many regions.
Figure 13-20:
The Strip
Silence window.
\\
Creating Folder Tracks
Logic Pro can help you organize your arrangement and experiment with different arrangements by using folders. A folder is a container. It looks just like a region but it can contain other regions. You can also have folders within folders. You might use folders to
\\Organize tracks and song sections
\\Nest parts of an arrangement
\\Nest alternate versions of a part
228 Part IV: Arranging and Editing Your Project
\ |
If you want to organize your tracks, another option is a folder track stack. You |
|
find out how to create track stacks in Chapter 4. Track stacks make it easy to |
|
open and close folders of tracks, which simplifies your workspace. |
|
Packing and unpacking folders |
|
You can select as many regions as you want and put them into a folder. If the |
|
selected regions are on the same track, the folder is added to the same track |
|
as the regions. But if the selected regions are on different tracks, a new folder |
|
track is created. To create a folder, do the following: |
\ |
1.\ Select the regions you want to include in the folder. |
\ |
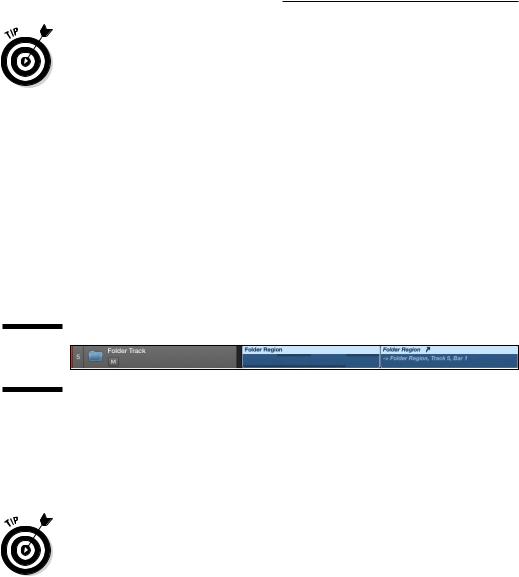
2.\ On the tracks area menu bar, choose Functions Folder Pack Folder. |
\ |
A folder track is created containing the regions, as shown in Figure 13-21, |
|
and the regions are removed from the tracks area. |
Figure 13-21:
Afolder track.
\ \ A folder looks like a region in the tracks area. A folder doesn’t have a channel
strip, so a folder track does not have audio controls. Double-click the folder to open the folder contents and display the tracks area of the folder. To leave the folder, click the leave folder icon (shown in the margin) on the tracks area menu bar or double-click an empty spot in the tracks area.
\You can drag a folder region to an audio or MIDI track type and the corre-
sponding contents of the region will play through the track’s channel strip. So if you drag a folder that contains MIDI to a MIDI track type, the MIDI regions play through the track’s channel strip. Likewise, a folder containing audio regions can be played on an audio track.
To unpack the contents of a folder, do the following:
\1.\ Select the folder region.
\2.\ Choose Functions Folder Unpack Folder to Existing Tracks or
Unpack Folder to New Tracks.
\ |
The regions contained in the folder are added to the tracks area. |
Chapter 13: Arranging Your Music 229
Adding and removing regions
To add regions to an existing folder, drag them onto the folder at the location you want them to play. The region is moved into the folder along with its track. To remove regions from the folder track, open a second main window and drag the regions from the folder to the main tracks area:
\1.\ Press -1 or choose Window Open Main Window.
\ |
A second main window opens in a new window. |
\ |
2.\ Double-click the folder region to view its contents. |
\ |
The tracks area displays all the regions contained in the folder. |
\3.\ Drag the regions from the folder to the tracks area in the first main
window where you want them to play.
\ |
Your region is moved to the main tracks area and is no longer contained |
|
in the folder. |
Creating alias folders and regions
Region aliases and clones are references not to science-fiction movies but to regions in the tracks area. You can create a region that references an original region, allowing you to edit the original and have the alias change too. These regions are referred to as aliases if they’re MIDI regions or clones if they’re audio regions. You can also create folder aliases. Aliases are great
for parts that repeat because you have to edit only the original region, and all the aliases will be updated with the new edit.
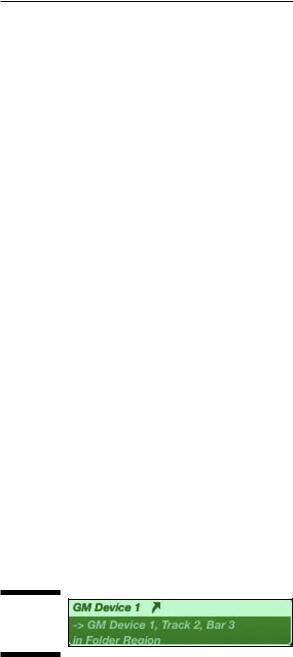
To create an alias of a region, press Shift-Option while dragging the region to a new location. If you make an alias of a MIDI region or folder region, the alias region looks different than the original, as shown in Figure 13-22. The name is in italics and the region has an alias icon. Cloned audio regions look the same as the original, which makes them less desirable than MIDI or folder regions.
Figure 13-22:
Aregion alias.
\\
230 Part IV: Arranging and Editing Your Project
\Audio clones have limited cloning capability because only the start and end points of the original region are cloned. You can get around this limitation by
packing the audio regions into a folder and then making an alias of the folder. Then all the edits you make to the regions in the original folder will be cloned in the folder alias.
Using Groove Templates
Another important part of arranging is creating parts that feel good together. Logic Pro gives you two amazing ways to make audio, and MIDI tracks follow the same groove:
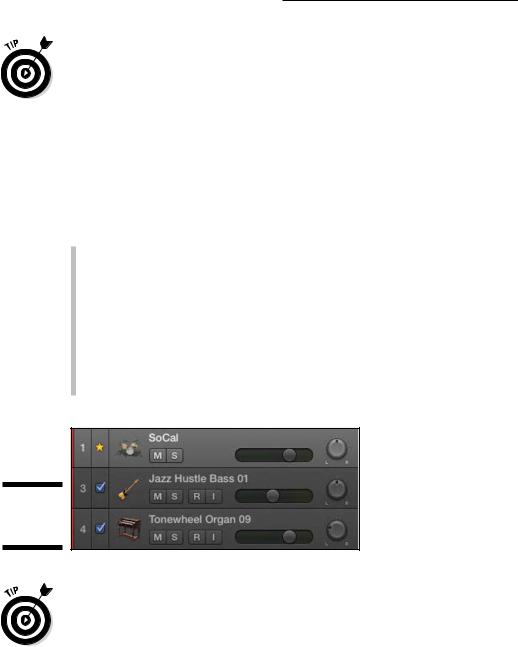
\\Groove track: You can set one track in your project as the groove
track and select other tracks to follow the timing of the groove track. Control-click anywhere on the track list and choose Track Header Components Show Groove Track. Click the track number of the track that defines the groove. A second column of check boxes appears in the track header, as shown in Figure 13-23. Select the check box to follow the groove track.
\\Groove template: You can create custom quantized grids based on an
audio or MIDI region. You apply the grid to other regions so they get the same feel.
Figure 13-23:
The groove track.
\\
\You can make groove templates as long as you like, but it’s usually best to create short ones, between two and four bars. Because you can create mul-
tiple groove templates in a project, you can model the groove from several different instruments and musical parts and use it throughout your project to enhance the timing and feel.
Chapter 13: Arranging Your Music 231
Creating a groove template
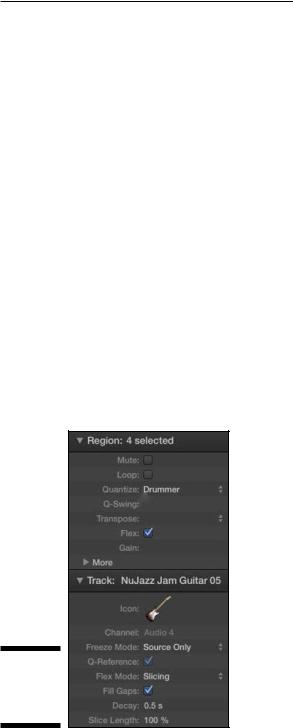
If you have a drummer track in your project, selecting a drummer region for your groove template is a great choice. But if you have a region that you think defines the groove better, select it. Better yet, create groove templates from both regions. Nothing is holding you back from creating groove templates from every region in your project. To create a groove template:
\1.\ Select the region you want to model for the groove template.
\2.\ On the Flex Mode pop-up menu in the track inspector (I), select a flex
time mode, as shown in Figure 13-24.
\ |
Because the transients in the audio region are used to quantize the |
|
region, either Slicing or Rhythmic flex time mode is a good choice. |
\3.\ On the Quantize pop-up menu in the region inspector, select Make
|
Groove Template. |
\ |
The groove template is added to the quantize menu, named after the |
|
region. |
\4.\ Select the regions you want to quantize with the groove template.
\5.\ On the Quantize pop-up menu in the region inspector, select the new
groove template.
\ |
The timing of the region matches the groove template. |
Figure 13-24:
The track and region inspector.
\\

232 Part IV: Arranging and Editing Your Project
\ |
|
If you delete the region on which a groove template is based, the groove tem- |
|
|
plate is deleted too. After a groove template quantizes a region, you can create |
|
|
a second groove template from the quantized region. This safeguards your |
|
|
groove template from being lost if the original region is deleted. You can also |
|
|
|
|
|
manually remove groove templates by using the region inspector Quantize |
|
|
menu. |
Importing groove templates from other projects
Because groove templates are based on regions in your project, any media you import can be used as a groove template. You can collect regions with good grooves and save them in a project template, as you learn in Chapter 2. Start your next project with this template and all your grooves will be ready to load.
\Groove track and groove templates can be used together. You can create groove templates from the tracks that follow your groove tracks. You can now
delete the original groove track because the tracks that were following the groove track are now following a groove template.
Importing third-party groove templates
You can import third-party groove templates by choosing File Import Other and navigating to the file. Logic Pro supports standard MIDI files and DNA Groove Template files. Because groove templates are basically MIDI events that are used to set quantize values, any imported MIDI file can become a groove template. Also, because you can quantize audio using flex time, as you learn in Chapter 14, even your imported audio can become a groove template. Groove templates are unbeatable at getting the right feel in your arrangement.
Now that you can build an arrangement in the tracks area, you can listen to how your favorite artists arrange their music and duplicate what they do in Logic Pro. You can import audio you love and make templates to tighten up your groove. Your command of folders and global tracks will make you more productive.
If you put Logic Pro to work for you, your arrangements will feel great and sound solid. Even the greatest musicians can benefit from Logic Pro’s timing enhancements and workflow shortcuts. Don’t feel odd or embarrassed if you find yourself saying, “Logic Pro, I couldn’t have done it without you.” I’m almost certain Logic Pro thinks the same about you.