

Chapter 4: Embracing Tracks and Regions |
67 |
You might use a folder track to
\\Store tracks you’re no longer using
\\Organize the regions of song sections
\\Organize arrangements and parts in a song
\\Sequence longer material, such as albums and musicals
To create a folder track, do the following:
\1.\ Select the regions in the tracks area.
\2.\ In the tracks area toolbar, choose Functions Folder Pack Folder.
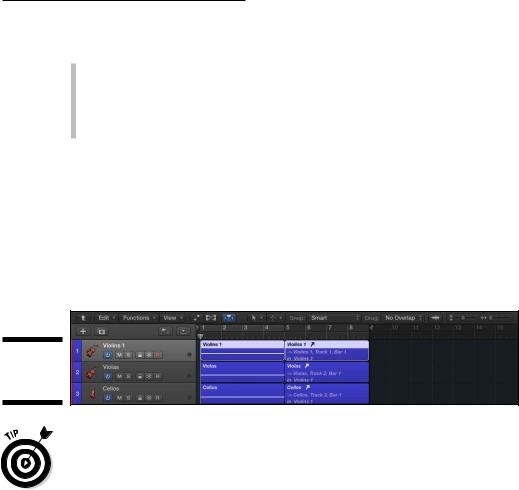
To view the contents of a folder track, double-click the folder. To exit the folder, click the leave folder arrow on the far left of the tracks area menu, as shown in Figure 4-8.
Figure 4-8:
Folder track contents.
\ |
After you’ve created a folder track and put some MIDI tracks in it, you can |
|
move that folder to an empty software instrument track and the MIDI in the |
|
folder will play the software instrument. |
You can unpack a folder by selecting the folder and choosing Functions Folder. Then choose Unpack Folder to New Tracks if you want to create tracks in the tracks area of the current project level, or choose Unpack Folder to Existing Tracks to use the existing tracks of the current project level.
As you just discovered, tracks do more than just hold audio and MIDI. They are creative instruments that you can play and explore.
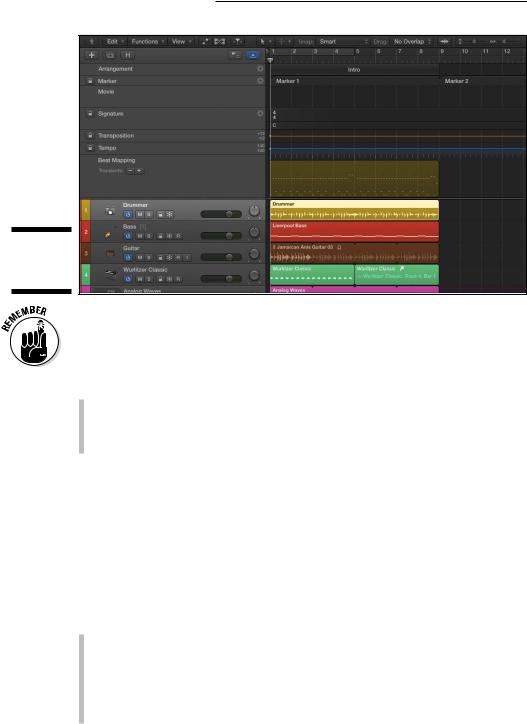
Around the Global Tracks
Global tracks, shown in Figure 4-9, contain lanes and data, but they’re global to the project. Global settings such as tempo and time signature changes affect the entire project, and you set them in your global tracks.
68 |
Part I: Leaping into Logic Pro X |
Figure 4-9:
The global tracks.
\ |
|
To have all the options mentioned in this book available to you, choose Logic |
|
|
Pro X Preferences Advanced and select all the options. |
|
|
|
|
|
|
To display your global tracks, do one of the following:
\\Choose Track Global Tracks Show Global Tracks.
\\Press G.
\\Click the global tracks icon at the top right of the track headers menu.
You might not see all available global tracks on the screen. To choose which global tracks are displayed, do the following:
\1.\ Choose Tracks Global Tracks Configure Global Tracks or press
Option-G.
\ |
2.\ Select the global tracks you want to show. |
\3.\ Click Done.
Here’s a brief description of the different global tracks:
\\Arrangement track: The arrangement track creates special markers that
are meant to help you organize your project based on common song sections, such as chorus, verse, and intro.
\\Marker track: The marker track lets you mark spots on your project.
You can name your markers, put descriptive text on them, and navigate to them by using key commands.

Chapter 4: Embracing Tracks and Regions |
69 |
\\Movie track: The movie track shows thumbnails of imported movies.
To import a movie into your project, choose File Movie Open Movie. You can choose to extract the audio from the movie into a track in your project.
\\Signature track: The signature track controls both the key signature and
the time signature of your project. You can change either at any point in your project by selecting the pencil tool on the tool menu and clicking where you want the change to occur.
\\Transposition track: The transposition track transposes MIDI and Apple
loops but not audio files. Click the track with the pencil tool to create a transposition node. Drag the node up or down and MIDI regions, MIDI Apple loops, and audio Apple loops will follow the transposition track.
\\Tempo track: The tempo track defines your object tempo. Double-click
anywhere in the tempo track lane to create a new tempo node. Adjust the tempo by dragging the node up or down.
\\Beat mapping track: The beat mapping track aligns the project tempo to
the content on your tracks. It’s useful for projects that don’t have a consistently perfect tempo.
Global tracks are covered in even more detail in Chapter 13, where you learn about arranging.
Sorting and Hiding Tracks
You can move tracks by dragging the track headers up and down. You can also sort tracks automatically according to type or whether or not they are being used by choosing Tracks Sort Tracks By.
Hiding tracks is useful when you want to clean up your project. You might not be ready to delete a track that’s no longer being used, but you want it out of the way. Here’s how you can hide tracks:
\1.\ Click the green hide icon on the track header menu (or press H if the
icon isn’t visible), as shown in Figure 4-10.
\ |
Hide icons will appear also on each track. |
\ |
2.\ Click the hide icon on the track you want to hide. |
\ |
The icon turns green. |
\ |
3.\ Click the hide icon in the track header again. |
\ |
The icon turns orange, indicating that tracks are hidden. The track is |
|
hidden from the track list and the channel strip disappears from the |
|
mixer. |

70 |
Part I: Leaping into Logic Pro X |
Figure 4-10:
Hiding tracks.
\\
To unhide your tracks, click the hide icon in the track header. The tracks are again displayed in the track list and mixer.
Knowing the Region Types
The rounded rectangles in your tracks area are called regions. Think of regions as flexible placeholders for your audio and MIDI data. Regions can be empty, waiting for you to add content, or created as you record new content. Regions are references to your MIDI and audio data. They can even reference a reference, allowing you to change one region and have all other regions follow suit.
In this section, you discover the different types of regions and how to use them.
Audio region
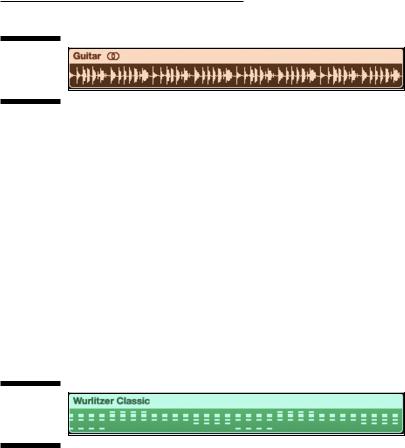
An audio region can be your own audio recording, an audio Apple loop, or an imported audio file. Audio regions, shown in Figure 4-11, can be only audio tracks. You can identify an audio region by its audio waveforms.
Chapter 4: Embracing Tracks and Regions |
71 |
Figure 4-11:
An audio region.
\\
Audio regions contain references to audio files. An audio region isn’t the file itself, and this is important to remember. If you split an audio region in half, for example, the audio file isn’t split in half. And if you delete a portion of an audio region, the audio file isn’t deleted — it simply isn’t referenced by the region any more. If you want to get that portion of audio back, all you have to do is drag the edge of the region. You learn more about basic region editing later in this chapter.
MIDI region
A MIDI region contains MIDI data. MIDI regions can be used on software instrument tracks or external MIDI tracks. You can identify MIDI regions by their thin rectangle note events, as shown in Figure 4-12.
Figure 4-12:
A MIDI region.
\\
MIDI regions are more flexible than audio. You can definitely manipulate audio beyond recognition, but you can’t remove a single note from an audio file and put it on its own track, as you can with MIDI. MIDI regions allow you to experiment and compose with complete freedom.
Drummer region
A drummer region can appear only on a drummer track. Drummer regions, shown in Figure 4-13, are like a MIDI-audio hybrid region. They look like audio but they contain MIDI data. The difference between a drummer region and a MIDI region is that you can’t edit the MIDI data directly on a drummer region. You have to use the drummer editor to edit the drummer region. However, after you’re happy with how a drummer region sounds, you can export the region as MIDI to edit in a MIDI editor. For details, see Chapter 9.