


90 |
Part II: Digital Recording and Using Prerecorded Media |
Understanding MIDI
The MIDI (Musical Instrument Digital Interface) protocol enables compatible devices to send and receive data. It was created to allow hardware to speak to each other. Logic Pro uses the MIDI protocol to play and record software instruments, automation, and external MIDI hardware. In this next section, you find out how to use MIDI and to connect your MIDI devices to Logic Pro.
\ |
|
MIDI does not contain audio. Your external MIDI devices still need their audio to |
|
|
be routed into your computer and Logic Pro to be heard. Follow the instructions |
|
|
for connecting your audio devices as described previously in the “Connecting |
|
|
Your Audio Devices” section. |
|
|
Sending MIDI messages
MIDI messages are sent from one device and received by another, such as from a MIDI controller to Logic Pro. These messages can include information about pitch, velocity, sustain, and much more. Logic Pro translates the MIDI messages and sends them to a software instrument or to external
hardware. (You create software instrument tracks and external MIDI tracks in Chapter 4.)
You’ll use MIDI to accomplish many of your musical goals in Logic Pro. As described in Chapter 3, you can even assign your MIDI controller to a Logic Pro command. It’s not difficult to map a button on your MIDI keyboard to tell Logic Pro to play your project. But while Logic Pro is always using MIDI under the hood, you’ll mostly be using MIDI to play software instruments.
To verify that Logic Pro is receiving the messages your MIDI controller is sending, show the MIDI activity in the LCD on your control bar as follows:
\1.\ Control-click an empty area on your control bar and choose Customize
Control Bar and Display.
\ |
A window opens with customization options. |
\2.\ In the LCD column, choose Custom.
\ |
3.\ Select the MIDI Activity (In/Out) check box. |
\4.\ Click the OK button.
\ |
Your LCD displays a small dot in the upper-right corner . If no MIDI is |
|
being received, the display will read No In/No Out. |

Chapter 5: Introduction to Digital Audio and MIDI |
91 |
Changing MIDI channels
MIDI devices send and receive information on 16 different channels. Many Logic Pro software instruments are multi-timbral, which means they can play multiple different sounds simultaneously. You can set these sounds to different MIDI channels, which allows you to play them independently using multiple MIDI controllers. Or if you have a MIDI controller that has a split or layer function, you can potentially use a single keyboard to play multiple software instruments at a time. You find out how to set MIDI channels for MIDI recording in Chapter 7.
Connecting Your MIDI Devices
MIDI devices can include keyboards, drum pads, alternative controllers such as guitar MIDI systems, and more. Although you don’t need a MIDI controller to make music with Logic Pro, it’s a lot more fun if you have a way to play software instruments. And trained players can make use of their skills to input music more quickly and accurately.
Connecting MIDI controllers
Many MIDI controllers will send and receive MIDI through USB, eliminating the need for a third-party interface. Older MIDI controllers may use 5-pin DIN cables and require a third-party hardware interface. Connect your controller to your MIDI interface or to your computer’s USB port.
Connecting external instruments
If you’re connecting a MIDI synthesizer or workstation to Logic Pro, in addition to making MIDI connections, you must be able to monitor the instrument’s audio. If your audio interface supports hardware monitoring, you can monitor the instrument through your hardware. If it doesn’t, you’ll need to add an audio track to your project to monitor the instrument. For more on monitoring audio sources, see Chapter 6.
\ |
When you play the keyboard, the instrument is sending and receiving MIDI at |
|
the same time, so sounds are doubled. Most keyboards have a Local Off func- |
|
tion, which you’ll want to use to stop the sound from doubling. |

92 |
Part II: Digital Recording and Using Prerecorded Media |
Exploring MIDI preferences
Global and project preferences are similar to audio preferences. To open the Global MIDI Preferences pane, choose Logic Pro X Preferences MIDI. Here’s a brief description of three tabs in the MIDI Preferences pane:
\\General: If you have MIDI communication problems, click the Reset All
MIDI Drivers button.
\\Reset Messages: If your MIDI controllers get stuck, including stuck notes,
select the controller you want to reset on this tab.
\\Sync: If you want to sync Logic Pro with another device or adjust the
timing of your MIDI, you can do so on this tab.
To open the Project MIDI Preferences pane, choose File Project Settings MIDI. Here’s a brief description of the three tabs on the Project Preferences pane:
\\General: You can set up MIDI to scrub with audio in the tracks area.
Scrubbing means to audition audio while you drag your cursor over it.
\\Input Filter: If you’re not using certain MIDI functions or don’t want
these functions to be sent or received, you can select them on this tab and they will be filtered out.
\\Chase: Use this tab to set how MIDI events will behave when you start
your project after a MIDI event has been triggered. For example, if you play your project in the middle of a pitch bend, selecting the Pitch Bend check box will ensure that the bend is synchronized correctly.
You can use the Audio MIDI Setup utility to set up devices connected to your computer. (Audio MIDI Setup is in the Utilities folder of your Applications folder.) You can test MIDI and audio devices, set audio levels, and much
\more. For a video tour of the Audio MIDI Setup utility, visit http://logic studiotraining.com/lpxfordummies.
Now that you know the fundamentals of digital audio and MIDI, you’re well on your way to recording your own audio and MIDI. With your hardware set up and your audio and MIDI preferences chosen, you’re ready to begin recording some great sounds.

Chapter 6
Recording Audio
In This Chapter
\Setting up Logic Pro for recording audio \Recording audio tracks and multiple takes \Overdubbing and punch recording audio \Setting up separate monitor mixes
Audio recording was introduced to the original Notator Logic in 1994, about 20 years before the introduction of Logic Pro X. “The Sign” by
Ace of Bass was the number-one song that year. While I can’t confirm that the song was referring to the emergence of computer audio recording, I can confirm that it was a breakthrough year for Logic.
Fast forward 20 years and you have a powerful and an affordable digital audio workstation that scores of major artists are using to create chart-topping hits. In this chapter, you discover how to record audio, build the perfect track from multiple recordings, and much more.
Preparing to Record Audio
In Chapter 5, you connect your audio hardware, set the project sample rate, and select the recording file type. You should confirm that the incoming signal from your audio source (microphone or instrument) is being received by your audio interface by checking the levels of your hardware inputs. (Check your audio interface documentation for details.)
Before you can begin recording, you need to create an audio track by choosing Track New Audio Track. The new audio track is added to the track list and selected automatically.
\ |
Name your new track something descriptive because the audio files generated |
|
from recording will use the track name in the file name. To name your track, |
|
double-click the track header or press Shift-Enter and type your track name. |
94 |
Part II: Digital Recording and Using Prerecorded Media |
On your new track, select the correct input as follows:
\1.\ Select the track.
\2.\ Open the track inspector by pressing I or by choosing View Show
Inspector.
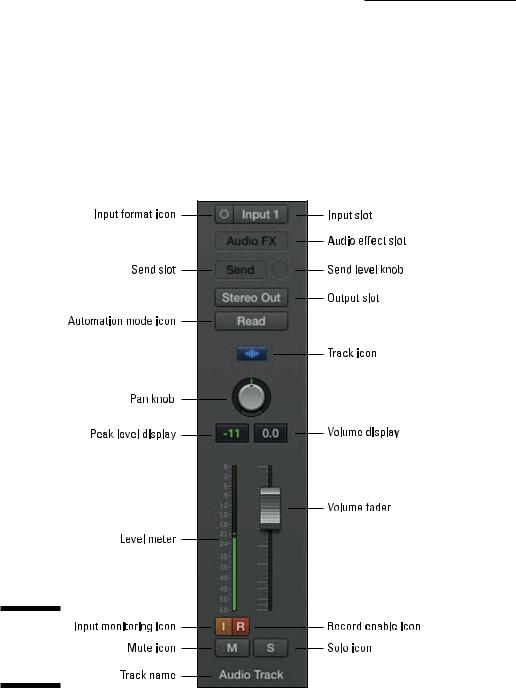
\3.\ Click the Input slot, as shown in Figure 6-1, and choose the correct
input.
\4.\ Click the input format icon to toggle between stereo and mono input.
Figure 6-1:
The Audio Track channel strip.
\\
Chapter 6: Recording Audio |
95 |
Test your recording levels
To test the volume level at which you’ll record, enable the track for recording by clicking the record enable icon on the track header (refer to Figure 6-1) or by pressing Control-R. The record enable icon will blink red to let you know that the track is enabled for recording. Play your instrument or speak into your microphone to test the recording level. If your signal is too high or low, adjust the instrument volume or the input level on your audio interface.
\ |
Don’t clip the audio signal! When a signal is too loud and exceeds the limit that |
|
digital audio can reproduce, the signal is said to be clipping. You can see when |
|
your signal is clipping by the peak level display at the top of your track’s level |
|
meter, as shown in Figure 6-2. When the number above the level meter is posi- |
|
tive, the peak level display will become red, indicating that the track is clip- |
|
ping. During the recording phase, the best way to remedy signal clipping is to |
|
lower the volume on your instrument or audio interface. (Be sure to check for |
|
clipping on your audio interface as well.) |
Figure 6-2:
The track header.
\ \
\ |
|
You must have Show Advanced Tools selected in the Logic Pro X Advanced |
|
|
Tools Preferences pane. Choose Logic Pro X Preferences Advanced Tools |
|
|
and select Show Advanced Tools. |
|
|
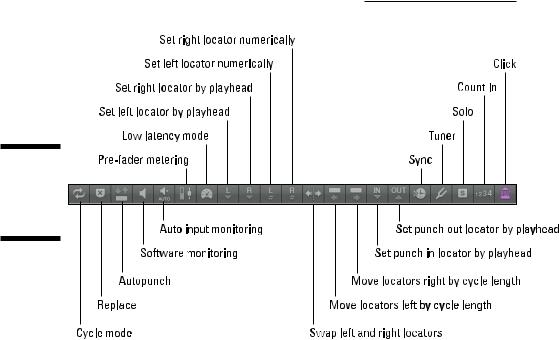
\Pre-fader metering, which is used to test recording levels, means the level
meter shows you the level of the signal before the fader. You can turn on prefader metering by customizing your control bar, as described in Chapter 3, and selecting Pre Fader Metering in the Modes and Functions column. An icon is added to your control bar, as shown in Figure 6-3, to allow you to toggle pre-fader metering. You want your meters to show you the signal pre-fader so that you can be aware of what’s being recorded, even if you lower the fader to blend better with the other tracks. If you use post-fader metering, the meter will show you the level of the track after it has been raised or lowered, and you won’t know whether it’s clipping.
96 |
Part II: Digital Recording and Using Prerecorded Media |
Figure 6-3:
The control bar modes and functions.
Enable software and input monitoring
If you’re not going to monitor your signal through your hardware, you’ll need to turn on software monitoring. Follow these steps:
\1.\ Choose Logic Pro X Preferences Audio.
\ |
The Audio Preferences window opens. |
\2.\ Click the Devices tab.
\3.\ Select the Software Monitoring check box.
\ |
You can now use the Logic Pro software to monitor your audio. If you |
|
plan on monitoring the signal through your hardware, deselect Software |
|
Monitoring. |
|
When a track is record enabled, you’ll be able to hear it. If a track isn’t record |
|
enabled, you won’t hear it unless you’ve turned on input monitoring. |
|
If you’re monitoring from hardware and not software, you should turn off |
|
input monitoring. Turn it off and on by clicking the input monitoring icon on |
|
the track header (refer to Figure 6-2) or on the channel strip. |
Chapter 6: Recording Audio |
97 |
Setting up the metronome
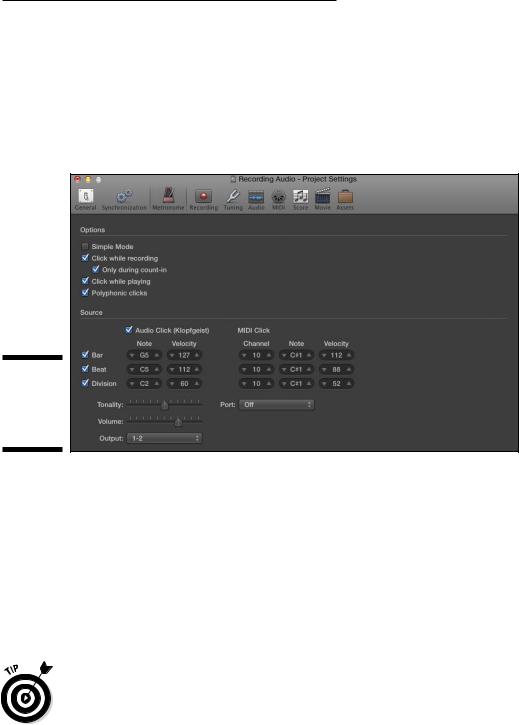
By default, Logic Pro will play a metronome as you record. To turn off the metronome while recording, choose File Project Settings Metronome and select the Click While Recording check box, as shown in Figure 6-4. If you want to hear the metronome while you play the track, press K to toggle the metronome on and off.
Figure 6-4:
The met-
ronome
Project
Settings.
The audio click you hear in the metronome is generated by the Klopfgeist software instrument. You can play it as instrument (though I don’t know why you’d want to). You can also set up an external sound source as your metronome. In Figure 6-4, MIDI channel 10 is set to transmit a MIDI click. MIDI channel 10 is often reserved for drum sounds, so if you have a multi-timbral keyboard workstation, you can set a drum sound to MIDI channel 10 to receive the MIDI click.
If you have a drumbeat that grooves a little differently than the metronome, you may want it to hear the click only during the count-in and not while recording. To do so, select the Only During Count-In check box.
\Be careful of metronome blindness, a condition where you don’t even realize that the metronome is playing because your brain has tuned it out. It’s hap-
pened to me and to others. The click can be heard over the entire mix but you forget that it’s on as you’re playing the track.