


184 Part III: Making Music with Virtual Instruments
To use the EVOC 20 PS as a classic vocoder, do the following:
\1.\ On the Side Chain menu in the EVOC 20 PS plug-in header, choose the
|
input source. |
\ |
The source can be a live input, an audio track, or a bus. The classic |
|
vocoder effect uses a live input or prerecorded vocal track. |
\2.\ Mute the input source so you hear only the output from the EVOC
|
20 PS. |
\ |
3.\ Play your MIDI controller simultaneously with the input source. |
\ |
The EVOC 20 PS synthesizes your input source. |
|
Here’s a brief description of a couple important EVOC 20 PS parameters: |
\\Side-chain analysis parameters: The upper-left area of the EVOC 20 PS
adjusts the side-chain parameters. Rotate the Attack knob to set how fast or slow the synth reacts to the beginning of the input signal. Rotate the Release knob to adjust how fast or slow the synth reacts to the end of the input signal. Click the Freeze button to hold the current input signal indefinitely.
\\U/V detection parameters: The right side of the EVOC 20 PS adjusts the
U/V (unvoiced/voiced) detection parameters. The human voice is made up of voiced sounds such as vowels and unvoiced sounds such as plosives, fricatives, and nasals. Rotate the Sensitivity knob to adjust how sensitive the EVOC 20 PS is to voiced and unvoiced input signals. Click the Mode field to choose how unvoiced sounds are synthesized. Rotate the Level knob to adjust the volume of the unvoiced content.
\You’ll get great results if your input source is a constant volume with lots of high-frequency content. Be sure that your input source’s volume doesn’t vary
too much. You can also EQ the input source to boost the high-frequency content. You learn how to EQ signals in Chapter 16.
Sampling with the EXS24 Sampler
The EXS24 sampler, shown in Figure 11-8, plays audio files known as samples. Samplers are useful for re-creating acoustic instruments because you’re playing back recorded audio files. But you can also sample synthetic sounds or mangle acoustic samples until they’re no longer recognizable to create unique sounds.
Chapter 11: Sound Design with Synths and Samplers 185
Figure 11-8:
The EXS24
sampler.
\\
In this section, you learn how to use the EXS24, import third-party sample libraries, create your own sampler instruments, and much more.
Importing sample libraries
The EXS24 comes with an enormous library of sampler instruments, but you can also import third-party sample libraries. The EXS24 has a large user base, so finding sample providers online isn’t difficult. In addition to the native EXS24 sampler instrument format, you can import SoundFont2, DLS, and Gigasampler files.
To import a third-party sample library, follow these steps:
\1.\ Copy the sample files to a subfolder of your choosing in any of the fol-
lowing locations:
Macintosh HD/Users/<USERNAME>/Music/Audio Music Apps/ Sampler Instruments/
Macintosh HD/Users/<USERNAME>/Library/Application
Support/Logic/Sampler Instruments/
Macintosh HD/Library/Application Support/Logic/Sampler Instruments/
\2.\ At the top of the EXS24 interface, click the Sampler Instruments menu
and choose Refresh Menu.
\ |
Your imported sampler instrument appears on the menu, so that you |
|
can select and open it. |

186 Part III: Making Music with Virtual Instruments
Converting regions to sampler instruments
You can create your own sampler instrument from any audio region in your project. For example, you can take a drum loop or an instrument riff and slice it into several pieces that you can play with your MIDI controller. You can also trigger the entire region as a loop or a one-shot sample, which means
it plays just once instead of repeating. To convert audio regions to sampler instruments, do the following:
\1.\ Select an audio region in your project.
\2.\ Control-click the region and choose Convert Convert Regions to New
Sampler Track (or press Control-E).
\ |
The Convert Regions to New Sampler Track dialog opens. |
\3.\ Select Create Zones from Regions or Create Zones from Transient
|
Markers. |
\ |
Select Regions to create a loop or one-shot sample. Select Transient |
|
Markers to slice the region into several different samples that you can |
|
trigger with your MIDI controller. |
\ |
4.\ Name the instrument and select the note trigger range. |
\ |
The note trigger range defines the MIDI notes that will trigger the |
|
samples. |
\5.\ Click OK.
\ |
A new software instrument track is added to the track list loaded with |
|
the EXS24. A MIDI region containing the trigger notes is also added to |
|
the tracks area. |
\If you convert a drumbeat to a sampler instrument, you can play the beat chromatically with your MIDI controller. A cool trick is to rearrange parts of
the beat to create new beats or drum fills. If you converted an instrument part to a sampler instrument, you can rearrange the part and come up with new instrument parts. You could also sample your boss saying, “No one leave until the work is done” and rearrange it to say, “The work is done. Leave.”
Controlling sample parameters
Just like the other Logic Pro synthesizers, EXS24 sounds can be shaped by filters and modulation. Here’s a brief description of some EXS24 parameters:

Chapter 11: Sound Design with Synths and Samplers 187
\\Global parameters: The top-left green section and top row of param-
eters are where you set the EXS24 global parameters. Click the Legato, Mono, or Poly button to change the keyboard mode. Double-click the Voices field to set the maximum number of notes that the EXS24 can play at a time. Click the Unison button to play many slightly detuned voices at once to emulate a thick and classic synth sound. Double-click the Velocity Offset field to increase or decrease the incoming velocity signals from your MIDI controller. Click the Hold Via field to change the default MIDI controller used to trigger the sustain pedal.
\\Pitch parameters: To the right of the global parameters are the EXS24
pitch parameters. In this section, you can transpose and fine-tune the instrument. You can adjust the amount of pitch bend and introduce random pitch changes to emulate analog synthesizers or live string players. Adjust the Glide slider to set the speed of the portamento effect.
\\Filter parameters: Below the sampler instrument menu are the EXS24
filter parameters. Click the buttons at the bottom of the filter section to choose the type of filter. Rotate the Cutoff and Resonance knobs to set the filter parameters.
\\Output parameters: To the right of the filter parameters are the EXS24
output parameters. Rotate the Volume knob to set the overall volume. Adjust the Level Via Velocity slider to set how velocity affects the volume. Double-click the Key Scale field to set how volume is affected by pitch. Positive values increase the level of higher notes, emulating acoustic instruments.
\\Modulation router: The center dark-blue strip of controls is where you
set the EXS24 modulation sources and targets.
\\LFO parameters: The bottom-left section of the EXS24 is where you set
the parameters of the three LFOs.
\\Envelope parameters: To the right of the LFO parameters are the envelope
parameters. Envelope 1 controls the filter while Envelope 2 controls the volume level.
\\EXS24 preferences: Click the Options button on the upper-right corner
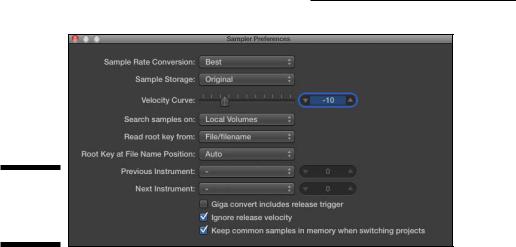
of the EXS24 to open the Options menu. Choose Preferences on the Options menu to open the Sampler Preferences window, shown in Figure 11-9. In this window, you can choose to search samples on your local hard drive, external hard drives, or all hard drives connected to your computer.
188 Part III: Making Music with Virtual Instruments
Figure 11-9:
The EXS24
Preferences
window.
\\
Editing sampled instruments
There may come a time when you want to create your own sampler instruments or edit the current instrument. A sampler instrument is made up
of zones and groups. A zone is the location of a single sample, whereas a group can contain many zones. You can edit all the zones in the group simultaneously.
To visualize how zones and groups fit together, consider a piano sampler instrument. Each piano key is sampled at multiple velocity levels. These sampled notes (zones) are grouped according to their velocity level for organization and so the group can be edited as a whole. You can have a group that contains loud samples and a group that contains quiet samples, for example, and edit each group and all the zones in it.
To open the instrument editor, which is shown in Figure 11-10, click the Edit button at the top right of the EXS24 interface. The instrument editor has two views, zones and groups, which can be accessed by clicking the buttons at the top left of the Instrument Editor window. On the Instrument drop-down menu at the top of the interface, you can save, rename, and create new instruments. You can also create zones and groups, as well as show and hide para meters on the View menu. Double-clicking the audio file names will open the samples in the Logic Pro audio file editor. (For more on the audio file editor, see Chapter 14).