

Chapter 3: Exploring the Main Window and Tracks Area |
47 |
Your Logic Pro Toolbox
Tools imply work. But Logic Pro is about having fun. So think of your toolbox as a fun box. The toolbar in the tracks area has several tools you can play with.
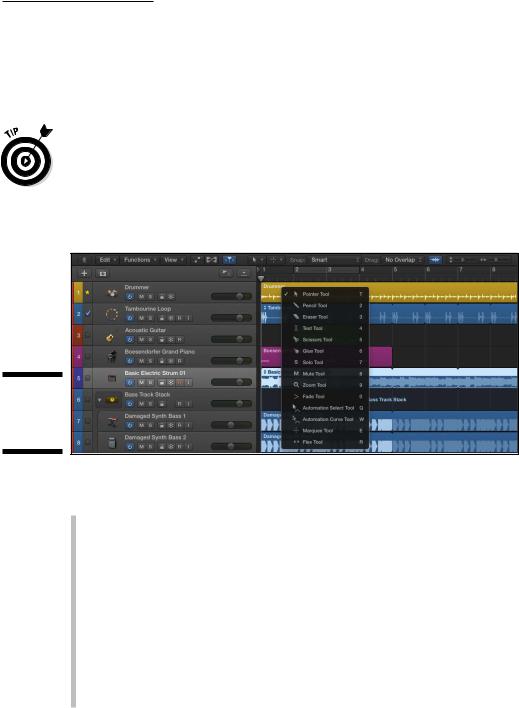
\Another important key command is T. This key command opens the tools menu, as shown in Figure 3-10. In several windows, including the tracks area
and most of the editors, pressing T opens the tools menu, and you can choose a tool with your cursor or with the keyboard shortcuts listed on the right. Note that the keyboard shortcut for the default pointer tool is also T, giving you an efficient workflow in which you can press T twice to get back to the pointer quickly.
Figure 3-10:
The tool menu in the tracks area.
\\
Here’s what’s on the tool menu:
\\Pointer: The pointer is your default tool for selecting and moving things.
Using the pointer tool, you can copy items by Option-dragging them. Grabbing the corners and edges of regions can temporarily cause the pointer to take a descriptive shape as an indicator of additional pointer functions. Place your cursor over the upper half of the right side of a region to turn the cursor into the loop tool. With the loop tool active, dragging the region corner to the right loops the region. Place your cursor over the lower half of the region’s right side to change the length of the region as you drag the corner. You’ll get the hang of the pointer quickly because it will be your most-used tool.
\\Pencil: The pencil tool is similar to the pointer tool, in that it can also
loop, drag, alter length, and even select regions and other events. What makes the pencil unique is that it creates regions when you click in
48 |
Part I: Leaping into Logic Pro X |
empty track areas. Note that if the project hasn’t been saved and you click an empty area with the pencil tool, you’ll be asked about opening an audio file.
\\Eraser: The eraser tool deletes regions and events from the tracks area.
If multiple regions or events are selected and you click one of them with the eraser tool, all selected items will be deleted. This tool doesn’t get a lot of use because pressing Delete has the same effect. However, if you are going to delete several items in a row, clicking with the eraser tool is faster than selecting each item one by one and pressing Delete after each. And if you’re trying out for the Logic Pro Editing Olympics, every keystroke counts.
\\Text: With the text tool selected, you can rename regions and other
events.
\\Scissors: Use the scissors when you want to split items. The scissors
tool has a special Option-click behavior that can split a region into portions of equal length. You can also click-drag the scissors tool over a region to find the right place to make your split.
\\Glue: The glue tool joins selected items. You can also click-drag over
items to select them before joining them.
\\Solo: Use the solo tool when you want to listen to only a single region.
With the solo tool, click and hold down on a region to hear it. You can also drag the solo tool through the region to listen to whatever the tool touches, a process known as scrubbing.
\\Mute: The mute tool mutes or unmutes the items and other selected
items it touches. You can select multiple items and mute or unmute them all at once or simply click any region to mute or unmute it.
\ |
The mute tool is a useful arranging tool because you can quickly hear |
|
how sections of music will sound without the muted part. Using the |
|
mute tool on a region is often better than deleting the region if you’re |
|
not sure you want to commit to the edit. |
\\Zoom: You learned how to use the zoom tool previously in this chapter
by Control-Option-dragging in the tracks area. You can also choose it as a tool from the tool menu, which you rarely need to do except when
you forget the key command, which isn’t likely since you’ll be using it so much. Another trick with the zoom tool: If your cursor is over an empty part of the tracks area, you only have to press Option to make your cursor the zoom tool.
\\Fade: With the fade tool, you can fade in and fade out the volume of
your audio regions by dragging over the start or end of the region, respectively. You may need to zoom in horizontally to see the fade that’s applied to the region. You can edit the length of the fade by dragging the start or end point with the fade tool. You can also adjust the curve of the fade by dragging up or down within the start and end points.
Chapter 3: Exploring the Main Window and Tracks Area |
49 |
\\Automation Select: I discuss automation in detail in Chapter 17. When
automation is active, the automation select tool allows you to select automation data for editing. Show Advanced Tools in the Advanced Preferences pane must be selected to enable automation tools.
\\Automation Curve: You can bend an automation curve by dragging it
with the automation curve tool. (You find out more about automation in Chapter 17.)
\\Marquee: Use the marquee tool to select and edit regions and parts of
regions. You drag the marquee tool over the objects you want to select or edit. After you’ve made a selection with the marquee tool, clicking Play on your transport will start your project at the beginning of your selection and playback will stop at the end of the selection. The marquee selection can also be used for punch recording, which you learn about in Chapter 6. The marquee tool is flexible, and you’ll use it a lot throughout this book.
\\Flex: The flex tool is going to blow your mind when you learn more
about it in Chapter 14. With the flex tool selected, you can grab an audio region’s waveform to manipulate it and change its rhythm. The flex
tool will save you from throwing away recordings that contain mistakes because you can fix them. It’s like having a time machine.
\ |
You have two tools available at all times. The first tool, chosen by the left tool |
|
menu on the menu bar, is the tool that’s currently available. The second tool, |
|
chosen by the right tool menu, is available by pressing . You can select any |
|
tool to be your -click tool. If you’re slicing a lot of regions, make the scissors |
|
your -click tool. Different workflows require different tools, and the -click |
|
tool will help you accomplish your work quickly. |
Keeping It Simple with Smart Controls
Smart controls are your personal Logic Pro genius bar. Smart controls know what you’re trying to achieve and give you the best tools for the job. They don’t give you every available parameter — only the most important ones.
Smart controls are dynamic. The controls you’re given depend on the selected track and the software instrument or plug-in effects on that track. For example, if you have a compressor and EQ plug-in on a track, the smart controls will give you a combination of the most important controls of each plug-in. If a software instrument track is selected, the smart controls will also include parameters that affect the sound of the instrument.
Last but not least, smart controls look cool and make you want to play with them.
50 |
Part I: Leaping into Logic Pro X |
Opening smart controls
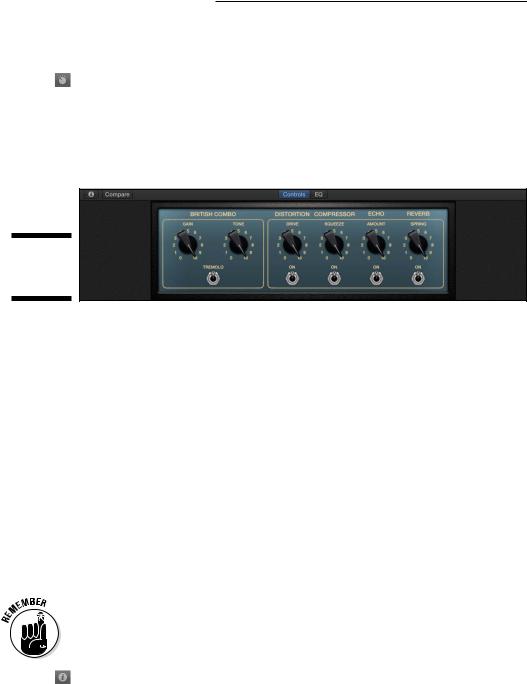
\\ Click the smart controls icon in the control bar or press the key command B to open the smart controls at the bottom of the tracks area, as shown in Figure 3-11. I memorized the smart controls key command by remembering
the word best, as in best controls. You can also choose View Show Smart Controls. To open smart controls in a new window, choose Window Open Smart Controls or press -3.
Figure 3-11:
The smart controls.
\\
At the top of the smart controls is a menu bar. In the center of the menu bar are two buttons to quickly switch between the track’s smart controls and dedicated channel EQ. If no EQ is inserted on the track and you press the EQ button, a plus sign icon in the center of the control area will allow you to insert an EQ into the track’s channel strip instantly.
\ \ If the selected track is a software instrument track, an arpeggiator icon
appears on the right side of the menu bar, as shown in the margin. An arpeggiator turns the chords you play into arpeggios, or one note played after another as opposed to simultaneously.
Click the icon to turn on the arpeggiator and a pop-up menu will appear so you can choose a preset or adjust the settings. The arpeggiator is a popular synth effect across many genres. Many of The Who’s greatest hits feature vintage synth arpeggiators and the effect is common in pop and dance music. (The arpeggiator and other MIDI effects are covered in more detail in Chapter 16.)
\ |
|
To enable the smart controls icons and features described in this chapter, |
|
|
Show Advanced Tools must be selected in the Advanced Preferences pane. |
|
|
Choose Logic Pro X Preferences Advanced Tools and select the Show |
|
|
Advanced Tools option. |
|
|
\\ On the left side of the smart controls menu bar is the smart controls inspector icon (shown in the margin) and a Compare button. The icon opens
the inspector on the left side of the Smart Controls window, as shown in Figure 3-12. The Compare button compares the edited smart controls with the saved version.

Chapter 3: Exploring the Main Window and Tracks Area |
51 |
Figure 3-12:
The smart controls inspector.
\\
Editing smart control layouts
Smart controls automatically give you quick control over the most important parameters, so you won’t need to edit them often. If you want to control a parameter that’s not included in the automatic smart control layout, you can edit the sound directly in either the software instrument interface or the effects plug-ins inserted in the track. (You find out how to adjust the plug-ins directly in Chapter 16.)
Think of smart controls as shortcuts to the sound parameters that you use most often. For example, if your track contains a software instrument, such as an electric piano, the smart controls will give you the knobs that are frequently needed to adjust the sound of an electric piano. If you were to also add an effect to the track, the smart controls will readjust based on the new setup. Smart controls will continue to adjust as you add or remove effects to a track — that’s why they’re smart.
But what if you want to manually customize the smart controls for a particular purpose? Fortunately, smart controls are as flexible as they are intelligent. They also have a menu of gorgeous layouts designed to emulate the look and feel of gear you may be familiar with, such as classic guitar amps and instruments.
To change the smart controls layout, follow these steps:
\1.\ Click the inspector icon.
\ |
The smart controls inspector opens to the left of the screen controls. |
|
At the top of the inspector is the name of the current layout (refer to |
|
Figure 3-12). The default layout is Automatic Smart Controls. |
\ |
2.\ Click the name of the current layout at the top of the inspector. |
\ |
A pop-up menu appears. |
\ |
3.\ Make a selection from the menu of layouts. |
\ |
The smart controls are updated. |

52 |
Part I: Leaping into Logic Pro X |
\ |
|
Smart control layouts are predefined. You can’t add knobs, buttons, or other |
|
|
controls to the layout, though you can map the relationship between the con- |
|
|
trols and your track’s parameters, as you discover next. |
|
|
Manually mapping smart controls
When you open the smart controls and choose Automatic Smart Controls as the layout, all the screen controls are mapped to the track parameters automatically. If the controls aren’t mapped to the parameters you want or some of the controls remain unmapped, you can both manually and automatically map the smart controls.
To map smart controls automatically:
\1.\ Open the smart controls inspector by clicking the inspector icon in
the smart controls menu bar.
\2.\ Open the Parameter Mapping area by clicking the disclosure triangle
(refer to Figure 3-12).
\3.\ Click the Parameter Mapping pop-up menu and make a selection as
follows:
•Choose Map All Controls when you want to completely reset the controls and have them automatically mapped. Automatically mapping your controls is a great starting place and usually gives you control over the parameters you need.
•Choose Map All Unmapped Controls when you want to map only the controls that are currently labeled Unmapped.
You can manually map smart controls in two ways. The first way is to map controls by using the Learn button:
\1.\ Open the smart controls inspector.
\ |
2.\ In the layout, select the control that you want to map to a parameter. |
\ |
Depending on the current layout, your controls could include knobs, |
|
faders, switches, buttons, and other interfaces. You should select the |
|
controller type that’s similar to the parameter you want to control. For |
|
example, a switch or button will control a parameter that has an on/off |
|
state, and a knob will control a parameter that has a range. |
\3.\ Click the Learn button next to the Parameter Mapping menu in the
inspector.
\ |
The Learn button flashes orange to indicate that learn mode is active. |

|
|
Chapter 3: Exploring the Main Window and Tracks Area |
53 |
|
|
||
\ |
4.\ Click the plug-in or channel strip parameter you want to control. |
|
|
\ |
For example, you might click the volume slider on the track. (Channel |
|
|
|
strip parameters and plug-ins are described in Chapter 16.) |
|
|
\ |
5.\ Click the Learn button again to finish mapping controls. |
|
|
\ |
The selected control now adjusts your track volume. |
|
|
The first method is great if you know which parameters you want to adjust.
The second way allows you to map controls by browsing the Parameter
Mapping pop-up menu.
\1.\ Open the smart controls inspector.
\2.\ Select the control in the layout you want to map to a parameter.
\\ 3.\ Click the parameter mapping disclosure triangle (see the margin) to
open the mapping area, and then click the parameter name (or click Unmapped if the control is unmapped).
\ |
A pop-up menu appears. |
\4.\ Choose the parameter you want to control.
\You aren’t limited to mapping a control to a single parameter. You can add additional parameters to the control by clicking the parameter name in the
inspector and choosing Add Mapping. In addition to adding mappings, you can copy and delete mappings from the same pop-up menu.
Editing smart control parameters
After you’ve mapped a control to parameters, you can adjust how the control modifies the parameters. For example, you might want a volume knob to never go all the way down and all the way up. You might want the control to modify a specific range. Open the Parameter Mapping area in the inspector by clicking the disclosure triangle, and you’ll see values that you can edit below the parameter name:
\\Range Min: This value sets the minimum range of the parameter.
\\Max: This value sets the maximum range of the parameter.
\\Invert: This check box switches the minimum and maximum values.
\\Scaling: Click the Open button to open a graph to adjust the minimum
and maximum range values, as shown in Figure 3-13.

54 |
Part I: Leaping into Logic Pro X |
Figure 3-13:
The scaling graph window.
\If you have more than one parameter mapped, you can change the order of the
parameters by dragging the left side of the parameter name up or down the list.
\Don’t forget to use the Compare button, which lets you audition changes
before fully committing to them.
|
|
Controlling the controls |
|
|
|
|
|
with your controller |
|
|
A major benefit of smart controls is how much time they save you. Instead |
|
|
of having to open plug-ins and instrument interfaces and find the parameters |
|
|
you need to change, smart controls give you the most used controls in a |
|
|
simple and beautiful interface. |
|
|
As Steve Jobs would say in every keynote, “But wait, there’s more.” Your MIDI |
|
|
controller can control all smart controls. The setup is super fast: |
\ |
|
1.\ Click the inspector icon to display the smart controls inspector. |
\ |
|
2.\ In the layout, click the control that you want to control. |