


Chapter 2
Examining Logic Pro Projects
In This Chapter
\Starting and finishing projects \Discovering some timesaving workflow tips \Backing up and securing your projects \Sharing your projects for collaboration
Logic Pro projects are similar to any computer file types, except they’re larger in scope than files such as text documents. You might be shocked
to see an entire chapter about a file type, but there’s so much more you can do with Logic Pro projects than you can with other file types that you’ll soon understand how important they are to the creative process.
Projects are flexible. When disk space is a concern, for example, you can save only the assets you want to keep. You can create project templates to speed up your workflow and set up Logic Pro exactly how you want to work. Each project contains global settings of the entire project as well as different snapshots of the project, such as different arrangements, mixes, or treatments. For example, you can create an alternate version of your project if the producer calls for a version without a vocal (for when the performer needs to sing live on TV to a backing track).
In this chapter, I cover naming conventions to keep all your projects organized, tips and tricks to speed up your workflow, strategies for archiving and backing up your work, and much more.
Starting Your Project
A project is the file type that you work with in Logic Pro. The file extension of a Logic Pro project is .logicx. The project file contains MIDI events, parameter settings, and information about the audio and video in your project.
To get the big picture of your project and how it relates to Logic Pro, the hierarchy goes like this:
Project Tracks Regions Events
20 |
Part I: Leaping into Logic Pro X |
Your project contains tracks. Your tracks contain regions. Your regions contain events. The File menu is where you do most of your project-level work.
To start an empty default Logic Pro project, choose File New or press
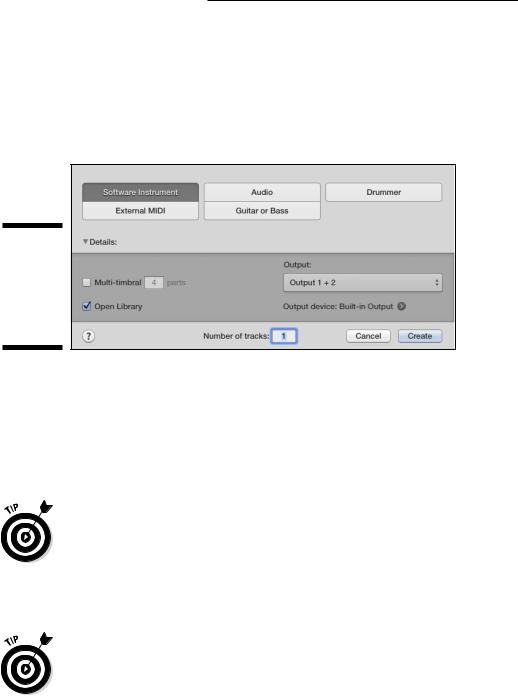
Shift+ +N. A New Tracks dialog window opens, as shown in Figure 2-1. At the top of the screen, choose the type of track you would like to begin working with and then click Create.
Figure 2-1:
The New Tracks dialog is where you choose your first track.
\\
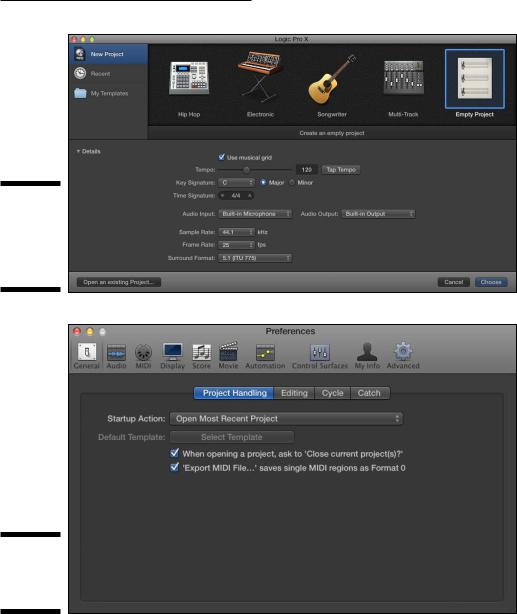
A more advanced and customized way to start a new project is to choose File New from Template ( +N). The Project Chooser window opens, as shown in Figure 2-2. You can select a premade project template, a recent project, or your own customized project template. I show you how to create a customized orchestral template in Chapter 12. Click Details (on the left) to display even more options for your new project, such as the tempo, time and key signatures, and audio input and output.
\You can change any project option, but you should stick to a single sample rate. The default sample rate, 44.1 kHz, is used for CD quality audio and is the
choice I recommend to all beginners. The 48 kHz sample rate is often used in video projects. Using higher sample rates depends on your hardware capabilities and project needs.
After you start your project, you’re ready to begin recording, arranging, editing, and mixing. It’s a dream come true.
\Choose a custom startup action to tell Logic Pro what to do when you launch it. If you’re the prolific type, you can create a new project every time you
launch the app. If you, like me, are a mere mortal, you might want to open the most recent project on startup. Choose Logic Pro X Preferences General and select the Project Handling tab, as shown in Figure 2-3. Then select your startup action. Logic Pro is kind enough to ask you what to do when it starts. But it won’t take food and drink orders. I’ve tried.
Chapter 2: Examining Logic Pro Projects |
21 |
Figure 2-2:
Choose customizable project templates here.
\\
Figure 2-3:
Customize your startup action.
Opening a project
You can open a project in several ways. You can click a project file in Finder, which will launch Logic Pro and open the project. If another project is open, Logic Pro will ask if you want to close the project. More than one project can be open simultaneously, so it’s not necessary to close the current project. To switch between open projects, choose Window on the main menu and then select the project in the list at the bottom of the menu.

22 |
Part I: Leaping into Logic Pro X |
You can open a project also from the File menu. Choose File Open or press +O and a dialog will open allowing you to navigate to the location of your
project in Finder. Choose File Open Recent instead to see a list of your recent projects.
Logic Pro can also open MIDI files, AAF files (Advanced Authoring Format files used by digital audio workstations such as Pro Tools), XML files (used by Final Cut Pro X), and GarageBand projects. It can also open projects created with earlier versions of Logic Pro.
\ |
If this is your first time launching Logic Pro X, you can open a demo project |
|
from the Help menu. Choose Help Logic Pro Demo Project and a project by a |
|
chart-topping band will give you something to explore. |
Saving a project
When you create your project, it is autosaved in the Logic folder under the temporary name Untitled.logicx. (You can get to the Logic folder in Finder by navigating to Users USERNAME Music Logic.)
To save your project manually, choose File Save. In the Save dialog that appears, name your project and choose a location or keep the default location, which is the Logic folder. You can choose to organize your project
as a package or a folder. A package saves your project as a single file that includes all project assets. A folder saves the project file and saves its assets in subfolders.
You can also choose to copy specific file types into your project. It’s a good idea to copy your audio files into the project, but you might not want to copy samples due to their potentially large file size. The benefit to saving a project without assets is that you conserve hard drive space. The downside is that it can be easy to mistakenly delete assets the project depends on. Hard drive space is inexpensive, so it makes sense to include all assets in your project folder. By doing so, organizing, moving, and archiving projects will be easier.
\I find saving projects as packages is the simplest approach. You can view the contents of packages (all package file types, including Pages, Keynote,
and Numbers files) by Ctrl-clicking the package in Finder and choosing Show Package Contents. All your audio files and assets will be in the Finder window that opens.
If you want to save the project with a different name or in a different location, choose Save As on the File menu. If you want to create a copy of the project, choose Save a Copy As on the File menu.