


210 Part IV: Arranging and Editing Your Project
Figure 13-4:
The track icon menu.
\\Freeze mode: Freeze a track to reduce processing power on the track
by temporarily turning the track and all its audio effects into an audio file. (In Chapter 3, you find out how to freeze tracks in the track header.) Freeze mode parameter can be set to Source Only, in which the track
is frozen without effects plug-ins, or to Pre Fader, in which the track is frozen with all effects plug-ins.
\\Q-reference: On audio tracks, use the track’s transients (peaks in volume)
as reference points during the quantization of an edit group. For more on editing audio, see Chapter 14.
\\Flex mode: Define how the audio will be processed while flex editing.
You can discover more about flex editing in Chapter 14.
\\MIDI channel: On MIDI tracks, choose the MIDI channel for the track’s
output.
Showing Your Global Tracks
In Chapter 4, you find out about global tracks, which affect all your project’s tracks. Global tracks are useful when you’re arranging because they help you create markers for quick navigation and for important sections of your project.

Chapter 13: Arranging Your Music 211
To view the global tracks, choose Track Global Tracks Show Global Tracks (G). The global tracks appear at the top of the tracks area, as shown in Figure 13-5. If you don’t see a global track you’re looking for, choose Track Global Tracks Configure Global Tracks (Option-G) and select the global tracks you want to view.
Figure 13-5:
The global tracks.
\\
Creating and naming markers
Markers are excellent arrangement tools. They allow you to quickly navigate your project and select regions. You can also rename markers to help you identify sections in your project. You can view and edit markers in several ways:
\\Choose Track Global Tracks Show Marker Track or press Shift- -K to
display the marker track.
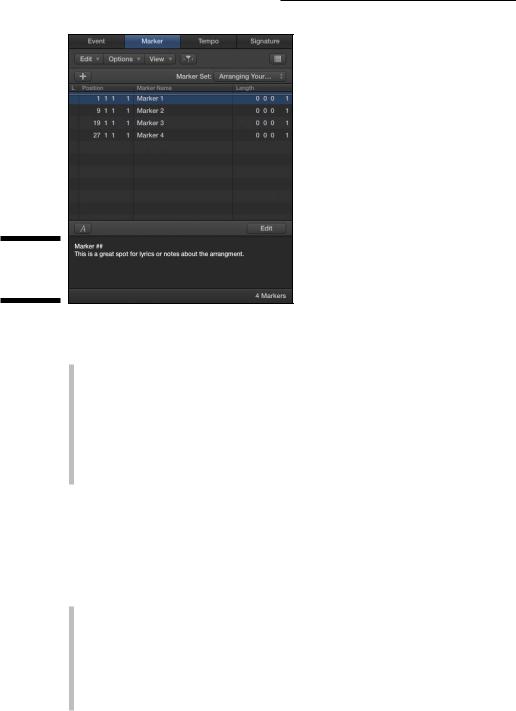
\\Choose View Show List Editors (D) and then click the Marker tab to
view the marker list editor, as shown in Figure 13-6.
\\Choose Navigate Open Marker List to view the marker list in a new
window.
212 Part IV: Arranging and Editing Your Project
Figure 13-6:
The marker list editor.
\\
To create and edit markers, do one of the following:
\\Click the plus sign icon in any of the marker editors to add a new marker
at the current playhead position.
\\In the global marker track, use the pencil tool and click the location
where you want to create a new marker.
\\In the marker list editor or Marker List window, choose Options Create.
\\At any time, press Option-apostrophe (‘) to create a new marker at the
current playhead position.
When you create a new marker, the default behavior is to round the marker to the nearest beat. If you want to create a marker without rounding, choose Navigate Other Create without Rounding or choose Options Create without Rounding from the marker lists.
Moving, renaming, and deleting markers is a straightforward process:
\\In the global marker track, drag the edges of the marker to change its
start and end points. Double-click the marker or use the text tool to rename it. You can delete selected markers by pressing Delete. Controlclick the marker to access a pop-up menu with more marker commands.
\\In the marker list editors, you can cut, copy, paste, and delete markers
on the Edit menu. You can adjust the position and length of markers by typing in the marker list. Double-clicking a marker will open the Edit

Chapter 13: Arranging Your Music 213
Marker Text area at the bottom of the editor window. Use this area to rename markers and add text notes to your marker. This spot is great for lyrics or notes about the arrangement.
You can also store alternate marker sets. If you need to create markers at a few places in your project to make edits later, but you don’t want to mess up your current arrangement of markers, you can create a new marker set and even give it a descriptive name. From the marker list editor, choose New Set on the Marker Set drop-down menu. To create a new marker set from the global tracks, click the Marker title in the track header and choose Marker Sets New Set on the pop-up menu. You can also rename sets from these menus.
\ |
If you have an extended keyboard with an extra number pad, press the number |
|
keys to instantly move the playhead to the corresponding marker number. You |
|
can also navigate markers by using the Next Marker and Previous Marker key |
|
commands: -period (.) and -comma (,). Whenever you find yourself wishing |
|
you could go to the same places in your project over and over again, create a |
|
new marker set and create a few markers. Then you can zip to the stored loca- |
|
tions quickly. |
Here are a some more uses and tips for markers:
\\Use the Go to Marker Number key command (Option-/) to open a dialog
where you can type the marker number and press Enter to instantly take the playhead to the marker.
\\Markers make it fast and easy to set locators. Use the Set Locators by
Marker and Enable Cycle key command (Control-Option-C). You can explore other key commands by opening the Key Commands window (Option-K) and typing marker in the search field.
\\You can color your markers by choosing View View Colors (Option-C).
Click a color in the palette and the selected marker will be colored.
\\The marker track can be resized to view all the text in your markers.
Put your cursor over the bottom edge of the marker track in the track header and pull down when your cursor becomes the resize tool.
Creating key signature and time signature changes
The signature global track does double duty, handling the key signature and the time signature. Choose Track Global Tracks Show Signature Track. The top half of the track shows the time signature, and the bottom half shows
214 Part IV: Arranging and Editing Your Project
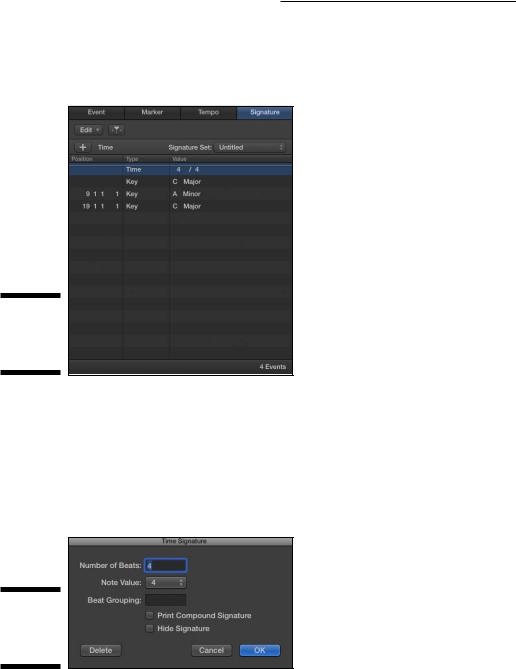
the key signature. You can also view and edit the signature track from the signature list editor. Choose View Show List Editors (D) and then click the Signature tab to view the signature list editor, shown in Figure 13-7.
Figure 13-7:
The signature list editor.
\\
You use the pencil tool to create signature changes in global tracks. Click the top half of the signature track to create a time signature change. The Time Signature window opens, as shown in Figure 13-8, and you can choose the number of beats per bar and the note value that equals one beat. You can also define how you want the beat divided. For example, a 7/4 time signature that’s divided as 2+2+3 can be entered as 223 in the Beat Grouping field. The beat grouping feature affects the display of notation in the score editor.
Figure 13-8:
The Time
Signature
window.
\\
You create key signature changes by clicking the bottom half of the signature track. The Key Signature window opens, as shown in Figure 13-9. Choose
the Key, Major or Minor, and whether to disable double flats (bb) or double sharps (x) in the score editor.
Chapter 13: Arranging Your Music 215
Figure 13-9:
The Key
Signature
window.
\\
To edit signature changes, double-click the signature change in the signature track. You can edit your signature changes also in the signature list editor. Just like with the marker track, you can create signature sets. Click the Signature name in the track header and choose Signature Sets New Set on the drop-down menu. Or use the signature list editor to create, delete, and rename signature sets on the Signature Set drop-down menu.
\ |
|
Key signature changes don’t change the pitch of the audio or MIDI regions |
|
|
you’ve recorded. They change only the display of the regions in the score editor. |
|
|
|
Creating tempo changes
Most projects have a single tempo. But when projects need tempo changes, it’s nice to know that Logic Pro makes the job simple and effective. Choose Track Global Tracks Show Tempo Track (Shift- -T). The tempo track behaves similarly to the other global tracks. But unlike the other tracks, the tempo track can handle more edit points and create smooth curves for natural feeling tempo changes.
Use the pencil tool to create a tempo change in the tempo track. A solid tempo control point will appear on the tempo line along with a hollow tempo curve automation point that you can drag left and right or up and down to create tempo curves between two points, as shown in Figure 13-10.
Figure 13-10:
The tempo track.
\\
Change the tempo resolution, change the quantization, and create tempo sets by clicking the Tempo name in the tempo track header and making a choice on the pop-up menu. Another way to adjust your tempo is with the tempo list editor, as shown in Figure 13-11. Press D to open the list editor and then click the Tempo tab.

216 Part IV: Arranging and Editing Your Project
Figure 13-11:
The tempo list editor.
\\
In the tempo list editor, click the Additional Info button to see all tempo points used to create your tempo curves. Because a curve can contain hundreds of tempo changes, it’s useful to hide that information when you’re viewing your tempo changes. Choose Options Tempo Operations to open the Tempo Operations window, as shown in Figure 13-12.
Figure 13-12:
The Tempo
Operations
window.
\\
Chapter 13: Arranging Your Music 217
The Tempo Operations window is capable of creating complex tempo curves or scaling existing tempo changes. Explore the Operation menu to see the other tempo operations available. Because the Tempo Operations window has an Undo button, it’s a great place to try out your tempo changes until you get it just right.
\ |
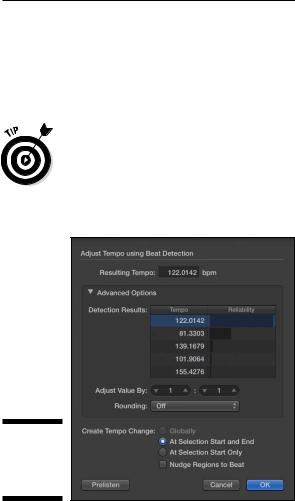
If you’ve imported audio into your project and you’re unsure of the tempo, |
|
you can use beat detection to create tempo changes. Select a region in the |
|
tracks area and choose Edit Tempo Adjust Tempo using Beat Detection |
|
(Option- -T). The Beat Detection window opens, as shown in Figure 13-13. |
|
The Beat Detection window displays the tempo of the region and enables you |
|
to create tempo changes. |
Figure 13-13:
The Beat
Detection
window.
\\
Creating arrangement markers
Arrangement markers are new to Logic Pro X. They are similar to regular markers but can be used to rearrange your project globally. To view the arrangement
track, choose Track Global Tracks Show Arrangement Track (Shift- -A). You create arrangement markers with the pencil tool. By default, arrangement
markers are eight bars long, but you can drag the edges of the markers to resize them. Click the name of the marker to choose a different preset name on the pop-up menu, or choose Rename to create your own marker name.
You can select arrangement markers and drag them to new positions on the arrangement track. All regions within the arrangement markers will be moved to the new position. You can select multiple arrangement markers by Shiftclicking them, and you can copy arrangement markers, including the regions