


Chapter 14: Editing Audio Tracks 239
\\Flatten and merge: The current active comp replaces the take folder.
Each take section is merged into a single audio file with only one region.
\\Export the active comp to a new track: The current active comp is
exported to a new track, leaving the original take folder unchanged. Each take section on the new track is in its own region with crossfades added to the regions.
\\Move the active comp to a new track: The current active comp is
exported to a new track, but the original take sections are removed from the take folder.
\You can create a vocal double effect, a common music production technique, by creating different comps and exporting them to new tracks. If you have sev-
eral usable takes in a take folder, creating multiple comps and exporting them makes vocal doubling easy. And if the exported comps aren’t perfectly in tune or the timing is off, you can adjust them by using flex pitch and flex time, as you’re about to learn.
Time Traveling with Flex Time
|
When flex time was added to Logic Pro in 2009, it was one of those gasp-at- |
|
the-possibilities moments. If you’ve ever been on a deadline and the record- |
|
ing wasn’t going well, you probably wished you had something like flex time. |
|
You’ve come to Logic Pro at the right time, as you’re about to find out. |
|
Flex time allows you to adjust the timing and groove of performances. You |
|
can fix mistakes, experiment, perfect important downbeats, and so much |
|
more. To enable flex time on a track in the tracks area, do the following: |
\ |
1.\ Choose Edit Show Flex Pitch/Time ( -F). |
\ |
Flex icons appear on the track headers, as shown in Figure 14-4. |
\ |
2.\ Click the flex icon on the audio track you want to edit. |
\ |
The flex menu appears on the track header. |
|
You can enable flex time also from the audio track editor: |
\1.\ Open the audio track editor by double-clicking an audio file or by
selecting an audio file and choosing View Show Editor (E).
\ |
The audio track editor opens in the main window. |
\ |
2.\ Click the flex icon on the audio track editor menu bar. |
\ |
The flex menu appears on the menu bar to the right of the flex icon. |
240 Part IV: Arranging and Editing Your Project
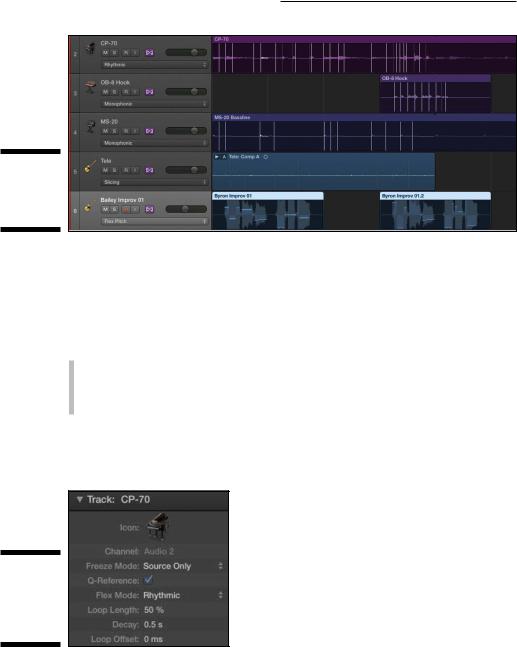
Figure 14-4:
Tracks with flex mode enabled.
\\
Choosing flex time algorithms
After you’ve turned on flex mode, you can select an algorithm in the flex mode menu, which appears in the following places, to determine how your audio will be altered:
\\Track inspector (see Figure 14-5)
\\Track header
\\Audio track editor
You can also have Logic Pro analyze your audio and automatically choose the best algorithm for the audio material.
Figure 14-5:
The track inspector flex
parameters.
\\
Depending on the flex algorithm you choose, different parameters will be available in the track inspector. You can choose between the following flex algorithms and parameters:
Chapter 14: Editing Audio Tracks 241
\\Automatic: Logic Pro analyzes your audio and selects between mono-
phonic, slicing, and rhythmic algorithms.
\\Monophonic: Used for monophonic audio such as bass lines, lead sounds,
and vocals. Click the Percussive check box if the audio is a percussive monophonic sound, such as a guitar or pitched percussion.
\\Slicing: Used for percussive audio such as drums and percussion. Audio
isn’t expanded or compressed with this algorithm, so moving audio can create gaps. Set the Decay time to compensate for gaps in the audio. Click the Fill Gaps check box to disable the decay time and remove any gaps. Set the Slice Length to shorten each slice by a percentage and adjust the gaps between slices.
\\Rhythmic: Used for rhythmic audio such as guitars and keyboards. Set
the Loop Length to adjust the length of the loop used at the end of the slice to fill the gap. Set the Decay value to adjust the decay of the loop. Set the Loop Offset to move the loop forward in time, preserving the attack of the transients that follow.
\\Polyphonic: Used for polyphonic audio such as chords and full mixes.
The polyphonic algorithm is the most processor intensive of all the algorithms. Click the Complex check box to add more internal transients to the flex time processing.
\\Speed (FX): Used for special effects, especially percussive material. This
algorithm has no additional parameters.
\\Tempophone (FX): Used for special effects based on granular synthesis
techniques. Adjust the Grain Size used to compress and expand the audio. Adjust the Crossfade length to set the quality of the effect. Higher values produce softer effects, and lower values produce hard effects.
Using flex markers
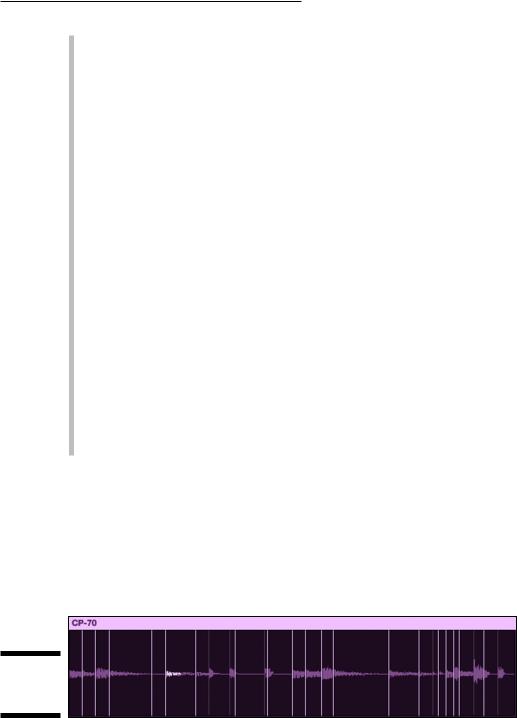
You adjust the timing of your audio with flex markers. After you enable flex time editing, your audio is analyzed using the chosen algorithm and transient markers are added to your audio, as shown in Figure 14-6. You can use these markers to help you see where you need to adjust the timing.
Figure 14-6:
Transient
markers.
\\

242 Part IV: Arranging and Editing Your Project
|
Flex time editing can be done in the tracks area and in the audio track editor. |
|
Follow these steps to adjust the timing of your audio tracks with flex time: |
\ |
1.\ In the track header, click the flex icon to enable flex time editing. |
\ |
Your audio is analyzed and transient markers are added to the region. |
\2.\ Choose a flex time algorithm.
\ |
3.\ Click the spot you want to adjust. |
\ |
A flex marker is added to the track. You can use the transient markers to |
|
guide your editing, but you can also add flex markers to points without |
|
transient markers. |
\ |
If you click the lower half of the region, multiple flex markers are added. |
|
In addition to the place you click, a marker is added to the left and right |
|
transients, making the flex editing more precise. |
\ |
4.\ Drag the marker to the left or right to adjust the timing. |
\ |
The audio is compressed or expanded to fit the edit. |
\You can connect a flex marker to a transient in a region on an adjacent track, allowing you to tighten the timing between two separate tracks. Drag a flex
marker up or down to a transient on another region until the line between the two regions turns yellow, and then release. Your track will be adjusted to the transient.
Using the flex tool
The tool menus in the tracks area and the audio track editor contain a flex tool to use on regions when flex editing isn’t shown. To use the flex tool on an audio region, do the following:
\ |
1.\ Open the tool menu (T) and choose the Flex Tool. |
\2.\ Drag the audio waveform to adjust the timing.
\Remember the marquee tool in Chapter 13? It’s a great tool for flex editing. Create a selection with the marquee tool, and then drag the selection with the
flex tool to adjust the timing. You can also click the selection with the pointer tool to create flex time markers from the selection and the closest transients. If you click in the upper half of the region, flex markers are added to the four positions: the edges of the selection and the nearest transients outside the selection. If you click in the lower half of the region, flex markers are added to three positions: the selection edges and the place you clicked.