


Chapter 14
Editing Audio Tracks
In This Chapter
\Getting to know the audio editors \Creating composite takes \Fixing pitch and audio timing \Repairing audio glitches
Imagine you’re back in the time before personal computers and you want to edit audio. You would have to use a razor blade on tape — with no
undo command. The process wouldn’t be creative or quick, and you wouldn’t edit analog audio just to experiment.
Fast-forward to the present. Music is in high demand in this high-speed world. You don’t have the luxury of taking months to finish a project — your Internet fans want it yesterday. Logic Pro X makes editing audio so simple and powerful that you can meet the demands of your fans and clients without breaking a sweat — or cutting your fingers on a razor blade.
In this chapter, you discover how to create the perfect take with Logic Pro’s quick swipe comping. You find out how to get the timing of your parts just right and tune up the pitch. And you learn how to get the best sound out of your audio and even create sounds that you didn’t record in the first place.
Knowing Your Audio Editors
Logic Pro X provides you with several ways to edit audio. You can do some audio editing right from the tracks area, as you learn in Chapter 13. In this section, you discover the specialized Logic Pro X audio editors.
234 Part IV: Arranging and Editing Your Project
The audio track editor
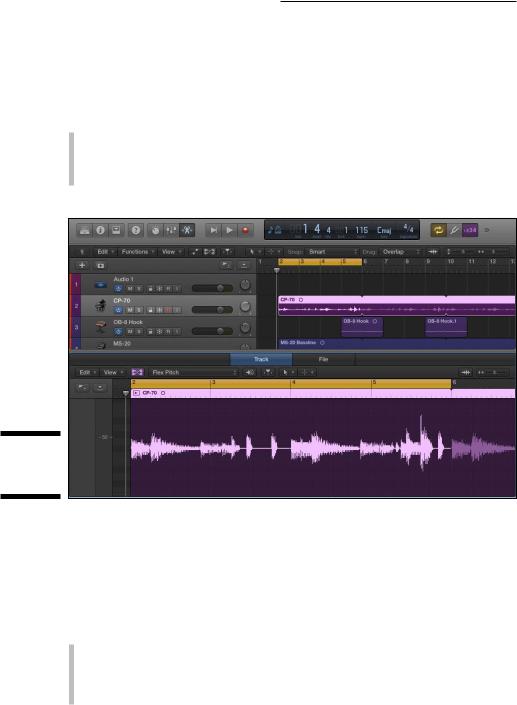
The audio track editor, shown in Figure 14-1, is the default Logic Pro audio editor. It works well for most audio editing needs. You can open the audio track editor in any of the following ways:
\\Double-click an audio region.
\\Choose View Show Editor with an audio region selected.
\\Press E with an audio region selected.
Figure 14-1:
The audio track editor.
\\
The audio file editor
The audio file editor, shown in Figure 14-2, is used for sample-level audio editing. It works well at audio repair, such as removing pops and clicks. You can open the audio file editor in the following ways:
\\Double-click an audio region, and then click the File tab at the top of the
audio editor.
\\Choose View Show Editor with an audio region selected, and then click
the File tab at the top of the audio editor.
Chapter 14: Editing Audio Tracks 235
\\Choose Window Open Audio File Editor to open the editor in a new
window.
\\Press Option and double-click an audio region in the project audio
browser.
Figure 14-2:
The audio file editor.
\\
\ |
The audio file editor is considered a destructive editor because the original |
|
audio file on your hard drive is modified. You can still undo your edits, but it’s |
|
always safer to work with copies of your audio files. |
Creating the Perfect Take with
Quick Swipe Comping
Creating the perfect take used to be time consuming. But since Logic Pro automatically records take folders, creating a composite take (a comp take) is almost too easy. You can quickly create a comp take by swiping on takes in a take folder, as you learn in this section. Quick swipe comping is another example of how Logic Pro X does the heavy lifting, allowing you to focus on creating.
\ |
|
Show Advanced Tools must be selected in the Advanced Preferences pane to |
|
|
get access to the additional audio editors. Choose Logic Pro X Preferences |
|
|
Advanced Tools and select Show Advanced Tools. |
|
|
236 Part IV: Arranging and Editing Your Project
Comping takes
A comp take is studio-speak for a composite take, a single recording made from many recordings. Comping used to require a lot of copying and pasting — as well as razor blades and tape before digital audio came along. As you learn
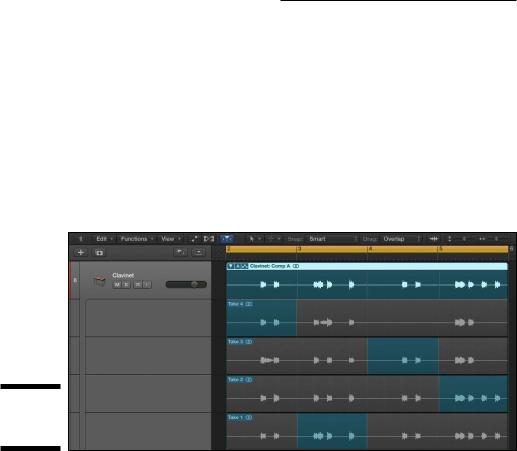
in Chapter 6, Logic Pro puts your recorded takes on multiple lanes of a single track, as shown in Figure 14-3. Each lane enables you to drag through the region to hide or display audio from the take and build a final composite take. For example, with a vocal performance, you can take one word or even just part of a word from a single take and improve your singer’s performance. (Just don’t tell the singer or you might bruise his or her ego.)
Figure 14-3:
A take folder.
\\
To create a single take from multiple takes, do the following:
\1.\ In the upper-left corner of the take folder, click the disclosure triangle
to see the individual take lanes.
\ |
2.\ Preview an individual take by clicking it and playing your project. |
\ |
If you have many takes, it’s a good idea to take notes with a pen and |
|
paper or with the Logic Pro notepad (Option- -P). Pay attention to what |
|
sounds good and what doesn’t. |
\3.\ Use the pointer or the pencil tool to drag over the areas of the take
|
you want in your comp. |
\ |
Dragging over one take automatically deselects the same area of the |
|
other takes and updates the current comp. |
|
In addition to dragging selections within takes, you can edit the comp in |
|
more advanced ways: |

Chapter 14: Editing Audio Tracks 237
\\Shorten a take section without extending the selection of other takes by
Shift-dragging the take section. Shortening a take section leaves silence in between the two adjacent sections in the comp.
\\Move the selection left or right by placing your cursor in the center of
the section and dragging when the cursor becomes a two-headed arrow.
\\Alternate sections between takes by clicking an empty section of a take.
The take you click will become active, and the formerly active take will become inactive. Use this method to audition sections of takes quickly.
\\Remove a section from the comp by Shift-clicking the section. To remove
the entire take from the comp, Shift-click the take header.
Creating alternate comps
When you create a comp that you like, it’s a good idea to duplicate the comp for safekeeping. You might also want to try out different ideas. Follow these steps to create alternative comps:
\1.\ To the right of the take folder disclosure triangle, click the current
|
comp indicator. |
\ |
A pop-up menu appears that lets you select takes and gives you com- |
|
mands for your comps and take folder. |
\ |
2.\ In the pop-up menu, choose Create New Comp or Duplicate Comp. |
\ |
Your new or duplicate comp appears in the menu list, where you can |
|
select and edit it. The Create New Comp command is available only if |
|
you haven’t created a comp. After you’ve created a comp, the Duplicate |
|
Comp command is available. |
|
After you’ve duplicated your comp, you can use the pop-up menu to select |
|
between the two comps as well as rename the comp. You can also delete the |
|
comp or delete all other comps except the current comp. |
Editing take regions
\\ You might want to edit take regions directly but not edit your comp. For example, you can change the start and end points of a take region or split the region in two. You can turn quick swipe comping on and off by clicking the take folder’s quick swipe comping icon (shown in the margin). When quick swipe comping is on, you can create and edit comps by dragging in the take regions, as described previously.

238 Part IV: Arranging and Editing Your Project
When quick swipe comping is off, the icon shows a pair of scissors, and you can edit the regions directly. You can also do the following to your take regions when quick swipe comping mode is off:
\\Select an individual take by clicking it.
\\Change start and end points by dragging the lower edges of the take
region.
\\Slice a take at a comp section borders by Control-clicking and choosing
Slice at Comp Section Borders in the pop-up menu.
\\Trim takes at active comp section borders by Control-clicking and
choosing Trim to Active Comp Section Borders in the pop-up menu.
\\Move a take within its lane by dragging left or right.
\\Move a take to a different lane by dragging the take to the new lane.
|
Packing and unpacking take folders |
|
It’s not necessary to record multiple takes on a single track to use a take |
|
folder. You can create a take folder from any audio you have in your project. |
|
You can also remove takes from a take folder so that they play independently |
|
as regions on their own track. |
|
To pack audio regions into a take folder, follow these steps: |
\ |
1.\ Select the regions you want to pack into a take folder. |
\ |
2.\ Control-click a selected region, and choose Folder Pack Take Folder |
|
(Control- -F) in the pop-up menu. |
\ |
The regions are placed into a take folder on the topmost track. |
|
You can do either of the following to unpack a take folder: |
\ |
\Control-click the take folder header, and then choose Folder Unpack |
|
Take Folder to Existing Tracks (Control- -U) or Folder Unpack Take |
|
Folder to New Tracks (Shift-Control- -U). |
\\Click the current comp indicator to the right of the take folder disclo-
sure triangle, and then choose Unpack or Unpack to New Tracks.
In addition to packing and unpacking take folders, you can do the following in the take folder menu:
\\Flatten: The current active comp replaces the take folder. Each take sec-
tion is its own region with crossfades added to the regions for smooth transitions between the regions.