


Chapter 14: Editing Audio Tracks 243
Tuning with Flex Pitch
|
Flex pitch is a new feature in Logic Pro X. It’s a good thing we were given seven |
|
years to come down from the glee of flex time before Logic Pro announced flex |
|
pitch. We needed to catch our breath. |
|
Editing pitch isn’t anything new and a few companies have done a pretty |
|
good job implementing it. But flex pitch makes editing pitch simple thanks to |
|
its intuitive workflow and the fact that it’s built into Logic Pro X. To enable |
|
flex pitch on a track in the tracks area, follow these steps: |
\ |
1.\ In the tracks area menu bar, click the flex icon to enable flex editing. |
\ |
Flex icons appear on the track headers. |
\ |
2.\ In the track header, click the flex icon. |
\ |
Flex editing is now enabled on the track. |
\3.\ On the Flex Mode menu in the track header or the track inspector,
|
choose Flex Pitch. |
\ |
The regions on the track display the flex pitch editing bars, as shown in |
|
Figure 14-7. |
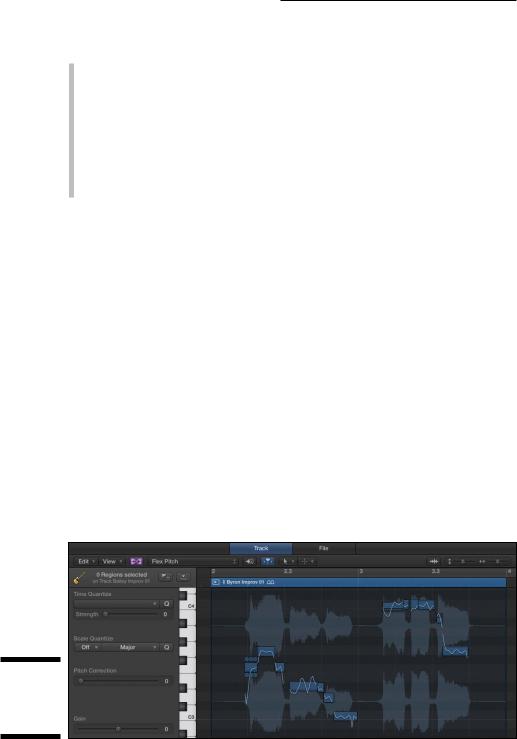
Figure 14-7:
Flex pitch in the tracks area.
Editing pitch in the tracks area
After you enable flex pitch on a track, the region in the tracks area displays horizontal bars above or below each note. These bars show you how close or far away the pitch is from the center pitch, indicated by the horizontal center of the region. If a bar is above the center, the pitch is sharp. If a bar is below the center, the pitch is flat. To edit the pitch, drag the bars closer to the center.
\ |
You can speed up the editing process by Control-clicking the audio region and |
|
choosing Set All to Perfect Pitch on the menu. If you don’t like your edits, you |
|
can start fresh by choosing Set All to Original Pitch. |
244 Part IV: Arranging and Editing Your Project
You can adjust two flex pitch parameters from the track inspector:
\\Formant Track: Formants are bands of frequencies that determine the
sound quality of vowels. Drag up on the Formant Track field to increase the tracking interval.
\\Formant Shift: This parameter adjusts how formants are affected by
changes in pitch. You can get some cool vocal effects by setting the Formant Shift value to extremes. Positive values give you squeaky Mickey Mouse effects, and negative values give you deep-voiced Barry White effects. The formant shift parameter is fun to play with, and it helps you get more natural sounding flex pitch edits.
Editing pitch in the audio track editor
You can edit pitch also in the audio track editor, which provides a different flex pitch interface. The flex pitch presentation in the audio track editor is similar to the pitch presentation in the MIDI piano roll editor, and you have more control over the edited sound. To use flex pitch in the audio track editor, do the following:
\1.\ Double-click an audio region to open the audio track editor, or select
|
the region and press E. |
\ |
The audio track editor opens at the bottom of the main window. |
\ |
2.\ On the audio track editor menu bar, click the flex icon. |
\ |
Flex editing is enabled on the track. |
\3.\ On the Flex Mode menu on the audio track editor menu bar, choose
Flex Pitch.
\ |
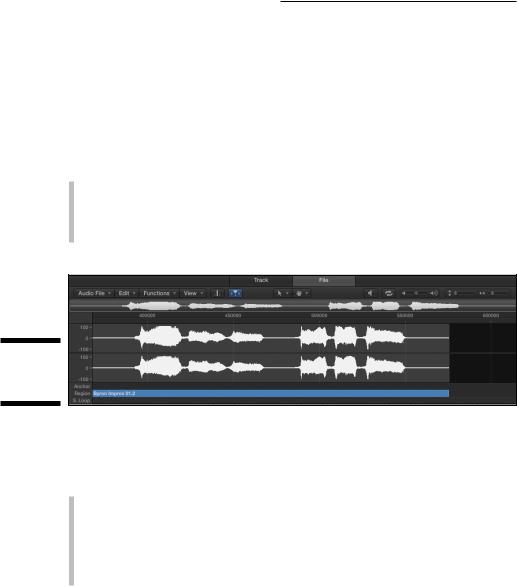
Flex pitch data is added to each note, as shown in Figure 14-8. |
Figure 14-8:
Flex pitch in the audio track editor.
\\
Chapter 14: Editing Audio Tracks 245
Editing pitch event hot spots
In the audio track editor, flex pitch creates a blue rectangle for each note. The notes correspond to the piano keys to the left of the editor. Drag the rectangle left, right, up, or down to adjust both time and pitch. You can also split the note with the scissors tool to create two notes or merge notes by using the glue tool. You can reset the pitch by Control-clicking the note and choosing Set to Original Pitch.
As you hover your cursor over each rectangle, six hot spots become available so you can edit the following flex pitch parameters:
\\Pitch Drift: The left and right hot spots at the top of the rectangle
control the pitch drift at the beginning and end of the note. Use these parameters to allow the pitch to drift into or out of the note. These parameters are useful for keeping a natural feel to the pitch because singers often scoop into notes and fall out of notes.
\\Fine Pitch: Use the top center hot spot to fine-tune the pitch.
\\Gain: The bottom left hot spot controls the volume of the note.
\\Vibrato: The bottom middle hot spot controls the pitch vibrato.
\\Formant Shift: The bottom-right hot spot controls how formants are
affected by the pitch shift.
\Have you ever wished you could sing a melody and have it turned into MIDI or notation? Flex pitch lets you do that. After you’ve finished flex pitch editing,
choose Edit Create MIDI Track from Flex Pitch Data on the audio track editor menu. A new software instrument track is created and the flex pitch data is added to a MIDI region as MIDI notes.
Quantizing the pitch and scale of a region
With flex pitch enabled in the audio track editor, you can have Logic Pro automatically quantize the pitch, scale, and time of a region. Choose View Show Local Inspector to view the quantization parameters. At the top of the inspector are the Time Quantize parameters, which enable you to choose the note value and strength of quantization. The Scale Quantization parameters enable you to choose the root note of the scale and the type of scale. All common scale modes are available along with other popular scale types and some more esoteric scales.
\Flex pitch can do more than just fix pitch mistakes or inconsistencies. You can use it also to create new parts, such as vocal harmonies. In many cases,
the parts you come up with will be perfectly useable. Sometimes, however, moving a pitch too far can sound unnatural, so adjust the formant parameters for better results. But even if you don’t keep the part, you can experiment and find out what will make your song sound stronger.
246 Part IV: Arranging and Editing Your Project
Editing Audio in the Audio File Editor
The audio file editor is new to Logic Pro X and replaces the sample editor from earlier versions of Logic Pro. You probably won’t need to use the audio file editor often because the audio track editor will usually be your first choice for editing audio. The audio file editor is reserved for more precise and permanent edits to audio files. You can open the audio file editor, shown in Figure 14-9, in the following ways:
\\Choose View Show Editor or double-click an audio file and then click
\\Choose Window Open Audio File Editor ( -6) to open the audio filethe File tab in the audio editor window.
editor in a new window.
Figure 14-9:
The audio file editor.
\\
It’s worth repeating that the audio file editor is a destructive editor, meaning it changes your audio permanently. Making copies and backups of files you intend to edit is good practice. You can
\\Choose Audio File Create Backup (Control-B). A duplicate of the audio
file is stored in the same location as the original file and given a .dup file extension.
\\Choose Audio File Save A Copy As. A dialog opens where you can
adjust the settings and location of the file before you click the Save button.
Navigating and playing audio
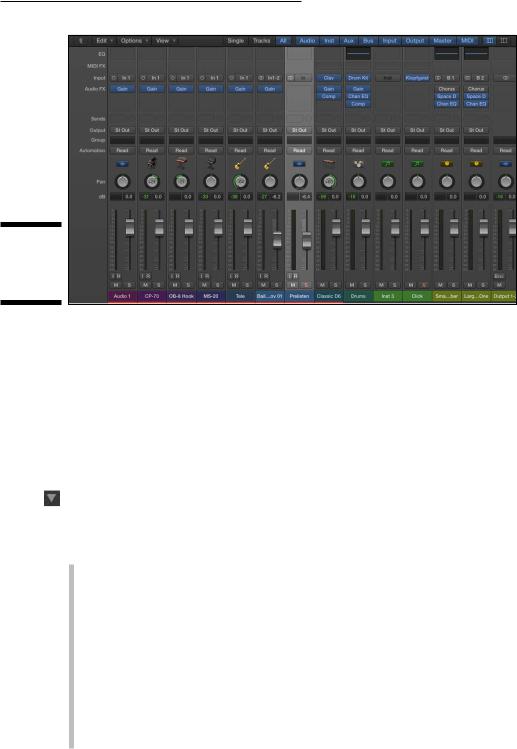
Playback in the audio file editor is independent from the project audio. That means the transport controls in the control bar don’t control the playback of files in the audio file editor. The audio editor is monitored through the pre listen channel strip in the mixer, shown in Figure 14-10. The prelisten channel strip adjusts the audio settings of files played in the audio file editor and project audio browser.
Chapter 14: Editing Audio Tracks 247
Figure 14-10:
The prelisten channel strip.
\\
|
Follow these steps to view the prelisten channel strip: |
\ |
1.\ Open the mixer in the tracks area (X) or in its own window ( -2). |
\ |
You can open the mixer also by choosing View Show Mixer or Window |
|
Open Mixer. |
\ |
2.\ On the mixer menu bar, click the All button to display all channel strips. |
\ |
The Prelisten channel strip is located to the right of the last audio chan- |
|
nel strip. |
\\ You can play audio files in the editor by clicking the prelisten icon (shown in the margin). Control-click the prelisten icon to choose to play audio through the prelisten channel strip or the track channel strip. In addition to the pre listen icon, you can play audio in the editor in the following ways:
\\Press Control-Option- -spacebar to play and stop the entire audio file.
\\Press Shift-Control-Option-spacebar to play and stop the audio con-
tained in the region.
\\Press Control-Option-spacebar to play and stop the region from the
anchor position. The anchor position is used to determine the absolute start point of the audio file.
\\Double-click the ruler to play and stop the audio file.
\\Click-hold the waveform overview to start playback at the click location.
\\Drag your cursor in the ruler to scrub the audio.
\\Click the cycle icon to continuously repeat the selected audio.

248 Part IV: Arranging and Editing Your Project
The audio file editor allows you to navigate to precise points in your audio file. Because the audio file editor is used for detailed editing, it’s important to have the capability to navigate around your audio file at the smallest level. To navigate your audio file, do one of the following:
\\Click the waveform display to navigate to specific locations in the audio
file.
\\Choose Edit Go To and select the audio file location you want.
\\Choose Functions Search Peak to find the loudest point in the audio file.
\\Choose Functions Search Silence to find the first silent point in the
audio file.
\\Use the vertical and horizontal zoom sliders to adjust how much of your
audio file you see in the editor window.
Selecting audio
To edit audio in the audio file editor, you need to select the audio in the editing window. The audio file editor gives you precise ways of selecting audio, down to the individual samples. You can select portions of your audio file in the following ways:
\\Choose Edit Select All ( -A).
\\Choose Edit Select All Previous (Shift-Control-Option-left arrow).
\\Choose Edit Select All Following (Shift-Control-Option-right arrow).
\\Choose Edit Region -> Selection to select only the audio that is used in\ Drag your cursor over the area you want to select.
the region.
In addition to these basic ways of selecting parts of your audio file, you can use transient markers to make selections. Transient markers can make selecting and editing audio much faster. To select audio using transients:
\ \ 1.\ On the menu bar, click the transient editing mode icon (see the margin).
\ |
The audio is analyzed for transients, and markers are added. |
\2.\ Double-click between two markers or use one of the commands on the
Edit Set menu.
The start and end points of your selection are shown in the info display on the menu. You change the format of the information by selecting one of the following modes from the View menu:
\\Samples
\\Min:Sec:Ms
Chapter 14: Editing Audio Tracks 249
\\SMPTE Time
\\Bars/Beats
Editing audio
In the audio file editor, you can do basic editing, such as copying and pasting, or more advanced editing, such as fading in and out and removing pops and clicks. Use the audio file editor, as opposed to the audio track editor, to accomplish more detailed, permanent edits.
From the Edit menu, you can copy, cut, paste, and delete. Copied audio is put on the clipboard for pasting to a new location. Cutting audio pulls all the audio after the cut forward and places the selection on the clipboard. Pasting audio occurs at the clicked location and makes room for the paste by pushing back all the audio that follows. Deleting audio is similar to cutting except the selected contents aren’t copied to the clipboard.
After you have selected some audio, you can choose several editing commands on the Functions menu. Here are some common editing functions:
\\Silence: Remove all sound. Be careful when you silence audio because
too much silence can make an audio recording sound unnatural. In many cases, it’s better to lower the gain by using the Change Gain function. Silencing audio is better at the beginning or ending of audio files or when you need to remove an unwanted artifact.
\\Reverse: Make the sound play backwards. If you’ve ever wanted to create
a reverse cymbal crash sound to swell into a section, you’ll love this command. It’s also useful for making clean versions of explicit vocal parts.
\\Remove DC Offset: Center the waveform and remove potential cracks
|
and pops that DC (direct current) offset can produce. Use this function |
|
if your audio hardware introduces DC offset into your audio. DC offset is |
|
clearly visible on your audio waveforms by a vertical shift in the wave- |
|
form display. |
\ |
\Trim: Remove everything except your selected audio. |
|
The pencil tool is probably the most useful tool for removing pops and clicks |
|
from your audio. To use the pencil tool, you’ll need to zoom in closely on the |
|
area you want to edit. If you’re not zoomed in enough, clicking the waveform |
|
with the pencil will automatically change it to the zoom tool, a nice hint that |
|
you’re not zoomed in enough. After you’re zoomed in enough, drag from left |
|
to right to draw in the new waveform. |
\ |
You can set Logic Pro to edit your audio in external editor: |
\1.\ Choose Logic Pro X Preferences Audio.
\ |
The Audio Preferences window opens. |

250 Part IV: Arranging and Editing Your Project
\ |
2.\ Click the Audio File Editor tab, as shown in Figure 14-11. |
\ |
3.\ Click the External Sample Editor field. |
\ |
A browser window opens where you can navigate to your external |
|
sample editor. |
\4.\ Select your external sample editor in the browser, and then click Choose.
Figure 14-11:
The Audio
Preferences
window.
\\
After you’ve set up your external audio editor, select an audio file and choose Edit Open in (Shift-W) on the tracks area menu bar. Your audio will open in the external audio editor, ready to be manipulated to your ear’s content.
We’ve come a long way since the days of tape and razor blades. You can take control of your audio quickly and easily. Your creative process can stretch into the realm of audio manipulation or consist of simply shaping things until you and your clients are happy.
With the capability to create perfect takes and massage the timing and tuning of your parts, you can deliver the best music your imagination has to offer. Your fans want more music. Go give it to them.