

Chapter 5: Introduction to Digital Audio and MIDI |
85 |
Connecting Your Audio Devices
If you plan on recording audio from a microphone or an instrument, you’ll need a way to get the audio into Logic Pro. Your Mac probably has a builtin line in or microphone. Although these may work in a pinch, professional recordings need higher-quality input devices. The documentation of most professional hardware will show you how to set it up with Logic Pro.
Choosing your input and output device
After your hardware is set up and connected to your computer, you must select the hardware in Logic Pro Preferences. To choose your audio input and output devices:
\1.\ Choose Logic Pro X Preferences Audio.
\2.\ Click the Devices tab.
\3.\ On the Input Device and Output Device drop-down menus (refer to
Figure 5-3), make your selections.
\ |
You can choose separate input and output devices. You may want |
|
to record a guitar by using a mobile guitar interface and monitoring |
|
through the computer speakers or headphones. In this case, you select |
|
the audio interface as the input and select Built-in Output as the output. |
\4.\ Click the Apply Changes button.
\ |
Logic Pro will now begin using your selected input and output device |
|
for audio. |
Setting your I/O buffer size and reducing latency
Latency refers to the delay between your audio input and audio output. This delay is unavoidable in software because your sound source must be converted to digital audio and processed before it can be heard. In many cases, latency is negligible and won’t be noticeable. However, latency can become an issue when a track has lots of plug-ins that require significant processing.
\It’s a good idea to record most of your tracks before you begin adding lots of plug-ins. The more plug-ins you add, the more processing power required, and
the more latency you can introduce into the system. If you record without a lot of plug-ins, latency probably won’t be an issue.

86 |
Part II: Digital Recording and Using Prerecorded Media |
When you record, latency can be a hindrance if you can’t hear what you’re playing exactly when you’re playing it. Fortunately, you can adjust the latency as follows:
\1.\ Choose Logic Pro X Preferences Audio.
\2.\ Click the Devices tab.
\3.\ On the I/O Buffer Size drop-down menu (refer to Figure 5-3), make
|
|
your selections. |
\ |
|
Note that a smaller buffer size will reduce latency. |
\ |
|
A smaller buffer size requires more processing power. If you set the |
|
|
buffer size too low, you can introduce clicks and pops in your audio. |
|
|
Experiment with the buffer size until you find a setting that minimizes |
|
|
latency but doesn’t introduce unwanted audio artifacts. |
|
|
\4.\ Click the Apply Changes button.
\ |
Logic Pro will begin using your selected I/O buffer size. |
Monitoring signals through your hardware or software
Some audio interfaces have built-in monitoring capabilities. This means you can listen to the source material you’re recording through your hardware instead of through the Logic Pro X software. Monitoring through your hardware is useful if the software introduces too much latency.
By default, Logic Pro monitors audio through the software. To turn software monitoring off, follow these steps:
\1.\ Choose Logic Pro X Preferences Audio.
\2.\ Click the Devices tab.
\ |
|
|
3.\ Deselect the Software Monitoring check box (refer to Figure 5-3). |
\ |
|
|
If no hardware is connected, the check box will appear dimmed and will |
|
|
|
be unavailable. |
\ |
|
|
The Software Monitoring check box is available only if Show Advanced |
|
|
|
Tools is selected in the Advanced pane of Logic Pro X Preferences, as |
|
|
|
discussed in Chapter 1. |
|
|
|
|
\ |
4.\ Click the Apply Changes button. |
||
\ |
|
|
Audio will no longer be monitored through Logic Pro. |
Chapter 5: Introduction to Digital Audio and MIDI |
87 |
Exploring audio preferences
You’ve seen Logic Pro X audio preferences throughout this chapter. As you’ve discovered, you can customize the software to your audio needs in many ways. Next, I briefly cover some global audio preferences that will be of use as you record, edit, and mix your audio in Logic Pro.
Open the Audio Preferences window by choosing Logic Pro X Preferences
Audio. Here’s a brief description of the audio preferences:
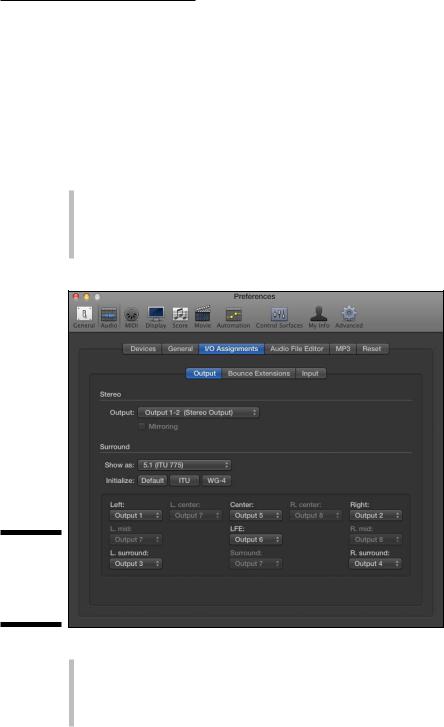
\\I/O Assignments tab: The I/O Assignments tab has three tabs: Output,
Bounce Extensions, and Input, as shown in Figure 5-5. The Output tab enables you to send your audio to a different output pair if your hardware supports it. Select the Mirroring check box to send your output through stereo out in addition to a second output.
Figure 5-5:
The I/O
Assignments
tab in Audio
Preferences.
\\
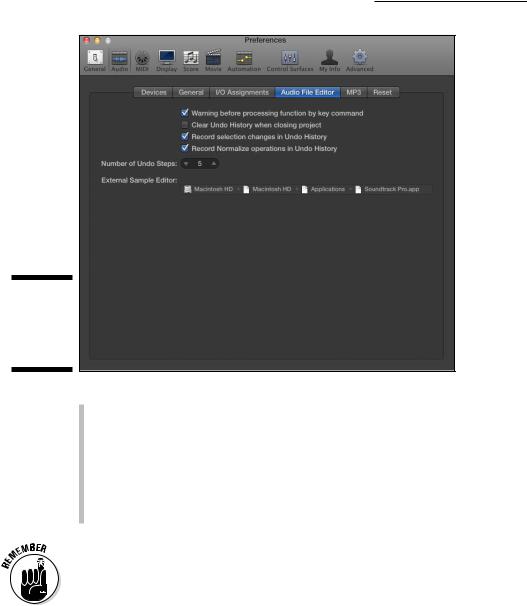
\\Audio File Editor tab: This tab, shown in Figure 5-6, let’s you set the
preferences for the audio file editor. (For details on this editor, see Chapter 14.) The audio file editor has its own undo history with a definable number of steps. You can also choose an external audio editor if you have one that you prefer.
88 |
Part II: Digital Recording and Using Prerecorded Media |
Figure 5-6:
The Audio File Editor tab in Audio Preferences.
\\
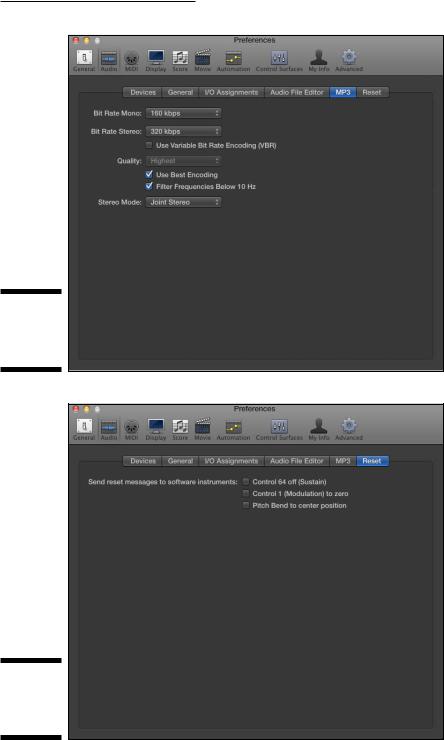
\\MP3 tab: The MP3 tab, shown in Figure 5-7, enables you to set the
default bit rate of mono and stereo MP3 files. As discussed previously in this chapter, a higher bit rate will result in higher quality audio.
\\Reset panel: If your software instruments get stuck and continuously
play notes, you can reset them in this tab. Sometimes sustain messages from a sustain pedal get stuck, and notes continue playing as a result. You can reset sustain MIDI messages in addition to modulation and pitch bend in this tab, as shown in Figure 5-8.
\ |
|
In addition to global audio preferences, you can make changes to the project’s |
|
|
audio settings by choosing File Project Settings Audio (refer to Figure 5-2). |
|
|
These preferences usually work just fine in their default state. The only setting |
|
|
you’ll want to adjust when you begin your project is the sample rate, which |
|
|
|
|
|
you learned how to do previously in this chapter. |
Chapter 5: Introduction to Digital Audio and MIDI |
89 |
Figure 5-7:
The MP3 tab in Audio Preferences.
\\
Figure 5-8:
The Reset tab in Audio Preferences.
\\