

Chapter 15: Editing MIDI Tracks 259
In the MIDI draw lane, click where you want to add MIDI controller data. You can click and drag in the lane to create smooth lines for multiple controller points to follow. All corresponding MIDI notes in the piano roll editor will be updated with the new controller data. Another common use for MIDI draw is editing sustain pedal events.
Editing MIDI in the Step Editor
The hyper editor has been renamed as the step editor, which as you’ll see makes sense. If you’ve played with a drum machine or Ultrabeat, you’ll get the hang of the step editor quickly. The step editor is unbeatable at programming drum patterns but, you can use it in other creative ways too. It’s unparalleled at organizing sounds and other MIDI events rhythmically.
Creating and editing steps
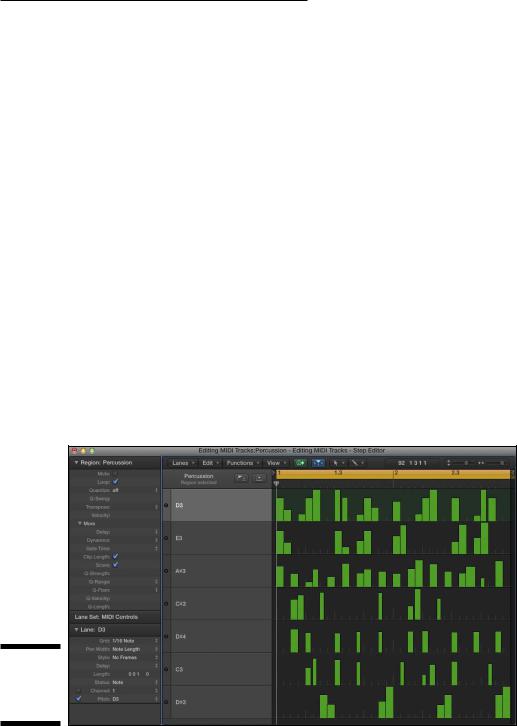
Steps are represented as vertical beams within the lanes, as shown in Figure 15-9. Each step represents MIDI events such as note events or other controller data. The height of the step determines the value of the MIDI event. To create steps, use the pencil tool to click where you want the step. Drag the step up or down to change the value. You can create multiple steps by dragging horizontally through the lane.
Figure 15-9:
Events in
the step
editor.
\\

260 Part IV: Arranging and Editing Your Project
Edit the value of steps by dragging the event up or down with the pointer tool or the pencil tool. You can copy, cut, paste, and delete events just as you would in the other editors. You can also edit steps by using the Edit and Functions menu in the step editor menu bar.
\You can edit the values of multiple steps at once by using the line tool. Drag
horizontally through the lane to edit the step values.
Creating and editing lanes
Step editor lanes can show more than just note events. You can assign a lane to show MIDI controller data such as modulation or velocity, and you can adjust how steps are displayed within the lane. To create a new lane, choose Lanes Create Lane. Edit the lane parameters in the lane inspector (refer to the bottom left in Figure 15-9). If the lane inspector isn’t shown, press I.
Here’s a description of the parameters in the lane inspector:
\\Name: Click the lane header to name the selected lane.
\\Grid: Choose the note length of the steps in the lane.
\\Pen Width: Choose the width of steps in the lane.
\\Style: Choose how the steps are displayed in the lane.
\\Delay: Move all events in the lane forward or backward in time.
\\Length: Choose the length of new events that are created.
\\Status: Choose the event type.
\\Channel: Choose the MIDI channel of the lane.
\\Pitch/Number: This parameter depends on the event type selected in
the Status parameter.
\ |
You can use multiple lanes for the same instrument. This allows you to quickly |
|
create eighth-note hi-hat patterns in one lane and sixteenth-note hi-hat pat- |
|
terns in a separate lane. |
Creating and editing lane sets
Lane sets are groups of lanes that you can save and recall. Changing a lane set doesn’t affect the data in the lanes, so you can freely try out different lane sets without editing your MIDI data. To create a new lane set, choose Lanes New Lane Set. Choose a different lane set by clicking the name of the current lane set in the inspector. A pop-up menu enables you to choose from a list of presets or lane set commands.
Chapter 15: Editing MIDI Tracks 261
\If you want to create a lane set from the events in a MIDI region, select the events in the piano roll editor first, and then choose Lanes New Lane Set
from Current Events on the step editor menu. All MIDI events will be added to separate lanes in the step editor.
Editing MIDI in the Score Editor
A thorough discussion of the score editor requires several chapters if not an entire book. The rules of professional music notation aren’t set in stone.
Music publishers have different notation styles, but one thing is fairly certain: Logic Pro can produce high-quality music engraving quickly.
\ |
|
The score editor quantizes your notation visually without actually quantizing |
|
|
the underlying MIDI data. This allows you to change the way notation looks |
|
|
without changing how it sounds. |
|
|
Creating and editing notes in the score
You can add notes in the score editor using the pencil tool and the step input keyboard. To add notes with the pencil tool:
\ |
1.\ Select a MIDI region in the tracks area and open the score editor. |
\2.\ Press I to open the Inspector.
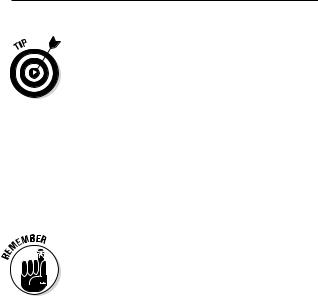
\3.\ Choose a note value from the Part Box in the inspector, as shown in
|
Figure 15-10. |
\ |
If you don’t see notes in the parts box, click either the All button or the |
|
notes icon in the parts box. |
\ |
4.\ Click the location where you want to add the note using the pencil tool. |
\ |
A new MIDI note is added to the region. You can also drag notes to the |
|
score directly from the part box. |
|
To add notes using the step input keyboard: |
\ |
1.\ Select a MIDI region in the tracks area and open the score editor. |
\ |
2.\ Choose Window Show Step Input Keyboard or press Option- -K. |
\ |
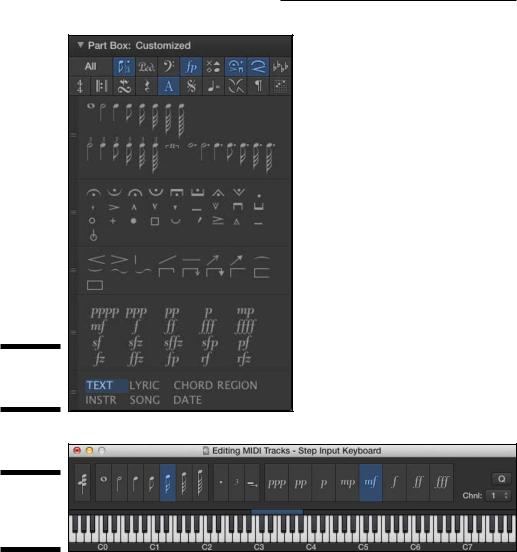
The step input keyboard opens, as shown in Figure 15-11. |
\ |
3.\ Choose a note value from the step input keyboard. |
\ |
4.\ Move the playhead to the position you want to add the note. |
\ |
5.\ Click the note you want to add on the step input keyboard. |
\ |
A note is added to the region. |
262 Part IV: Arranging and Editing Your Project
Figure 15-10:
The part box.
\\
Figure 15-11:
The step input keyboard.
\\
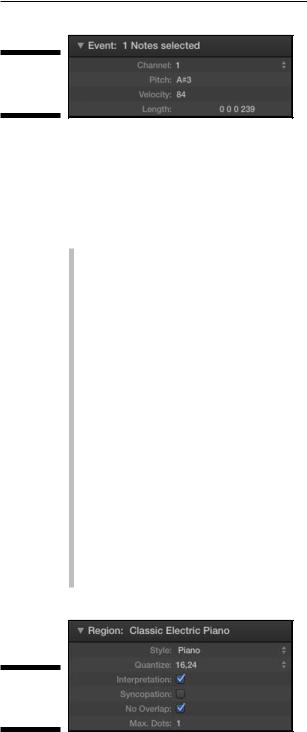
Using the pointer tool, you can select and move notes left or right in the bar or up and down to change the pitch. You can change a selected note’s length and velocity from the Event inspector, as shown in Figure 15-12. You can also quantize the MIDI note event, as opposed to editing only the visual quantization, using the Time Quantize parameters in the score editor local inspector. To view the local inspector choose View Show Local Inspector.
Chapter 15: Editing MIDI Tracks 263
Figure 15-12:
The event inspector.
Investigating the score region inspector
Every region in the tracks area can have different display properties in the score editor. You change these properties in the score editor region inspector, as shown in Figure 15-13. Here’s a description of the region inspector parameters:
\\Style: Choose the staff style for the selected track. Staff styles determine
how the MIDI data is displayed in the score editor. For example, you can choose a bass staff style for a bass track or a piano style for a piano
track. The staff style will determine the clef, transposition, and other display parameters.
\\Quantize: Choose the minimum note value that is displayed in the score
editor. The quantize value only determines the display in the score editor and doesn’t edit the actual MIDI data.
\\Interpretation: Select the interpretation check box to make the score
more readable instead of presenting the MIDI data precisely as it’s sequenced. For example, shorter note values like sixteenth notes are often rounded up when interpretation is selected. It’s a good idea to deselect interpretation when inputting notes using the step input keyboard or pencil tool.
\\Syncopation: Select the syncopation check box to make syncopated
rhythms more readable in the score editor. When syncopation is selected, tied notes will be shown as single notes.
\\No Overlap: Select the No Overlap check box to shorten notes that over-
lap and make them more readable.
\\Max Dots: The Max Dots field allows you to choose the maximum
number of dotted notes in the score.
Figure 15-13:
The region inspector.
\\

264 Part IV: Arranging and Editing Your Project
Adding items from the part box
You can add a lot more than just notes to the score editor. In order to make your scores more meaningful to the reader, you can add symbols, text, chords, and much more. For example, you can add accents to notes or change the note heads themselves. To add symbols to notes, drag the symbol you want to add from the part box onto the note. To add symbols to multiple notes, select the notes and then drag the symbol from the part box onto any one of the notes.
Many of the symbols can be added to any location in the score. For example, dynamic marks can be added to tell the player how loud or soft to play the part. Simply drag the dynamic symbol you want to add from the part box onto the score.
The score editor is a fantastic resource and worth exploring in detail. You can add chords to your score, including guitar tablature. You can also add text and lyrics to produce lead sheets for performing or copywriting. If you want an in-depth tour of the score editor, visit http://logicstudiotraining.com/ lpxfordummies for a complete score editor video guide.
Editing MIDI in the MIDI
Transform Window
The MIDI transform window can save you hours of tedious MIDI editing. Whenever you find yourself clicking a lot, open the MIDI transform window and get ready to be amazed. Just a little planning can make your MIDI editing go faster and get you back to creating music.
To edit MIDI using the MIDI transform window, follow these steps:
\ |
1.\ Select a region or MIDI events within a region. |
\2.\ Press -9.
\ |
The MIDI transform window opens, as shown in Figure 15-14. |
\ |
3.\ On the Presets menu, choose a preset. |
\4.\ Click Operate Only.
\ |
Your selected MIDI is transformed according to the preset. |
Chapter 15: Editing MIDI Tracks 265
Figure 15-14:
The MIDI transform window.
\\
In addition to the Operate Only button, two other buttons determine how the
MIDI transform window behaves:
\\Select Only: Click the Select Only button to select MIDI events that meet
the criteria in the transform window. Selecting MIDI events before you operate on them is useful when you want to double-check that your transform parameters are set up correctly.
\\Select and Operate: It’s not necessary to select the MIDI events in a
region before you transform them. You can tell the transform window to select MIDI that meets your criteria, and then transform the MIDI by clicking Select and Operate.
\You can also open the MIDI transform window from the piano roll editor by
choosing Functions Midi Transform and selecting any function in the list.
Using transform presets
You can choose from several MIDI transform presets on the Presets dropdown menu. Here’s a description of some of the presets you might want to consider using:
\\Humanize: Introduce a range of random velocity, position, and length to
your MIDI notes. This preset is perfect for MIDI that has been entered by using the step input keyboard or the pencil tool precisely on the grid.