


8 |
Part I: Leaping into Logic Pro X |
Remembering the Logic Pro journey
Logic Pro has come a long way since its inception. In the mid-80s, the German company C-LAB created Supertrack for the Commodore 64 computer. This product evolved into the Creator software program and eventually became Notator Logic, which ran on the Atari system in the early 90s. Here are some important milestones on the path to Logic Pro X:
\\1994: Audio recording capabilities were added to Notator Logic.
\\2000: Virtual instruments were added to Logic 4.
\\2002: Apple purchased Logic. \\2004: Logic 6 became Mac-only.
\\2007: Several audio applications, including Logic Pro 8 and MainStage, were bundled
as Logic Studio. New features such as Quick Swipe Comping and the Delay Designer plug-in were introduced, and the copy protection USB dongle was eliminated.
\\2009: Logic Pro 9 introduces more features such as flex time editing, Amp Designer, and Pedalboard plug-ins.
\\2010: Logic Pro 9 goes 64-bit.
\\2013: Logic Pro X is released, with a redesigned look, flex pitch editing, new editors, the Drummer software instrument, the Bass Amp Designer plug-in, virtual vintage instruments, MIDI plug-ins, track stacks, smart controls, tighter integration with GarageBand, the Logic Remote iPad app, and much more.
Embracing Logic Pro
Lots of digital audio workstations (DAWs) are out there, so why would you want to settle down with Logic Pro? Here’s a list of reasons why you don’t need to look any further than Logic Pro:
\\Logic Pro is designed by Apple, so hardware and software compatibility
are simple and usually hassle-free. I have upgraded Logic Pro and the Mac operating system within a week of new releases and have yet to encounter any problems. If you’re ever wondering whether it’s safe to upgrade, stop by http://logicstudiotraining.com and ask me.
\\Logic Pro has thousands of sampled instruments and effects presets, so
you can save thousands of dollars in additional expenses. You get a complete studio — including a virtual drummer who won’t show up late or scuff your floors.
\\Logic Pro excels at both recording and editing audio and MIDI. Some
DAWs do one or the other really well, but Logic Pro does both with superb sound quality and ease of use.
\\Logic Pro is compatible with most audio and MIDI hardware. I rarely
get asked hardware questions from my clients because the product just works.

Chapter 1: Getting Logic Pro Up and Sprinting |
9 |
\\Logic Pro enables you to provide professional notation for lead sheets
and full scores. When you need to hand out chord charts to the band or provide fully engraved charts with advanced markup to the orchestra, Logic Pro has you covered. Logic Pro can also create guitar tablature and add lyrics to your score.
\\Logic Pro supports many hardware control surfaces, so you can control
knobs, faders, buttons, and other parameters in Logic Pro right from your hardware. An inexpensive MIDI controller can be turned into a remote control for advanced control (or when the hand you use for your mouse or trackpad begins to ache from overuse).
\\Logic Pro is a powerful mixing console. If your computer can handle
it, you can have 255 audio tracks, 255 software instrument tracks, and 255 auxiliary tracks. You weren’t worried about running out of tracks, were you? And because you don’t have 255 hands, you can automate parameter changes on all those tracks.
\\Logic Pro is a 64-bit application that gives you increased power. Older
32-bit apps allow the use of only 4MB of RAM, but Logic Pro can access all the memory your computer has installed. You can run more plug-ins and more software instruments without a hiccup.
I’ve only touched the surface of what Logic Pro can do. Surround sound, virtual vintage instruments, drum machines, guitar amps and pedals, pitch and time editing, and MIDI effects are a fraction of what you have available as a Logic Pro user. Congratulations on making such a smart choice to embrace Logic Pro. Welcome to the club!
Transitioning from Other Software
I won’t bad-mouth or slam other DAWs. It’s a good rule to live by, especially when you collaborate with musicians who use different software. I happen to be a fan of GarageBand and use it regularly because it integrates so well with Logic Pro. If you’ve used GarageBand, you’ll find the Logic Pro interface familiar and welcoming.
Logic Pro X has many of the same features as GarageBand, plus a lot more, such as a professional mixer and finer control over audio and MIDI regions. GarageBand 10 users are familiar with smart controls, but with Logic Pro X you can do a lot more with them, such as control and edit more parameters. Best of all, Logic Pro can open GarageBand projects, including GarageBand projects created in iOS, the operating system that powers the iPhone, the

10 |
Part I: Leaping into Logic Pro X |
iPad, and the iPod touch. Being able to start projects on one of those devices and continue working on them in GarageBand or Logic Pro creates a powerful workflow.
If you’re coming from another software environment, maintain a beginner’s mind as you explore Logic Pro. The workflow is probably similar to what you’re accustomed to. It won’t take you long to understand that a Logic Pro project has tracks containing MIDI or audio regions and that you can arrange those regions right in the main window or edit them in the various editors. Did I just give the whole book away right there? Not quite, but understanding Logic Pro is almost that simple.
Just remember, if your objective is clear, Logic Pro can help you reach it.
Creating with Logic Pro\
With Logic Pro, you have a full band at your fingertips. From country to dance music, songwriting to film scoring, capturing MIDI performances to professional audio recording, Logic Pro will excite your passions and showcase your strengths. Lead the way and Logic Pro will follow.
Thinking like a pro
Whether or not you’re in it for the money, having a professional mindset can make your experience with Logic Pro more productive and enjoyable.
My advice to new and seasoned Logic Pro users alike is to set a goal and work steadily towards that goal. Here’s what I’ve found and I hope you agree. Creativity loves speed. Slow and tedious labor kills creativity faster than anything. So set a clear objective and move quickly towards completion.
Planning your creative process
You can always wait for inspiration to strike you — but you could end up waiting a long time. And when inspiration does strike, it often doesn’t stick around long. For all the moments when you’re not feeling inspired, having a plan for your creative process can help.
What’s your purpose for the project? Are you learning something or creating something? If you’re learning, what’s your learning goal and how much time are you going to give it? You could easily get lost trying to learn everything

Chapter 1: Getting Logic Pro Up and Sprinting |
11 |
Logic Pro can do and never create anything. That will suck the joy out of using Logic Pro, and you’ll find yourself opening it less and less. So give yourself learning limits and give yourself creative projects. Connecting to the purpose of your project will keep you motivated and moving in a clear and forward direction.
Here are some example projects to get you learning and creating:
\\Learn a tool. Logic Pro comes with lots of tools and editors to help you
achieve your creative goals. Spend 5 to 15 minutes learning a single tool, function, or editor. You will have many opportunities to do this throughout the book.
\\Write a song. Lots of my students find it easier to separate writing a
song from recording a song. Writing a song means starting from scratch and trying out ideas. You’ll end up doing some recording, but your purpose is not to create “keeper” tracks but to experiment and organize your ideas.
\\Record a song. If you’ve already written a song, record it. Logic Pro
has an intuitive interface, and you’ll be able to polish your tracks until they’re as shiny as a platinum record.
\\Sequence an 8-bar loop. Not all projects have to be big and grand.
A simple 8-bar piece of music can become a loop that you can use in another project or license to another artist.
\\Compose a score. Use the orchestral instruments or synthesizers to
create a score for a video or just for fun. If you have any home videos on your computer, you can import them to Logic Pro and give them a soundtrack. Play the video at the next holiday reunion, and your film composition is sure to impress friends and family.
\\Design a sound. Spend 30 minutes with any of the Logic Pro virtual
instruments and come up with your own sounds. Several synths even come with a randomize button to keep the sound fresh. Ever wondered what a six-foot guitar made of cardboard would sound like? Me neither, but you can make it happen with the Sculpture software instrument in Logic Pro.
\\Mix a song. You can use a project you’ve recorded or you can use
Apple loops to practice your mixing chops and share your project with the world. Be sure to consult my mixing guide at http://logic studiotraining.com to make your time in audio engineering land productive and free of earaches.
These examples are just a sampling of the types of projects you can start. The main point is to set a clear objective so you can achieve your goal. Set yourself up to win and you’ll stay motivated.

12 |
Part I: Leaping into Logic Pro X |
Getting to the finish line
Most Logic Pro users come to me for help not with getting started but with getting things done. When inspiration fades, so does motivation, unless you have a strategy for getting to the finish line.
Here are some tips for completing projects:
\\Set time limits. Give yourself the shortest time frame for completing a
task. Parkinson’s law states that work expands to fill the time available to complete it. Set aside 10 hours to complete a job, and it will take
10 hours. Set aside 30 minutes, and the job will take 30 minutes. For larger projects, put a deadline on the calendar and stick to it. This suggestion might sound rigid, but the only thing you have to lose is your uncompleted projects.
\\Make projects attainable. Dream big but be realistic. If you’ve never
done a particular task before, give yourself time to learn and improve. You might want to write a chart-buster, but begin by writing a simple song with a clear structure. Then you can build upon your new skills and improve with each project.
\\Break the project down. Typically, an album is made up of many songs,
each song is made up of many instruments recorded on separate tracks, and each track is made up of many takes that are edited and turned into a final take. When you list all the tasks required to complete your project, you’ll have an easier time completing each task.
\\Keep it simple. The fewer parts you commit to your project, the easier
it will be to complete. Many pop songs have 32 tracks on the low end and more than 100 tracks on the not-so-high end, but that doesn’t mean you have to do the same. Lots of great songs have only four instruments, including the lead vocal. Try to simplify your project; you’ll find that completing your project is much easier when it isn’t complicated.
The more you create, the better you’ll get. The more projects you complete, the more confidence you’ll have. With confidence and chops, you’ll tackle more ambitious projects and find yourself working with higher-level musicians.
Now that you’ve read about the Logic Pro producer’s mindset, it’s time to get your gear ready to handle your mad genius.

Chapter 1: Getting Logic Pro Up and Sprinting |
13 |
Connecting Your Logic Pro Studio\
You can do a lot just with the Logic Pro software. You can play the software instruments with your computer keyboard by using musical typing (described in Chapter 7). You can import media from a variety of sources, such as iTunes or iMovie (as detailed in Chapter 8). You can use headphones or your computer speakers to listen to your project. To take advantage of all that Logic Pro has to offer, however, you’ll want to connect some peripheral devices.
Consider adding some or all of the following devices to your studio:
\\Audio interface: You’ll need to get audio into and out of your computer.
Your computer probably has a built-in mic, but you might also want to capture audio from a variety of sources such as a keyboard, guitar, and microphone. You may want to be able to record more than one instrument at a time. Audio interfaces allow you to get professional sounding audio into your Logic Pro project. You can get inexpensive, good quality input devices through major retailers such as Amazon and the Apple store, or you can search eBay and Craigslist for used options. USB and Thunderbolt connectivity are standard on the latest Apple computers. Firewire might be another option, depending on the capabilities and age of your computer.
\\Speakers: In the pro audio community, your speakers are known as mon-
itors. In a pinch, your computer speakers will do just fine. I use them to do a chunk of my mixing because many people listen to music on their laptop’s speakers. (The same advice goes for Apple’s earbuds, which are provided with all their mobile devices.) For a more accurate picture of your audio, listen to your project on a set of monitors that produces the entire frequency range. There’s a good chance that the audio interface you choose will have a stereo monitor output for connecting a pair of speakers.
\\MIDI controller: MIDI (musical instrument digital interface) allows
devices to talk to each other and enables you to control all the wonderful software instruments that come with Logic Pro. A MIDI controller can be a keyboard, drum pads, or any other device that transmits MIDI. MIDI controllers connect to your computer by USB or by a separate MIDI interface for devices that have 5-pin DIN connectors.
\\iPad: The Logic Remote iPad app can control software instruments and
the mixer, execute key commands, and more. Best of all, the app is free! It connects to Logic Pro through your Wi-Fi network. Got a keyboard sitting 20 feet across the room? No problem: Use the iPad to control Logic Pro remotely. I cover Logic Remote in Chapter 20.

14 |
Part I: Leaping into Logic Pro X |
Setting up your computer
If you haven’t already installed Logic Pro X on you computer, get it from the Apple App Store. Open the App Store in your Applications folder and search for Logic Pro X. Purchase and install it (an installation wizard will guide you) — but be patient while downloading because the program is about 800MB. You need a minimum of 5GB of disk space plus 35GB if you want to add optional content available through a free in-app download. You also need a minimum of 4GB of RAM, a display with 1280-by-768 resolution or higher, and OS X v10.8.4 or later.
To download the additional Logic Pro X content, launch Logic Pro X. Choose Logic Pro X Download Additional Content. Select all the additional content packages you want to install, and then click the Install button.
\ |
I recommend finding the hard drive space to download the additional content |
|
because the instruments, samples, and loops you get are fantastic and fun |
|
to play. |
Here are some tips to make your experience with Logic Pro X as smooth as possible:
\\Pay attention to Time Machine backups. If you use Time Machine to
back up your computer, Time Machine might access the hard drive while you’re accessing the hard drive with Logic Pro. As a result, you might get an error if you’re working on a project with a high track count or lots of samples streamed from the disk. Turn off Time Machine temporarily if you encounter any issues.
\\Shut down other apps if you run out of power or if Logic Pro gets
glitchy. When I arrange or edit my projects, I often leave other apps open. When I’m recording or in the final process of mixing, however, I close all other apps so that the hard drive is free and extra power is available for processor-intensive Logic Pro effects.
\\Prevent app nap in OS X Mavericks. When apps are hidden and not
actively working, they enter app nap to save power and battery life. This feature might get in the way if you put Logic Pro in the background while you, say, look at lyrics in a text document while recording your voice. To prevent Logic Pro “napping,” go to the Applications folder, right-click or Ctrl-click the Logic Pro X application, and choose Get Info. Then select the Prevent App Nap check box.
\ |
|
\Show Advanced Tools. Logic Pro X has with several advanced features |
|
|
that aren’t available by default. You should enable them so that you can |
|
|
follow along with the examples in this book. In the main menu, choose |
|
|
Logic Pro X Preferences Advanced Tools and then select the Show |
|
|
|
|
|
Advanced Tools check box, as shown in Figure 1-1. |
Chapter 1: Getting Logic Pro Up and Sprinting |
15 |
Figure 1-1:
The Logic
Pro X
Advanced
Preferences
pane.
\\
Now that you’ve installed Logic Pro X and made a few tweaks, you’re ready to connect your hardware and start making music.
Connecting your hardware
If you plan on recording audio, you’ll need a way to get audio into Logic Pro. Your Mac probably has a built-in line in or microphone. These may work in a pinch, but professional-quality recordings need professional hardware. Luckily, most professional hardware is compatible with Logic Pro X, so you should have a simple plug-and-play experience.
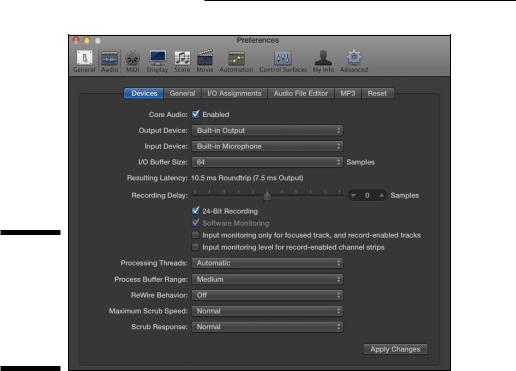
After you connect your audio hardware, you tell Logic Pro how to use it by choosing Logic Pro X Preferences Audio. Select the Devices tab, as shown in Figure 1-2, and use the Output Device and Input Device drop-down menus to choose your audio hardware.
\You can get to Logic Pro X Preferences quickly by pressing +comma (,). This
key command will display the Preferences in most applications on your Mac.
16 |
Part I: Leaping into Logic Pro X |
Figure 1-2:
In the Audio Preferences pane, choose and configure your audio hardware.
\\
Similarly, if you plan to control Logic Pro from a MIDI controller, your computer needs to be connected to the controller. Many controllers will send and receive MIDI through USB, eliminating the need for a third-party interface. Other controllers may use 5-pin DIN cables and require a hardware MIDI interface to go between the computer and the controller. Check the literature; Logic Pro will probably be mentioned.
After you’ve connected your MIDI controller, Logic Pro will automatically listen for your controller’s signals on the currently selected track. Playing software instruments with a MIDI keyboard controller is usually a plug-and- play experience without any need for customization.
With all your hardware connected, Logic Pro X is ready and waiting for your commands.
Building common setups
To help you visualize what a complete hardware and software setup looks like, I’ve designed some possible systems. You can create music with a computer and the Logic Pro software alone. However, if your goals are more ambitious and you want to get good sounds into and out of Logic Pro, consider
Chapter 1: Getting Logic Pro Up and Sprinting |
17 |
your hardware and the acoustics of your listening environment. Idealized scenarios aren’t necessary for good quality or enjoyment. With a Mac computer and Logic Pro X, your baseline for quality and fun is already high.
It’s easy to believe that you need the best equipment (and a lot of it) to create anything worthy of attention. Don’t believe the hype and don’t get GAS (gear acquisition syndrome). Spend your money wisely and spend your time creating, not buying. The setups in this section can be built inexpensively.
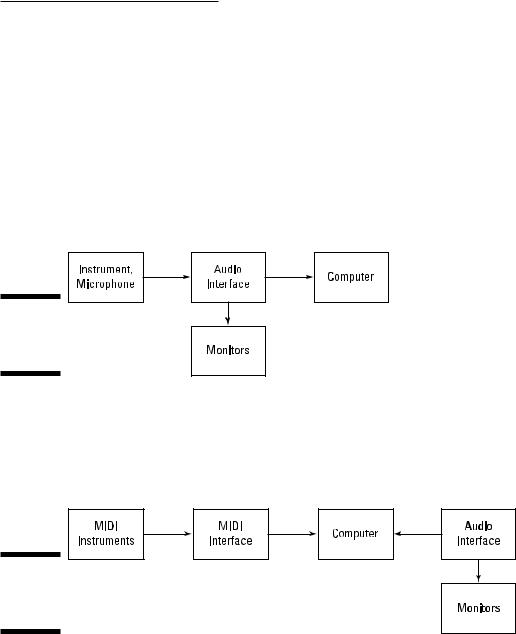
In a recording setup, such as the one shown in Figure 1-3, you need to get audio from instruments or microphones into Logic Pro. You also need to hear what you’re recording through monitors or headphones. Your audio interface is the intermediary between your computer and the peripherals.
Figure 1-3:
A typical recording setup.
\\
In a MIDI studio, such as the one in Figure 1-4, instruments such as synthesizers, drum machines, samplers, and even alternate controllers (for example, a guitar MIDI system) connect to a MIDI interface, which transmits the MIDI
messages from the various instruments to the computer. An audio interface is still needed to transmit audio in and out of your system.
Figure 1-4:
A studio of MIDI instruments.
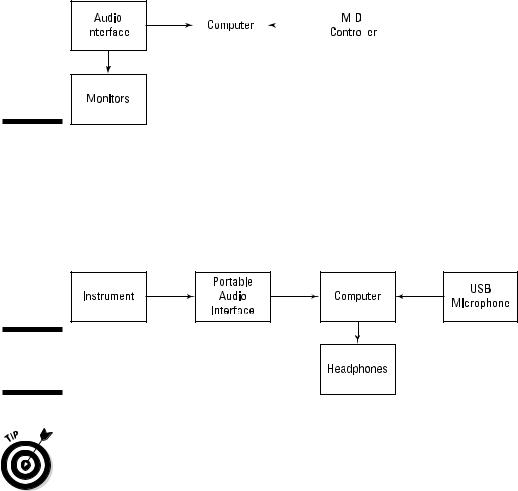
If all you do is mix other people’s music, you may never need to do any recording of your own. In this case, you need an audio interface to get audio from Logic Pro and into a pair of monitors, as shown in Figure 1-5. You may, however, use a controller to mimic a mixing console with faders, knobs, buttons, and other useful features that control Logic Pro remotely.
18 |
Part I: Leaping into Logic Pro X |
|
|
|
|
|
|
|
|||
|
|
|
|
|
|
|
|||||
|
|
|
|
|
|
|
|
|
|
|
|
|
|
|
|
|
|
|
|
|
|
|
|
|
|
|
|
|
|
|
|
|
|
|
|
|
|
|
|
|
|
|
|
|
|
|
|
|
|
|
|
|
|
|
|
|
|
|
|
|
|
|
|
|
|
|
|
|
|
|
|
|
|
|
|
|
|
|
|
|
|
|
|
|
|
|
|
|
|
|
|
|
|
|
|
|
|
|
|
|
|
|
|
|
|
|
|
Figure 1-5:
A mixing studio.
\\
I love to travel, and I never go anywhere without a laptop and an instrument. I travel with guitars, drum machines, small keyboards, and sometimes more than one of each. I like to keep the setup as simple as possible while affording me the flexibility that I love. In a mobile rig, such as the one shown in Figure 1-6, headphones will replace speakers, and portable interfaces and microphones will be used to get audio in and out of Logic Pro.
Figure 1-6:
A mobile audio rig.
\If you plan on performing live, consider buying MainStage, the companion app to Logic Pro. MainStage shares all the instruments and presets with Logic Pro
but is designed for live performance. It has a gorgeous full-screen interface that’s easy to read on stage. MainStage doesn’t include features that you don’t need live, such as notation or audio and MIDI editors.
There’s never been a better time to be a Logic Pro user. You get an amazing studio at an amazing price and you can do amazing things with it. I hope you’re as excited as I am to dig into what Logic Pro can do.