

Chapter 19
Bouncing and Sharing Your Music
In This Chapter
\Bouncing full mixes to final audio files \Backing up and archiving your projects \Creating alternate mixes and music stems \Sharing your music
Ithink all Logic Pro users anticipate the moment when they can turn their full mix into a format that they can share with the world. Seeing a project
through to the end takes patience and persistence, and you go through so many emotions during the process that the project ends up holding a lot of personal value. Rendering your full mix to a single audio file (called bouncing) is an exciting moment because you make your song real and ready for the world.
You have many reasons to want to bounce your project as soon as possible. You can deliver it to a DJ. You can test it in your car. You can put it on your website. And you can celebrate your creation. In this chapter, you render the final audio file and share it with me so I can help you celebrate being a music producer.
Bouncing Your Project
You usually end up bouncing several times during the course of a project. You might want to listen to your song on the go or share it with someone for feedback. And at some point, you’re going to bounce the project because it’s complete. In this section, you learn how to render your project into an audio file that you can listen to in software such as iTunes.
\ |
Back up your projects. It’s an awful feeling to lose your precious data due to a |
|
hard drive crash or, even worse, a stolen computer. You can lessen the pain by |
|
backing up your data so you can get back to work. |

326 Part V: Mixing, Mastering, and Sharing Your Music
Apple’s Time Machine software, which is installed on your Mac operating system, can get you started backing up. It will back up your entire computer at regular intervals to an external hard drive or an AirPort Time Capsule. In addition, services can back up your data offsite to inexpensive storage solutions such as Amazon S3 or Bitcasa. Finally, you can sync your current projects between computers and into the cloud using services such as Dropbox. And if you’re like me, obsessive at backing up data, you can keep a small external hard drive handy and manually back up your current projects. One day, you will be thankful that you have your data backed up.
Recording external instruments before you bounce
Before you can bounce your project into a single audio file, or even multiple audio files for archival, you need to record all your external MIDI instruments to audio tracks, as described in Chapter 6. External MIDI instruments are controlled by the MIDI tracks in your project, but the audio of the external instrument needs to be captured in your project on an audio track.
Capturing your software instrument tracks as audio is also a good idea, because you never know when a third-party software instrument will become obsolete. If you want to future-proof your project, bounce all your software instruments to audio tracks. To bounce a software instrument track, follow these steps:
\1.\ Select a software instrument track.
\ |
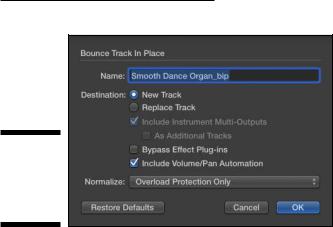
2.\ Choose File Bounce Track in Place, or press Control- -B. |
\ |
The Bounce Track In Place dialog opens, as shown in Figure 19-1. |
\ |
3.\ Name the file and select your options. |
\ |
To retain the track’s current sound and mix automation, deselect Bypass |
|
Effect Plug-ins and select Include Volume/Pan Automation (the default |
|
settings). If you want to bounce the raw track, as you would for raw |
|
archival or sharing with other mix engineers who plan on adding their |
|
own effects, do the opposite and select Bypass Effect Plug-ins and dese- |
|
lect Include Volume/Pan Automation. |
\4.\ Click OK.
\ |
Your software instrument track is bounced to audio and added to a track |
|
in the project. |
Chapter 19: Bouncing and Sharing Your Music 327
Figure 19-1:
The Bounce Track in Place dialog.
\\
Bouncing to an audio file
Bouncing is an exciting step. You’ve been building the house piece by piece, and now you finally get to observe it as a whole. Even though the file will sound the same as your mix in the project, bouncing is an important final step and symbolic of your commitment to the project. You can bounce your project in the following ways:
\1.\ Select the length of the section to be bounced by selecting regions,
by setting the cycle mode, or by deselecting regions to use the project end point.
\ |
If cycle mode is off and a region is not selected, Logic Pro defaults to |
|
bouncing the length of the entire project. If cycle mode is on, Logic Pro |
|
will use the cycle length to determine the bounce length. If cycle mode |
|
is off and a region is selected, the bounce length defaults to the length |
|
of the selected region. I like to determine the bounce length by the cycle |
|
length. That method allows me to precisely define the start and end |
|
points to remove empty space in the beginning and capture any reverb |
|
or delay tails at the end. |
\2.\ Start the bounce in either of the following ways:
•Click the bounce icon at the bottom of the Stereo Output channel strip.
•Choose FileBounce Project or Section, or press -B.
\ |
The Bounce window opens, as shown in Figure 19-2. You can select the |
|
destination file type, file type parameters, and bounce mode, and you |
|
can refine the start and end times. Normalizing raises the level of your |
|
track to 0 dBFS, so it’s best to leave it off. |

328 Part V: Mixing, Mastering, and Sharing Your Music
Figure 19-2:
The Bounce
window.
\\
\3.\ Click Bounce.
\ |
The bounce file-naming dialog opens. |
\ |
4.\ Name your file and choose its location. |
\5.\ Click Bounce in the dialog window.
\ |
The bounce is processed and the bounced files are saved in the location |
|
you chose in the preceding step. |
\If you’re completely done with the project, it’s a good idea to export all your tracks as audio files. Audio files aren’t going away any time in the distant
future. Third-party plug-ins and software change regularly, so you never know whether your favorite third-party plug-in will work in a later version of Logic Pro. Choose File Export All Tracks as Audio Files or press Shift- -E. In the dialog that appears, choose the file location, file type, and file settings. Click Save and every track will have a separate audio file. You could also give the resulting audio to a Pro Tools user, who would be able to easily import your audio and begin mixing right away.
Creating Stems and Alternate Mixes
Bouncing several different versions of your final mix is a common practice. Clients have different needs, and alternate versions of mixes can cover all your bases. Sometimes, artists need versions without the vocal for performing live to backing tracks. You may even need to bounce groups of tracks separately, creating a stem mix. Whatever your needs, bouncing alternate mixes and stems is easy using Logic Pro.

Chapter 19: Bouncing and Sharing Your Music 329
Bouncing a stem mix
Stem mixes have many uses. You can give a remix artist the stems of the mix for remixing and DJ gigs. Film scores and surround sound projects often use music stems. Mixing and mastering engineers might want stems instead of individual tracks or bounced stereo tracks.
The fastest way to create a stem is to solo the tracks you want to include in the stem and bounce as described previously. Name and catalog your stems clearly. That way, they’re easy to recognize and you won’t accidentally leave out individual tracks.
The stems you create will depend on your project and collaborators. A remixer might want separate vocals, drums, and musical instruments. A film score might want to separate the orchestra from any electronic instruments or sound effects. If stems are required, you can meet the demand.
\ |
You can also use track stacks to build and organize your stems. By using track |
|
stacks, it’s easy to solo or mute the instruments in the track stack for bounc- |
|
ing the stems. |
Bouncing alternate mixes
When it comes to mixing popular music, you can make several common alternate mixes. And it’s probably best to make them even if no one asks for them. Making an alternate mix takes little time, and you may end up liking one of the alternates better. Here’s a list of common alternate mixes:
\\Without vocals: This mix can be used when a performer needs to sing
to a backing track. TV appearances often use live vocals with backing tracks instead of live performers to guarantee great sound. An alternate version of this mix is to leave the background vocals in, known as the TV mix. This type of mix is also useful if your song ends up being used for karaoke.
\\Vocals only: This mix is loved by remixers and DJs because they can
provide their own beats and music under the lead vocal track. It can also be mixed with the vocal-free backing track version when film and TV editors need independent control of the vocal level because it coincides with dialog.
\\Vocal up/vocal down: These mixes involve raising and lowering the
overall level of the lead vocal 1 or 2 dB. The change in level is subtle but often necessary to please the discerning ears of your clients.
\\Without solo: If the song has a solo instrument or solo section, you
might treat it as a lead vocal and provide versions with and without the solo instrument.