

42 |
Part I: Leaping into Logic Pro X |
At the bottom of the inspector are two channel strips. The strip on the left corresponds to the currently selected track. The strip on the right is dynamic and is discussed further in Chapter 16. Above the channel strips are two panes that you can open and close:
\\The track inspector pane gives you details about the entire track. You
can change the track icon here, which I love to do. You discover what the track inspector can do in Chapter 4.
\\The region inspector shows you details about the currently selected
region or regions. The details in both the region and track inspector panes depend on what kind of track or region is selected.
Understanding the difference between the track and region inspector panes will save you from a lot of confusion as you work. You discover more about tracks and regions in Chapter 4.
Taking Inventory of Your Track List
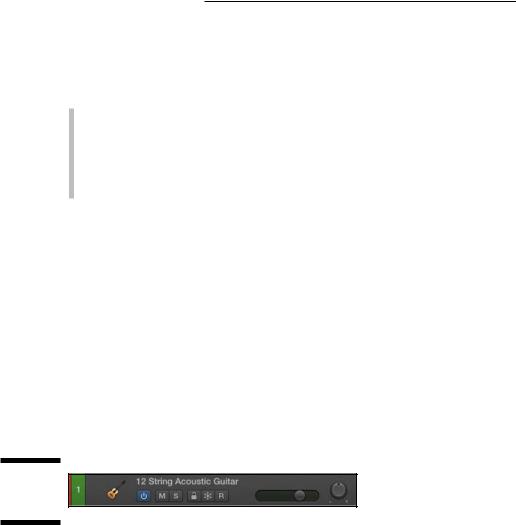
Every track you create is added to the track list and given a track header, as shown in Figure 3-7. You can reorder tracks by dragging the track headers to new locations in the list. To select more than one track at a time, -click the track headers. You can delete tracks by choosing Track Delete Track or by Control-clicking the track header and choosing Delete Track. You can also navigate your track list by using the up and down arrow keys.
Figure 3-7:
A track header.
\\
Make headway with track headers
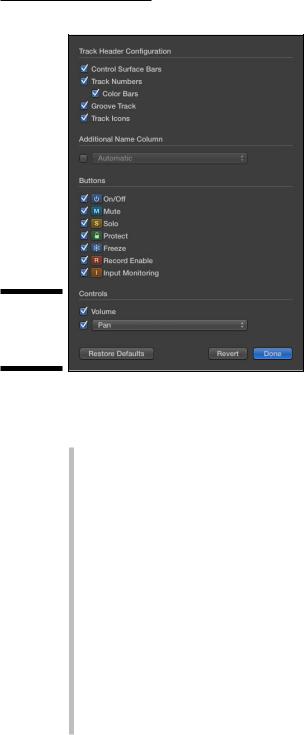
Track headers are customizable and resizable. Choose Track Configure Track Header (or press Option-T) to display the Track Header Configuration dialog shown in Figure 3-8. Select the additional items you want to see in your track headers and click Done. You can also Control-click any track header
to pull up the Track Header Configuration dialog. You can resize the track header vertically or horizontally by placing your cursor at the top, bottom, or right edge of the track header and dragging when your cursor changes to the resize pointer.
Chapter 3: Exploring the Main Window and Tracks Area |
43 |
Figure 3-8:
Track header configuration dialog.
\\
By default, all the buttons and controls aren’t shown on the track headers.
Here’s a brief description of the track header configuration options:
\\Control Surface Bars: Select this option to add on the far left of the
track header a thin bar that indicates whether the track is being controlled by a control surface. A control surface, such as your iPad, is a hardware device that allows you to control a digital audio workstation such as Logic Pro. Many MIDI controllers can also be used as control surfaces, which allow you to use hardware to control the onscreen faders, knobs, buttons, and displays. To read an in-depth manual on control surfaces, choose Help Logic Pro Control Surfaces Support.
\\Track Numbers: Select the Track Numbers option to display the track
number on the left of the track header. Selecting this check box also gives you the option to select the Color Bars check box, which colorizes the track numbers area and visually organizes your tracks. You find out more about track colors in the next section.
\\Groove Track: You can set one track in your project as the groove track
and select other tracks to follow the timing of the groove track. When a groove track is selected, a star will appear to the right of the track
number and all other tracks will have check boxes that you can select to make a track follow the groove track. For the details on groove tracks, see Chapter 13.

44 |
Part I: Leaping into Logic Pro X |
\\Track Icons: If you Control-click the track icon in the track header, you
can choose a new icon from the icon pop-up menu. Track icons are useful visual indicators and look cool, too.
\\Additional Name Column: Add a name column to the right of the track
name. You can also customize what the column displays by using the drop-down menu in the track header configuration dialog.
\\On/Off: Use the on/off icon to save processing power. To turn off tracks,
|
you must select Show Advanced Tools in the Advanced Preferences |
|
pane (see Chapter 1). When a track is turned off, it is silenced. |
\ |
\Mute/Solo: The mute icon silences the track. You can mute all tracks |
|
by pressing while you click the mute icon. The solo icon mutes every |
|
track except the soloed track. You can mute or solo multiple tracks at |
|
once by clicking and holding down on the icon and dragging your cursor |
|
up or down the track list. |
\\Protect: This icon prevents changes to the track. With the protect icon
enabled, you won’t be able to record or edit the track. Protecting a track is useful when you want to make sure it remains exactly as it is, without accidental changes.
\\Freeze: When you freeze a track, you reduce processing power on the
track by temporarily turning the track and all its audio effects into an audio file. This feature is useful for software instruments and audio tracks with lots of plug-in effects that require a lot of processing power. With freeze enabled, all plug-ins (including software instruments) are temporarily deactivated and the track is turned into an audio file that includes all effects.
\\Record Enable: Click the record enable icon to enable your track for
recording.
\\Input Monitoring: This icon allows you to monitor audio tracks that
aren’t enabled for recording. Use this icon whenever you need to set audio levels for recording or to practice a part you plan to record.
\\Volume/Pan: If you’re used to working in GarageBand, having your
volume and pan control in the track header might help you get accustomed to Logic Pro. I’m usually in need of more workspace in the tracks area, so I don’t display these. Plus, I find the mixer controls better suited for the job. But when I’m on a bigger computer screen, I like to fill my track headers. The volume slider does double-duty as a level meter. You can change the pan control to an effects send control. You learn more about send effects in Chapter 16.
\ |
You can quickly rename a track in the track header by pressing Shift-Return |
|
and typing the new name. You can get through the entire track list by pressing |
|
Tab between each new name. |
Chapter 3: Exploring the Main Window and Tracks Area |
45 |
Make it pretty with track colors
Track colors not only make your tracks pretty but also help you identify tracks and groups of tracks quickly. In the track header configuration dialog (refer to Figure 3-8), you can display the color bars to aid visual recognition. When you create new regions on a track, they are also colorized in the same color. You can even change the color of regions independently of the track color. However, selecting a track automatically selects all the regions on the track, so if you colorize a track while all the regions are selected, those regions will also change color.
To change a track color, Control-click a track and choose Assign Track Color. You’ll be shown a beautiful palette of 72 color swatches that you can use to colorize your selected tracks and regions. By default, MIDI tracks are colorized green and audio tracks are blue. I always group my tracks by color. Drums get their own color, lead vocals get their own color, background vocals get a different color — you get the idea. Group your groups with color.
Zooming Tracks
You’ll probably need to zoom in and out of tracks a lot, especially when you’re editing. Fortunately, you can zoom tracks in several ways. The first trick is to turn on Auto Track Zoom by pressing Control-Z or by choosing View Auto Track Zoom from the tracks area toolbar. With Auto Track Zoom on, as in Figure 3-9, the currently selected track will automatically zoom horizontally. You see not only more of the track contents but also a quick indicator of which track is selected and has focus. The key command makes it easy to toggle between the two zoom states.
Figure 3-9:
Auto track zoom on a selected track.
\\

46 Part I: Leaping into Logic Pro X
At the top right of the tracks area toolbar are two zoom sliders, vertical to the left and horizontal to the right. Drag the sliders to adjust the zoom level. You can also use key commands to zoom; I suggest that you memorize thembecause they’re so easy to use. To zoom in on all your tracks vertically, press -down arrow; to zoom out, press -up arrow. Likewise, to zoom in horizon-
tally, press -right arrow; to zoom out, press -left arrow.
If you want to zoom in on a specific area of your tracks, you can use the zoom tool. It’s always available when your cursor is in the tracks area: Simply press Control-Option while dragging over the area you want to zoom. Your cursor will temporarily turn into the zoom tool, and the area you select will automatically zoom when you release the cursor. To get back to the previous level of zoom, press Control-Option while clicking anywhere in the tracks area.
\You can recall up to three levels of zoom by using the zoom tool. This means you can zoom in on a large portion of your project, zoom in on a smaller sec-
tion, zoom in on a single part of a region, and then recall each one in sequence just by pressing Control-Option and clicking the tracks area.
Another useful key command to memorize is Z, which toggles the Zoom to Fit Selection or All Contents command. If a region is not selected, this zoom command zooms out to fit all the content in the tracks area. The tracks and regions are smaller and you can view all your content. If you have any regions selected, the same command will zoom in on those regions.
One more zoom to consider is the Waveform Vertical Zoom. Press -minus (-) or -plus (+) to zoom only your audio waveforms. This zoom feature makes your audio waveforms larger in the regions without making the regions themselves bigger. I use this feature a lot for audio editing and voice-over work when waveforms aren’t tall because they’re not recorded at high volumes. If you forget the key command, use the waveform vertical zoom icon to the left of the zoom sliders in the tracks area toolbar (refer to Figure 3-9).
\The default state of zoom should be to see the entire project. You learned how to zoom out to see your entire project by pressing Z with no regions selected.
From that position, you can easily see where you want to focus and get there quickly by Option-Command-dragging over the area. When you’re finished, zoom back out and decide what to do next. This method of zooming creates an efficient workflow.
You can zoom in and out of your project in many other ways, as you discover later in the chapter when you read about creating your own key commands.