- •Contents at a Glance
- •Table of Contents
- •Introduction
- •About This Book
- •Foolish Assumptions
- •Icons Used in This Book
- •Beyond the Book
- •Where to Go from Here
- •Embracing Logic Pro
- •Transitioning from Other Software
- •Starting Your Project
- •Augmenting Your Project
- •Customizing Your Project Settings
- •Tidying Up Your Project
- •Navigating Logic Pro
- •Taking Inventory of Your Track List
- •Zooming Tracks
- •Your Logic Pro Toolbox
- •Keeping It Simple with Smart Controls
- •Navigating with Key Commands
- •Saving Workspaces with Screensets
- •Knowing Your Track Types
- •Around the Global Tracks
- •Sorting and Hiding Tracks
- •Knowing the Region Types
- •Editing Regions
- •Understanding Digital Audio
- •Connecting Your Audio Devices
- •Understanding MIDI
- •Connecting Your MIDI Devices
- •Preparing to Record Audio
- •Recording Your First Audio Take
- •Recording Multiple Takes in Cycle Mode
- •Recording Multiple Inputs
- •Punching In and Punching Out
- •Setting Up Multiple Monitor Mixes
- •Preparing to Record MIDI
- •Recording Your First MIDI Take
- •Creating Tracks in Cycle Mode
- •Overdubbing MIDI
- •Recording Multiple MIDI Inputs
- •Adding Apple Loops to Your Project
- •Adding Prerecorded Audio to Your Project
- •Importing Video to Your Project
- •Playing with Your Virtual Drummer
- •Creating Beats with Ultrabeat
- •Taking Stock of Vintage Instruments
- •Spinning Your Tonewheels with the Vintage B3
- •Funking Up the Vintage Clav
- •Getting the Tone of Tines with the Vintage Electric Piano
- •Fusing Four Synths with Retro Synth
- •Exploring the Logic Pro Synths
- •Sampling with the EXS24 Sampler
- •Modeling Sounds Using Sculpture
- •Building an Orchestral Template
- •Performing Your Orchestra
- •Traveling the World Instruments
- •Working in the Tracks Area
- •Showing Your Global Tracks
- •Beat Mapping Your Arrangement
- •Arranging Regions in the Tracks Area
- •Creating Folder Tracks
- •Using Groove Templates
- •Knowing Your Audio Editors
- •Time Traveling with Flex Time
- •Tuning with Flex Pitch
- •Editing Audio in the Audio File Editor
- •Knowing Your MIDI Editors
- •Editing MIDI in the Piano Roll Editor
- •Editing MIDI in the Step Editor
- •Editing MIDI in the Score Editor
- •Editing MIDI in the Event List Editor
- •Editing Your MIDI Environment
- •Knowing Your Channel Strip Types
- •Adjusting Channel Strip Controls
- •Adding Effects to Tracks
- •Controlling Signal Flow
- •Adjusting the EQ of Your Tracks
- •Adding Depth with Reverb and Delay
- •Adding or Removing Dynamics with Compression
- •Taking Track Notes
- •Turning Your Mix Into a Performance with Automation
- •Choosing Your Automation Mode
- •Adding Automation to Your Tracks
- •Recording Live Automation
- •Fine-Tuning EQ
- •Adding Multiband Compression
- •Turn It Up
- •Bouncing Your Project
- •Creating Stems and Alternate Mixes
- •Sharing Your Music
- •Playing Keys
- •Playing Guitar
- •Playing Drums
- •Editing Tracks and Your Arrangement
- •Using Your iPad Mixing Console
- •Recording Remotely
- •Commanding Logic Pro
- •Navigating Logic Pro
- •Sketching Songs with GarageBand
- •Importing iPad Audio
- •Use Key Commands
- •Use Screensets
- •Choose a Tool and Master It
- •Choose a Tool and Ignore It
- •Use the Fastest Way, Not the Right Way
- •Establish a Troubleshooting Strategy
- •Save and Back Up Frequently
- •Don’t Lose Sight of the Music
- •Index
- •About the Author

304 Part V: Mixing, Mastering, and Sharing Your Music
\\Master section: On the right side of the interface is the master section.
The Feedback field sends the output of a single tap back through the effects to make the rhythm continuous. The Mix sliders set the wet/dry mix so you can use the effect as an insert effect as well as a send effect and still control the balance of the wet/dry signal.
\\Tap parameters: The wide bar at the bottom of the interface controls
the selected tap. You can turn the filter on or off, and set the frequency cutoff, resonance, and filter slope. To the right of the Tap Delay circle, you can turn the Pitch parameter on or off and set the transpose level. The Flip parameter sets the pan to its opposite. You can also set the stereo spread, mute, and output level for the selected tap.
\Get the classic delay made famous by The Edge of U2 by using a dotted eighthnote delay. An eighth-note or a quarter-note delay can get lost behind all the
other instruments playing on the beat, but a dotted eight note allows the delay to peek out in the space between the other instruments.
Adding or Removing Dynamics with Compression
Controlling the dynamics of the overall mix as well as individual instruments is a crucial fundamental of mixing. A compressor is your main tool for controlling dynamics as well as for effect. Compressors work well on individual sounds, groups of instruments or sounds, and even the entire mix. There are many types of dynamic control, include limiting, multiband compression, deessing, gating, envelope shaping, side chaining, and parallel compression. In this section, you learn how to use the dynamics tools of Logic Pro to create powerful and interesting mixes.
Using Compressor
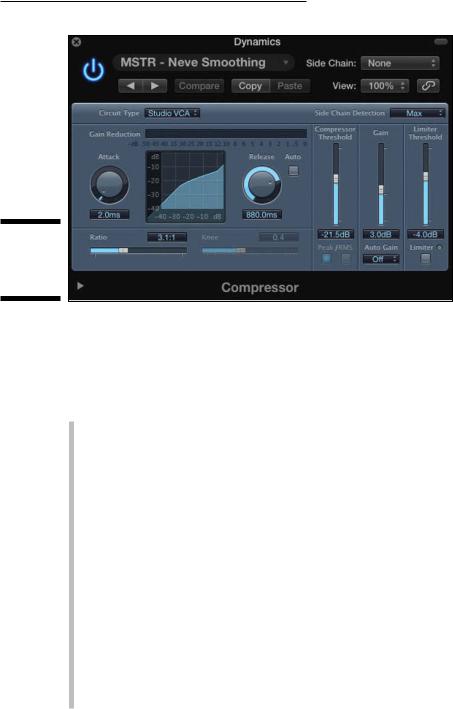
The Logic Pro Compressor plug-in, shown in Figure 16-14, can emulate a wide variety of hardware compressors. Many compressors have become classics in the recording and mixing world, and there’s a giant market for software emulations of these compressors. Logic Pro doesn’t advertise its own compressor emulations, but savvy users know what they are, and you will too after you read this section.

Chapter 16: Mixing Your Project 305
Figure 16-14:
The
Compressor
plug-in.
\\
Like Channel EQ, Compressor has its own meter in the channel strip, right below the EQ display. The meter shows you the amount of gain reduction. You can double-click the meter to open Compressor. If it’s not currently inserted on the channel strip, it’s added to an open slot. Here’s a description of Compressor parameters:
\\Circuit Type: The Circuit Type menu is where you choose a compressor
emulation:
•Platinum: This compressor is Logic Pro’s original compressor. It’s a transparent compressor you can use on any audio source to control dynamics.
•Studio VCA: The studio VCA is similar to the SSL bus compressor. This compressor is clean, with low distortion, and has a faster attack than FETs. Use it when you want to protect a track from clipping and on instruments with complex harmonics, such as pianos, harpsichords, or 12-string guitars. The studio VCA is great for providing “glue” on groups of tracks or the entire mix.
•Studio FET: The studio FET is new to Logic Pro X. FET-style compression is warm with a fast attack time. It’s often used on individual tracks and groups of tracks for both compression and color.
•Vintage VCA: The vintage VCA is similar to a dbx 160. This compressor has a fast response and a distinct sound, and is useful for protecting tracks from clipping. It’s often used on bass, kick, and snare.

306 Part V: Mixing, Mastering, and Sharing Your Music
•Vintage FET: The vintage FET is similar to the UREI 1176. This compressor can provide a lot of aggressive color to groups of instruments, such as drums, and individual instruments, such as bass and lead vocals.
•Vintage opto: The vintage opto is similar to a Teletronix LA-2A. Electro-optical tube compression is smooth and rich, with a warm tone. It’s often used on piano, bass, and vocals.
\\Compressor Threshold: Drag the Compressor Threshold slider to adjust
the level at which compression starts.
\\Attack: The Attack time knob sets the reaction speed of the compressor.
\\Release: The Release time knob sets the speed it takes for the compres-
sor to release after the signal falls below the threshold. Click the Auto button to let the compressor choose the release time.
\\Ratio: The Ratio slider sets the ratio of gain reduction when the thresh-
old is reached.
\\Knee: The Knee slider adjusts how extreme the compression begins
as the signal reaches the threshold. Low values compress harder, and higher values compress softer.
\\Gain: Use the Fain slider to raise or lower the gain after the signal has
been compressed. You can choose to automatically raise the gain to –12 dB or 0 dB on the Auto Gain menu.
\\Limiter Threshold and button: Click the Limiter button to turn the lim-
iter on, which limits the signal from going beyond the level set by the limiter threshold.
\\Extended Parameters: Click the disclosure triangle at the bottom of the
Compressor interface to choose advanced settings. You can choose the type of output distortion, which adds color to the compressor in varying degrees. You can adjust the output mix to blend the compressed signal with the original signal for parallel compression. You can also add a sidechain filter.
\You can set Compressor to react to the dynamics in another track in the proj-
ect. Choose the track that will trigger Compressor on the Side Chain menu at the top of the plug-in interface. Now Compressor will compress the audio only when the track chosen on the Side Chain menu reaches the threshold. This feature is useful when you want to make room for a track in the mix by automatically lowering any track that’s competing with it.

Chapter 16: Mixing Your Project 307
Using Limiter
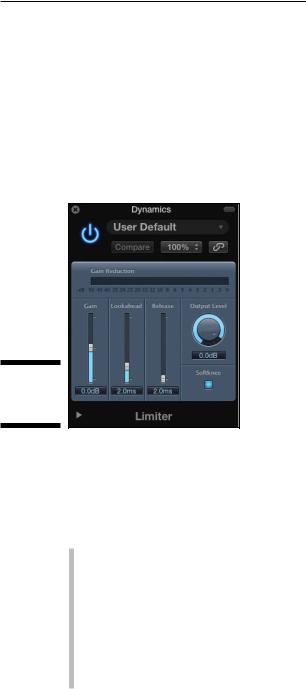
The Limiter plug-in, shown in Figure 16-15, is used when you need to restrict the level from going any higher. Limiters differ from compressors in that they have a strict threshold, whereas compressors only reduce the level above the threshold. You might put a limiter on a single track to guarantee that it doesn’t clip or on a group of tracks to raise the volume as high as possible before it distorts. Limiters can have a big effect on the sound, so a little goes a long way.
Figure 16-15:
The Limiter
plug-in.
\\
Limiters are often added as the last insert effect in the chain. But sometimes you can add a limiter before a compressor that’s set to a slow attack time to catch any large peaks and avoid the pumping and breathing effect that can come from too much compression. A description of the Limiter parameters follows:
\\Gain: Drag the Gain slider to adjust the level of the input.
\\Lookahead: Drag the Lookahead slider to adjust how far in advance the
limiter will analyze the signal. Higher levels cause latency, so it’s best not to use this setting on instrument or group tracks because it will change the timing. Higher lookahead times work better when the Limiter is on the main output.
\\Release: Drag the release slider to set the time it takes for the compres-
sor to release after the signal falls below the threshold. Click the Auto button to let the compressor choose the release time.
