


114 Part II: Digital Recording and Using Prerecorded Media
Recording Your First MIDI Take
Recording a MIDI take is similar to recording an audio take. Just do the following:
\1.\ Select the track, and then record-enable it by clicking the record
|
enable icon on the track header or by pressing Control-R. |
\ |
The record enable icon will blink red to let you know that the track is |
|
enabled for recording. |
\ |
2.\ Place the playhead where you want to begin recording. |
\ |
3.\ Press R or click the record icon on the transport in the control bar. |
\ |
Refer to Chapter 3 for control bar and transport details. |
\4.\ Wait for the count-in and then start playing.
\5.\ When you’re finished, press the spacebar or click the stop icon on the
|
transport. |
\ |
A new MIDI region will fill the area where you began and stopped |
|
recording, as shown in Figure 7-7. |
Figure 7-7:
A recorded
MIDI region.
\ |
|
You can adjust the recording count-in by choosing File Project Settings |
|
|
Recording Count-In. |
|
|
|
|
|
|
\As you record a MIDI track, your controller could be sending a lot more data
than note on and note off messages. You could be sending aftertouch data, system exclusive data, or other control changes. If you don’t need these types of MIDI data in your project, you can filter them. Choose File Project Settings MIDI, click the Input Filter tab, and then select the MIDI data you
want to filter (see Figure 7-8). Recording all MIDI data isn’t a big deal, but if you need to do MIDI editing in the list editor (described in Chapter 15), having less data makes it easier.
Chapter 7: Recording MIDI 115
Figure 7-8:
Project settings for the MIDI input filter.
\\
Recording Multiple MIDI
Takes in Cycle Mode
As with audio takes, you can record multiple MIDI takes to build a perfect take. Building a final composite take from multiple takes is called comping. To create a take folder when recording in cycle mode, you must first choose Record MIDI Recording Options Create Take Folders. The MIDI recording options will set how your project behaves when you create overlapping MIDI regions.
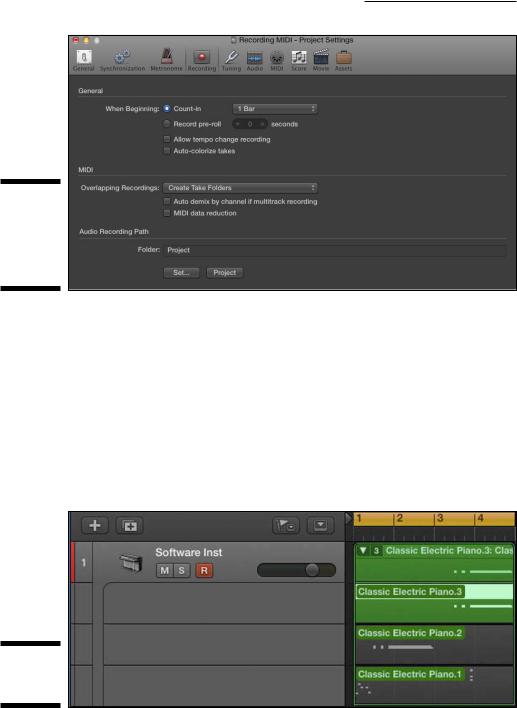
\You can get to the MIDI recording options also by choosing File Project
Settings Recording. Then select how your project handles overlapping MIDI regions on the drop-down menu, as shown in Figure 7-9. For a detailed look at all overlapping recording options, see the video guide I provided for you at http://logicstudiotraining.com/lpxfordummies.
To record MIDI takes in cycle mode, follow these steps:
\1.\ In the cycle ruler at the top of the tracks area, drag from left to right
to set the cycle locators.
\ |
Cycle mode is automatically turned on and represented by a yellow strip |
|
in the ruler. |
116 Part II: Digital Recording and Using Prerecorded Media
Figure 7-9:
Project settings for MIDI recording options.
\\
\2.\ Press R to begin recording.
\ |
After the second take is recorded, a take folder is created, as shown in |
|
Figure 7-10, and new lanes are added with each pass through the cycle. |
|
All previous takes are muted so you hear only the current take. |
\3.\ Press the spacebar to end recording.
\ |
4.\ Click the disclosure triangle in the upper-left corner of the take folder. |
\ |
The take folder will open and display all the takes, as shown to the right |
|
in Figure 7-10. You can open the take folder also by double-clicking it or |
|
by selecting it and pressing Control-F. |
Figure 7-10:
A MIDI take folder.

Chapter 7: Recording MIDI 117
Creating Tracks in Cycle Mode
You might want to record a beat or groove and build it one take at a time. Recording this way makes it easier to focus on a single element rather than playing a full part. Logic Pro gives you several options when you record in cycle mode:
\\Record MIDI Recording Options Create Tracks when Cycling creates a
new take track with each pass. A take track uses the same channel strip as the original track, so it doesn’t use up more resources. For example, if you’re recording MIDI drums and want each drum sound on a different
track, you can create new tracks in cycle mode until you have a complete beat. You can use the same technique with a multi-instrument (a single software instrument with more than one sound) and create an entire groove from the ground up. Recording this way is like using a looper, with each loop building on the first, except it continues to add layers until you stop recording.
\\Record MIDI Recording Options Create Tracks and Mute When Cycling
mutes the previous track after each pass. Use this if you don’t want to build on the previous take but do want to create take alternatives. This method is similar to take recording, but it creates new take tracks instead of creating a take folder. Logic Pro lets you accomplish similar goals in several ways. In many cases, there’s no right way to do something — just the way that lets you get the job done.
Overdubbing MIDI
You may need to add a part to an existing region. Building drum grooves is a perfect example. You might want to join the new recording to the already existing region. In this case, choose Record MIDI Recording Options Join with Selected Regions. Everything you record on top of a current region will be joined with it, as long as it’s selected before you begin recording.
If you want a similar recording behavior while recording in cycle mode, choose Record MIDI Recording Options Join When Cycling. Now all regions will be joined after each pass.
Recording Multiple MIDI Inputs
You can record more than one MIDI track at a time. Record-enable each track that you want to record and then record as usual. Anything you play will be recorded on all record-enabled tracks.

118 Part II: Digital Recording and Using Prerecorded Media
If you want to use two or more controllers to perform different parts on different software instruments, you’ll need to set the tracks and controllers to separate MIDI channels in the track inspector, as described previously in the “Preparing to Record MIDI” section.
\I’ve saved the best tip for last. Imagine that you’re playing your project and it’s sounding good. You’re feeling the vibe, so you reach over to your keyboard and
improvise a sick riff. “Oh, that was nice! I wish I had recorded that,” you think to yourself as you gaze beyond the cold heartless computer, disappointed. Stop feeling blue. I have great news: You were recording the entire time! You can capture that recording retroactively:
\\Press Shift-R to capture the most recent MIDI performance. Depending
on your current MIDI recording options, your most recent performance is captured as a region, take, or take track on the selected track.
\\You can add the capture recording icon to the control bar. For details on
customizing the control bar, see Chapter 3.
\\Capture recording works only on MIDI tracks. You can’t retroactively
capture audio recordings.
As you can see, your creative power is limited only by your imagination. And your imagination is fueled by the possibilities Logic Pro gives you. You have a professional recording studio that can handle any project you can envision.