

Chapter 20: Ten Ways to Use an iPad with Logic Pro X 343
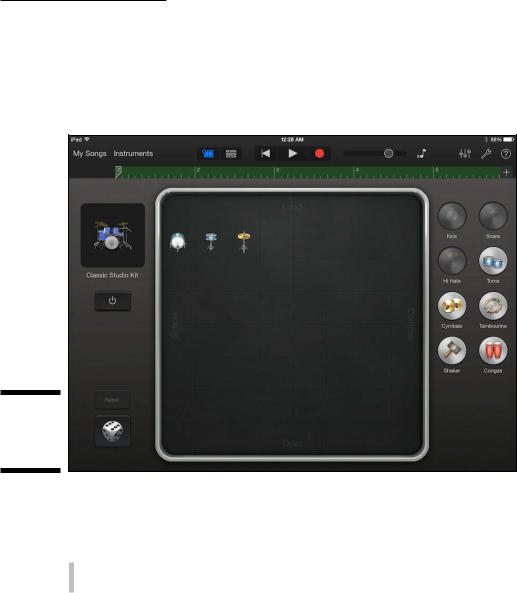
GarageBand for iOS is a simple app to master. It has a limited feature set but gives you more recording and editing capabilities than The Beatles had in their early days. Plus, you can use its many auto-accompaniment features, such as smart drums, shown in Figure 20-8, to sketch new songs. Tap the settings icon (wrench) to open the GarageBand help system.
Figure 20-8:
Garage Band smart drums.
\\
GarageBand for Mac and iOS are both free apps. With your Logic Pro knowledge, I’m confident that you’ll master GarageBand quickly. To find out more about GarageBand for iOS and Mac, visit the following links:
\\http://logicstudiotraining.com/garagebandios
\\http://logicstudiotraining.com/garageband
Importing iPad Audio
GarageBand for iOS is capable of recording other music applications on your device through Inter-App Audio. Many iOS apps support the Inter-App Audio protocol. It’s a great way to get audio from your third-party synths and drum
344 Part VI: The Part of Tens
|
machines into GarageBand and, eventually, into Logic Pro. In GarageBand |
|
for iOS, here’s how to record audio from an app with Inter-App Audio |
|
capabilities: |
\ |
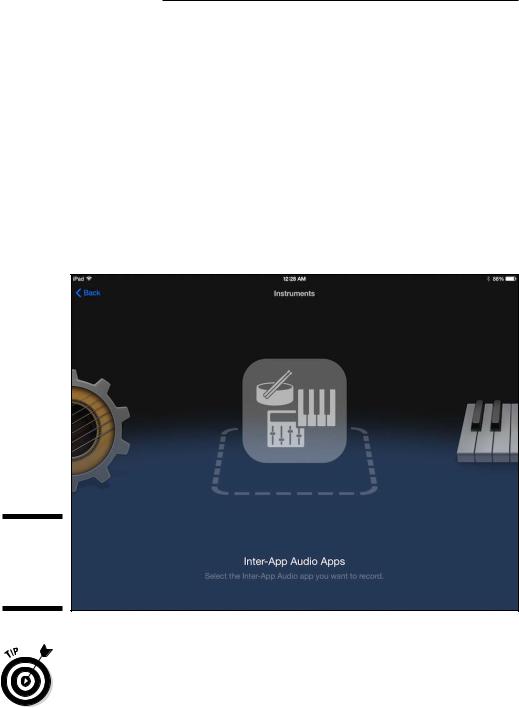
1.\ Tap the Instruments button, which is at the top of the interface. |
\ |
The touch instrument browser opens, as shown in Figure 20-9. |
\ |
2.\ In the instrument browser, choose Inter-App Audio Apps. |
\ |
The screen updates to show you apps capable of inter-app audio. |
\ |
3.\ Choose the app you want to add to your song.\ |
\ |
An audio track is added to your song using the output of your inter- |
|
app audio app. You can now record audio from the chosen app within |
|
GarageBand. |
Figure 20-9:
The Garage Band touch instrument browser.
\\
\You can also use third-party audio effects via Inter-App Audio. Some fantastic sounding guitar amp simulators can be used as an effect on your audio
tracks. Recording apps into GarageBand for iOS and then importing projects to your computer is a simple and effective way to get the most from your iPad, GarageBand, and Logic Pro X.
Chapter 21
Ten Tips to Speed Your Workflow
In This Chapter
\Getting organized and productive \Using key commands and screensets \Saving time with patches and presets \Troubleshooting and mastering Logic Pro
Finishing a Logic Pro project is like completing a puzzle: You have to fit all the pieces together to see the final picture. Some parts of the game
are more fun than others, so you need a good reason to see it through, such as the enjoyment of listening to your project come together. A better motivator is to make every moment that you create with Logic Pro a purposeful moment.
Start by giving your Logic Pro project deadlines and clear outcomes. If you don’t have a song to work on, create a learning project. I create projects to learn tools, workflows, plug-ins, and software instruments, in addition to songwriting and music producing. You’ll speed up your chops with experience, especially if your purpose is clear.
In this chapter, I offer practical tips to help you speed up your workflow and make more music.
I start almost every project by opening the project notes (Option- -P). I write a brief sentence about my project goal, and I sign my projects, adding my URL and copyright notice. That simple sentence alone will save you time as you search through projects for stuff. Sometimes I need to find a piece of music or an effects chain to use in a current project, and the search is much easier when each project has a short description in the notes.

346 Part VI: The Part of Tens
Project notes are also an ideal place to list all your deliverables. In Chapter 16, I list the fundamentals of mixing; I like to collect all that information in the project notes. I list reference tracks, effects ideas, track groups, bar numbers, lyrics, and anything else I can dump out of my brain. I also use project notes as a to-do list so I can keep track of what I’ve done and what’s left to do.
Use track notes to store specific information about the track, such as instrument frequency ranges and effects chains. I also keep a change log of significant edits and patches or channel strip settings. Sometimes, I’ll change the patch or channel strip setting of a track, but I always write down the name of the current patch. Keeping notes saves you from having to commit anything to memory, so you have more mental energy for the music.
Use Key Commands
You can use more than 1,200 key commands in Logic Pro X — many more than you’ll ever need. But many Logic Pro functions can be achieved only by key command, so one key command you should memorize is Option-K, which opens the key commands window.
If there’s anything you want to do in your project, you can search through menus to find it, or you can quickly open the key commands window and search. The second way is usually faster. Open the key commands window regularly and search for commands related to your task.
\ |
Keep one key combination for ad hoc key command assignments. When you |
|
find a key command that doesn’t have an assignment, you don’t have to find |
|
a permanent home for it right away. You can assign it to your temp key com- |
|
mand and use it immediately. My temp key command is Control-Option- -K, |
|
and I can remember it easily because it’s similar to Option-K. |
Use Screensets
Screensets are snapshots of your current screen layout. I use them all the time. To access your screensets, press any number key on your keyboard from 1 to 9. Hold Control for the first digit of double-digit screensets. I reserve screenset 9 for project notes and 8 for track notes, and they’re the first screensets I create. I also lock my screensets. That way, I can move them around but get them back to their locked position by pressing the screenset number.