- •Table of Contents
- •Preface
- •More than Just Email
- •Introducing Zimbra
- •What's in a Name?
- •Building Better Collaboration
- •Front-End
- •Back-End
- •The Benefits of Zimbra
- •Summary
- •Before the Installation
- •Hardware
- •Software
- •Editing the HOSTS File
- •Configuring DNS
- •Turning Off Sendmail
- •Installing on Red Hat Enterprise Linux 4
- •Installing the Red Hat Operating System
- •Installing Zimbra Collaboration Suite
- •Installing on SUSE ES 9
- •Preparing SUSE ES 9 for Zimbra
- •Installing on MAC OS X
- •Preparing MAC OS X Server for Zimbra
- •Installing the Zimbra Collaboration Suite
- •Post-Installation Steps
- •Configuring the Firewall
- •Uninstalling Zimbra
- •Summary
- •An Overview of the Administration Console
- •A. Content Pane
- •B. Search Bar
- •C. Monitoring
- •Server Management
- •Creating a New Domain
- •Configuring Global Settings
- •Class of Service
- •User Management
- •Creating User Accounts
- •Creating an Alias
- •Creating a Distribution List
- •Administering Zimbra from the Command Line
- •Managing Services with zmcontrol
- •Creating Accounts with zmprov
- •Summary
- •The Web Client System Requirements
- •A Bird's Eye View of the Web Client
- •Working with Email
- •Checking Email
- •Composing Email
- •Tags
- •Conversations
- •Managing Contacts
- •Sharing Address Books
- •Managing Schedules
- •Adding Appointments
- •Creating Multiple Calendars
- •Sharing Calendars
- •The Zimbra Documents
- •Creating Documents Pages
- •Sharing Documents
- •Saving Time with the Zimbra Assistant
- •Saving Even More Time with Keyboard Shortcuts
- •Sending an Email with Shortcuts
- •Summary
- •Built-In Security
- •Web Client Security
- •Mail Transfer Agent
- •Anti-Spam
- •Anti-Virus
- •Securing the Operating System
- •Host-Based Firewall
- •Services
- •Updates and Patching
- •Securing the Network
- •Firewalls
- •Virtual Private Networks
- •Summary
- •Exploring User Options
- •General Options
- •Mail Options
- •Mail Filters
- •Address Book
- •Calendar
- •Shortcuts
- •Configuring POP Accounts
- •Configuring Mail Identities
- •Building Searches
- •Building Our Search
- •Using a Saved Search
- •Summary
- •The PST Import Wizard
- •The Zimbra Connector for Outlook
- •A Look at Zimbra Integration
- •Contacts
- •Appointments
- •Sharing Outlook Folders
- •Summary
- •Preparing the Zimbra Server for Zimbra Mobile
- •Configuring Windows Mobile to Sync with Zimbra
- •Configuring Palm OS to Sync with Zimbra
- •Summary
- •An Overview of Zimlets
- •Mouse-Over Zimlet Example
- •The Date Zimlet
- •The Yahoo! Maps Zimlet
- •Managing Zimlets
- •Managing Zimlets through the Administrator Console
- •Assigning Zimlets to a COS
- •Assigning Zimlets to an Account
- •A Look at Configuring the RSS Zimlet
- •The RSS Zimlet in Action
- •Allowing RSS Feeds for Additional Sites
- •Managing Backups
- •Restoring Mailboxes
- •Using the Command Line for Backups
- •Summary
- •The Need for Monitoring
- •Availability
- •Scalability
- •Security
- •Working with Mail Queues
- •Monitoring Log Files
- •Summary
- •Index
This material is copyright and is licensed for the sole use by Kliwon Klimis on 28th October 2008 425 cilce, , frood, grradt, 525254
Administrating Zimbra
Finally, we will go ahead and create a Distribution List to send to all of our users (well, the two of them we have so far).
Creating a Distribution List
Distribution lists are very handy, as they are used to create a mailing list of multiple users, but the sender only needs to enter in one email address to reach all of these users. This saves a lot of time on the user's part and also facilitates better
communication by making sure everyone receives necessary information without the worry of a user leaving someone off of the list. To begin, create our distribution list:
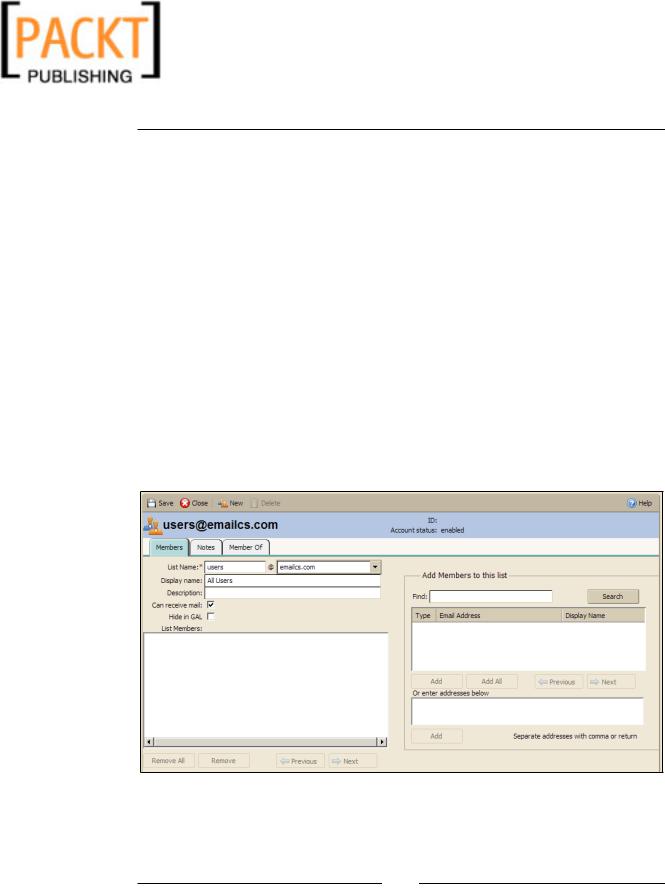
1.Single-click Distribution Lists from the Addresses section of the Navigation Pane.
2.Click New from the upper-left-hand corner of the Content Pane.
3.Give the list the name users and keep the default of emailcs.com for the domain.
4.Display name could be entered as All Users and no description is necessary, as I think this is pretty self explanatory.
5.On the right-hand side of the screen, we could go ahead and add members to our distribution list. By clicking on SEARCH, all users will be listed that are on the server. If we had a lot of users, we could type in a search criteria in the search text box.
[ 78 ]
This material is copyright and is licensed for the sole use by Kliwon Klimis on 28th October 2008 425 cilce, , frood, grradt, 525254
Chapter 3
6. Highlight worker@emailcs.com and ceo@emailcs.com and click Add.
7.Once completed, click Save in the upper-left-hand corner and your distribution list is complete.
We have spent a good amount of time looking into the Administration Console and have seen how useful it is in helping email administrators manage the system and its users. However, there is also another way to mange the Zimbra Collaboration
Suite that is very appealing to Linux users, and that is by way of the Command Line Interface (CLI).
[ 79 ]