


This material is copyright and is licensed for the sole use by Kliwon Klimis on 28th October 2008 425 cilce, , frood, grradt, 525254
Chapter 2
During the install process, the installer will do a check on the operating system to ensure the following are installed on the server. If any of these are missing, the installer will fail.
•NPTL
•Sudo
•libidn
•cURL
•fetchmail
•GMP
•compat-libstdcc++-33 (and compat-libstdc++-296 for Red Hat, both 32 bits and 64 bits version of the library are needed for a 64 bits OS)
•Java 1.5 as default Java (MAC OS X )
Also, I would recommend SSH is installed for remote management (Zimbra needs it anyway to communicate with itself for mail queue management). DNS should be installed and configured prior to installation of the Zimbra Collaboration Suite, but after the installation and initial testing, I would host the DNS record elsewhere. This will be discussed later in the chapter. Finally, when installing the operating system, do not install any Apache or MySQL servers. These will be installed with the ZCS installer and if they are already running on the box, this may cause problems later.
Editing the HOSTS File
Regardless of which operating system you choose to run, there are a couple of configurations you will need to complete prior to installing the software. The first is a simple fix of the hosts file.
The hosts file is used to translate network names to IP addresses and is usually located in the /etc directory of the computer file-system. This is a static file and with the advent of DNS is not used very often. However, most operating systems use this file for local host information and it could also be used to statically map a network name to an IP address without the need for creating a DNS zone file.
Due to the fact that Zimbra uses a MySQL database and uses MySQL permissions to grant access to users from localhost, the /etc/hosts file must be correctly configured or the installer will abort. To edit the /etc/hosts, you will use your preferred text editor (in this case, we will be using vi) and follow the instructions below:
1. You must be the Superuser to save changes to the /etc/hosts file: su –
2.Next, we will open the file with our text editor: vi /etc/hosts
[ 21 ]
This material is copyright and is licensed for the sole use by Kliwon Klimis on 28th October 2008 425 cilce, , frood, grradt, 525254
Installing Zimbra
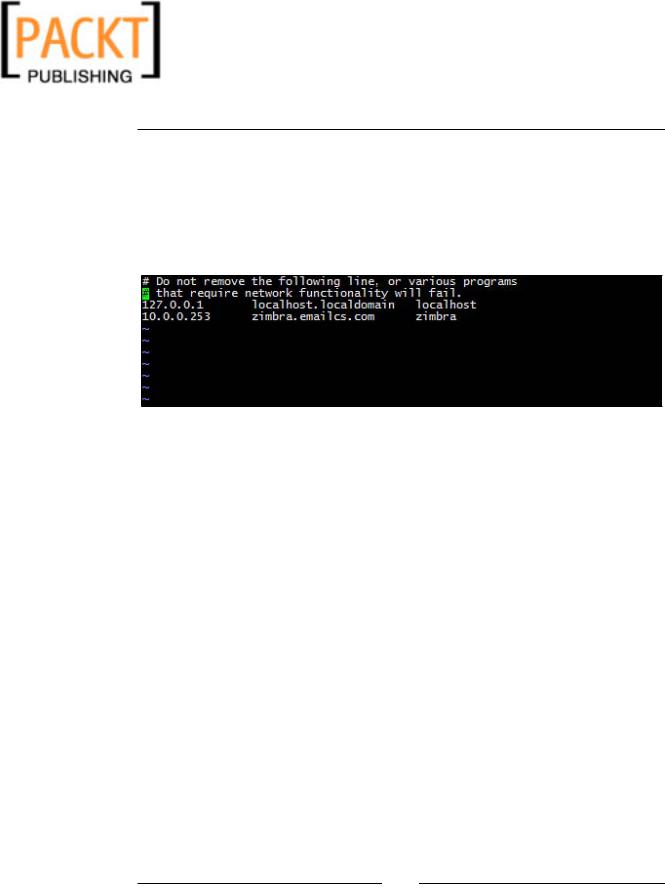
3. The first line of the file defines the IP address of localhost as follows:
127.0.0.1 |
localhost.localdomain |
localhost |
4.The second line will include the private IP address and hostname of the server:
10.0.0.253 |
zimbra.emailcs.com |
zimbra |
5. The final file should resemble the following screenshot.
6. Once the file is correct, simply type :wq to save and close the file. Once we have fixed the /etc/hosts file, the next step is to configure DNS.
Configuring DNS
By default, most operating systems install BIND when it installs a DNS server. DNS is used to dynamically map network names to IP addresses and also to inform other computers on the network which server the email should be sent to (via an MX record) in order to reach its intended recipient. Since we are building an email server,
Zimbra wants to ensure there is an MX record for the initial domain that we are installing the Zimbra Collaboration Suite for. So initially, what we do is configure a zone file for our local domain for testing and development purposes, but once we are ready to "go live" with the email server in production, it is highly recommended we host our DNS information on another server.
To configure DNS for our server domain name, in our case emailcs.com, we need to edit two files. The first being the named.conf which BIND uses to let the DNS server know which domain names we have local information for. To edit the named.conf file, you will have to do the following:
1.Just like the /etc/hosts file, we will need to be root before we could save any changes to the named.conf file. So our first step would be:
su –
[ 22 ]
This material is copyright and is licensed for the sole use by Kliwon Klimis on 28th October 2008 425 cilce, , frood, grradt, 525254
Chapter 2
2.The named.conf will sometimes be located in the /etc directory. However, if your installation of BIND is using chroot, (which is the case for most of them) the named.conf file is located in the /var/named/chroot/etc/ directory. To open the named.conf file for editing:
vi/var/named/chroot/etc/named.conf
3.In the named.conf file, we will add an entry for our emailcs.com domain. Essentially, what we are doing is informing BIND where to find the master file of the domain and where to find the DNS information for our domain.
See the following screenshot to see what the entry should look like:
4.Once we add the information, save and close the named.conf file by entering (in command mode)
:wq!.
5.Next, we will create our zone file. As defined in the named.conf file, we are going to simply name the file containing the DNS information emailcs.com. This file will be located in the /var/named/chroot/var/named directory
(assuming BIND is chrooted), if not, the file will be created in the /var/ named/ directory.
viemailcs.com
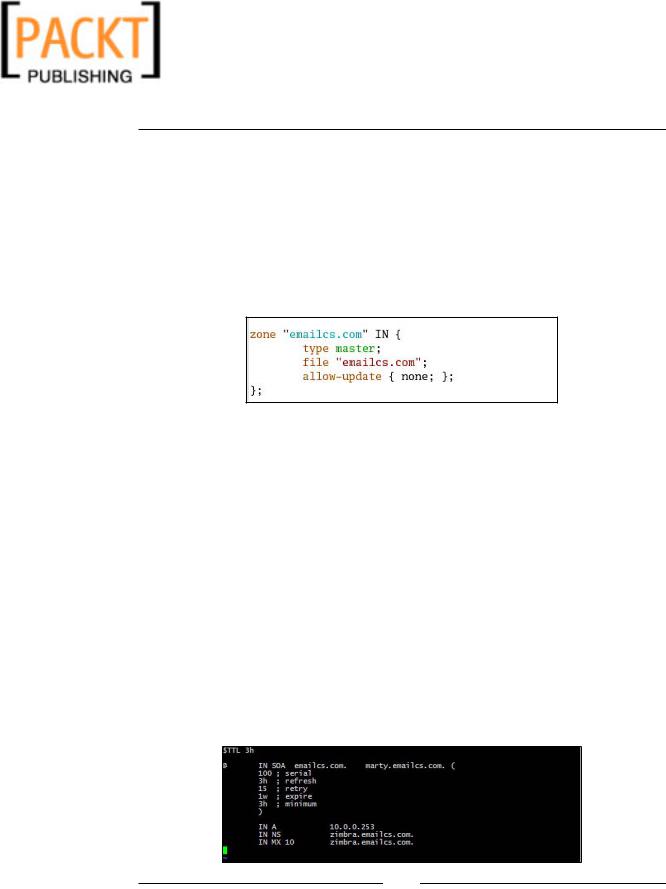
6.The file will contain specific information. BIND needs to be able to resolve all of the information needed for our emailcs.com mail server. We will create an "A" record, which maps the network name to an IP address. We will also create an MX record, which Zimbra and other Mail Transport Agents require in order to know what server handles email for our domain, and then also a CNAME record, which will create an ALIAS of a server that we will use for our mail server. So the file when completed, should look similar to the one in the following screenshot::
[ 23 ]
This material is copyright and is licensed for the sole use by Kliwon Klimis on 28th October 2008 425 cilce, , frood, grradt, 525254
Installing Zimbra
Let's take a moment to review a few key items in this zone file. As this is not a comprehensive book on DNS, some items will not be covered in detail. The first line of the file is the time to live. In our case it is set to 3h or 3 hours. The next line begins with an ampersand (@) and is used to let BIND know that this file will serve as the "authority" for all DNS information of the emailcs.com domain.
Whenever a domain name is written out in a Zone file it must end with a period (.).
So in this case, we write emailcs.com as emailcs.com. The next entry is the domain administrator's email address. This line is unique as the ampersand is replaced with a period and again the domain name ends with a period. We then define the periods for refreshing the zone file, and the serial number of the file itself. This information is used when transferring zone files between DNS servers and also, each time a zone file is changed, the administrator should change the serial number so BIND knows a change has been made.
The next set of lines will give specific information about our domain. The first line is the A record which, as discussed earlier, simply lets DNS know what the IP address is of our domain. The next line is a NS record, informing all DNS servers which server has the authoritative information about this domain. The next line is a key line for us, as it lets BIND know which server will handle our email. And lastly, an alias record, or CNAME, is defined which, will let BIND know where Zimbra.emailcs.com is actually located. In this case, it is just an alias of emailcs.com.
1.Once we add the information, save and close the emailcs.com file by entering
(in command mode)
:wq!.
2.Now we can restart our BIND server and load our zone file, essentially making it active:
service named restart
3.Before we move forward, we must test our DNS configuration using the nslookup command:
nslookup emailcs.com
This command should return the IP address of our domain name emailcs. com, in our case it is 10.0.0.42.
To test our MX record configuration we will use the dig command: dig emailcs.com mx
[ 24 ]