


This material is copyright and is licensed for the sole use by Kliwon Klimis on 28th October 2008 425 cilce, , frood, grradt, 525254
The Zimbra Web Client
Conversations
Zimbra has a built-in feature that groups email conversations into a single thread.
This being the case, we can now make it easier to find messages, as they are all logically grouped together, with no extra effort on our own.
Earlier in this chapter, we discussed the Location Box and how, for some applications, it will have a View drop-down box. In the Mail application, the two views are By Conversation and By Message. By default, messages are grouped by Conversation, so the initial email in the thread will be displayed with a number in parentheses in the Conversations column. In our case, that number is "(2)"
representing that there are two messages in the conversation. By double-clicking on the message, the Content Pane will now display the list of messages that make up the conversation, as shown in the following screenshot:
Conversations make it easier to organize your email and increase search and grouping capabilities with very little interaction from the user.
Admittedly, some users will not like the Conversation view and they have the option to choose By Message from the View menu.
[ 100 ]

This material is copyright and is licensed for the sole use by Kliwon Klimis on 28th October 2008 425 cilce, , frood, grradt, 525254
Chapter 4
Working with email only reveals a small measure of the unique capabilities that the Zimbra Web Client has to offer. Continuing on with our exploration of the Web
Client, we will now take a look at managing contacts.
Managing Contacts
Imagine life without your list of Contacts. In my experience as an Email Administrator and Implementer, this is the one area where users get very protective, especially executives and managers within an organization. Zimbra provides the users with two types of personal address books. One called Contacts allow users
to add users manually to their address book. The other, Emailed Contacts, tracks contacts that the user has sent and received emails to or from. This list is populated automatically.
For the following exercise, we will be logging in as the CEO and managing his address book.
1.Login to the Zimbra Web Client at http://zimbra.emailcs.com as CEO.
2.Once logged in, click on Address Book.
3.In the Address Books application, the Content Pane changes to a phone list of our contacts. At this point, our Address Book list is blank.
[ 101 ]

This material is copyright and is licensed for the sole use by Kliwon Klimis on 28th October 2008 425 cilce, , frood, grradt, 525254
The Zimbra Web Client
4.Click on New in the Toolbar to add our first contact.
5.Enter your first name, last name, and email address and click Save. Zimbra offers the ability to store a ton of information about a contact, for now, we will just keep it simple.
6.The File As: section provides options for how the user would like contacts displayed in the Address Book. Ours will be filed as "Last, First".
7.In the Content Pane, you should now be able to click on the first letter of your last name or the All button and see an entry for the new contact.
Seems pretty straightforward, but let's add some additional Zimbra functionality to make things more interesting. For example, earlier we discussed how users have the ability to Tag email messages, well what if the user wanted to logically group contacts through Tags?
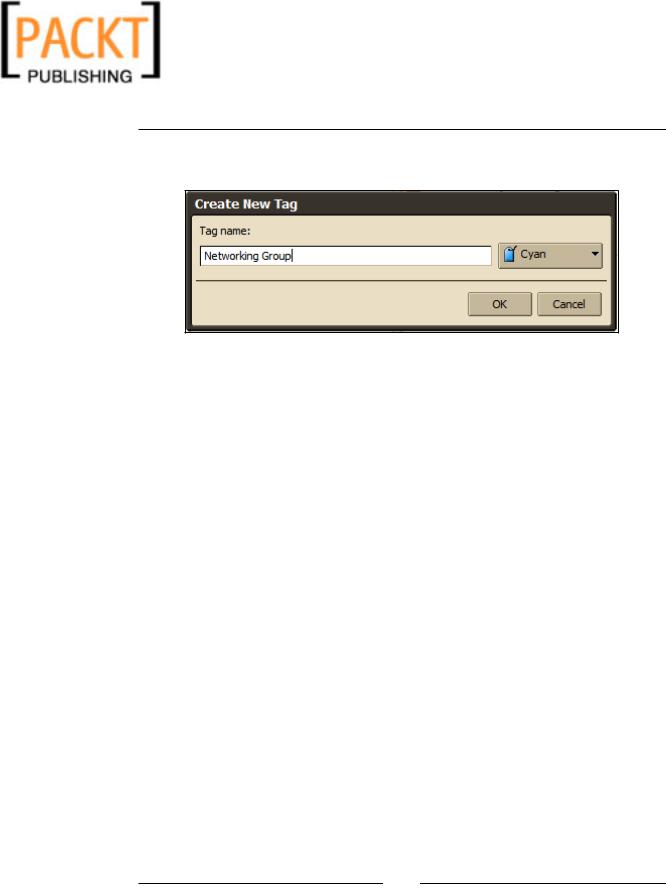
1.Find the contact we just created in the Address Book, right-click the contact and select Tag Contact New Tag.
[ 102 ]
This material is copyright and is licensed for the sole use by Kliwon Klimis on 28th October 2008 425 cilce, , frood, grradt, 525254
Chapter 4
2.Type a name for the Tag, we will call this one "Networking Group", and choose Cyan for the color.
3.Click OK and you should see a Cyan tag next to the contact in the Content Pane.
4.Also in the Navigation Pane, under Tags, you should see the Cyan tag labelled Networking Group. By clicking on the Tag, all of the members of the Networking Group will appear.
Keep in mind that Tags are universal among all of the Zimbra applications. So a contact and an email message and an appointment could all be assigned to the same
Tag. Also, items could be assigned to multiple tags. Zimbra really makes organizing your user's messaging needs pretty easy.
One more feature we should take a look at, is the ability to share address books among users.
Sharing Address Books
As the Worker Bee, you have been assigned the task of managing the contacts of the CEO. He has much more important things to do. The CEO needs only to share his address book with you and you will be able to manage his contacts from your
Zimbra Web Client using your login. Here's how:
1.As the CEO, right click on the Contacts folder in the Address Books application.
[ 103 ]
This material is copyright and is licensed for the sole use by Kliwon Klimis on 28th October 2008 425 cilce, , frood, grradt, 525254
The Zimbra Web Client
2.Select Share Address Book from the drop-down menu as shown in the following screenshot.
3.The Shared Address Book dialog box will appear. Enter worker@emailcs. com for email and select the radio button labelled Manager. Sending a standard message is fine, so click OK.
4.Log out of the Zimbra Web Client by clicking on Log Off and log back in as the worker.
5.You should now see a new email message from the CEO with the subject line "Share Created". This message will be in the CEO folder (because of the rule we created before).
6.Double click the email message and in the Content Pane you will have the option to Accept or Decline the share. Seeing as though this is from the CEO, we better accept it. Click Accept Share and a dialog box will appear.
7.Leave the default name of "The Boss's Contacts" and select Orange for the color.
[ 104 ]

This material is copyright and is licensed for the sole use by Kliwon Klimis on 28th October 2008 425 cilce, , frood, grradt, 525254
Chapter 4
8.There is no need to send an email about the share, so click Yes.
9.Click on the Address Book icon in the Application Chooser and you should now see The Boss's Contacts in the Worker's contact list.
[ 105 ]