

AUDIO PANEL AND CNS
SECTION 4 AUDIO PANEL AND CNS
4.1 OVERVIEW
The Communication/Navigation/Surveillance (CNS) system includes the Audio Panel, communication radios, navigation radios, and Mode S transponder. The System Overview Section provides a block diagram description of the Audio Panel and CNS system interconnection.
CNS operation in Cessna Nav III aircraft is performed by the following Line Replaceable Units (LRUs):
• Primary Flight Display (PFD) |
• Audio Panel |
• Multi Function Display (MFD) |
• Mode S Transponder |
•Integrated Avionics Unit (2)
The MFD/PFD controls are used to tune the communication transceivers and navigation radios.
The Audio Panel provides the traditional audio selector functions of microphone and receiver audio selection. The Audio Panel includes an intercom system (ICS) between the pilot, copilot, and passengers, a marker beacon receiver, and a COM clearance recorder. Ambient noise from the aircraft radios is reduced by a feature called Master Avionics Squelch (MASQ). When no audio is detected, MASQ processing further reduces the amount of background noise from the radios.
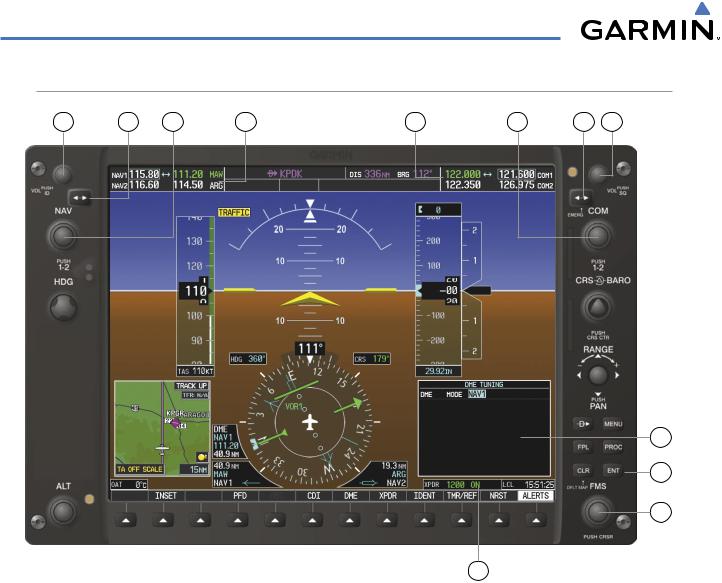
The Mode S transponder is controlled with softkeys and the FMS Knob located on the Primary Flight Display (PFD). The Transponder Data Box is located to the left of the System Time Box. The data box displays the active four-digit code, mode, and reply status (Figure 4-1).
190-00498-03 Rev A |
Garmin G1000 Pilot’s Guide for Cessna Nav III |
4-1 |
AUDIO PANEL AND CNS
MFD/PFD CONTROLS AND FREQUENCY DISPLAY
1 |
2 |
3 |
4 |
5 |
6 |
7 |
8 |
9
10
11
12
Figure 4-1 MFD/PFD Controls, COM/NAV Frequency Tuning Boxes, and DME Tuning Window
(Cessna 172 PFD Shown)
4-2 |
Garmin G1000 Pilot’s Guide for Cessna Nav III |
190-00498-03 Rev A |

AUDIO PANEL AND CNS
1NAV VOL/ID Knob – Controls NAV audio volume level. Press to turn the Morse code identifier audio on and off. Volume level is shown in the NAV frequency field as a percentage.
2 NAV Frequency Transfer Key – Transfers the standby and active NAV frequencies.
3NAV Knob – Tunes the standby frequencies for the NAV receiver (large knob for MHz; small knob for kHz). Press to move the tuning box (light blue box) and Frequency Transfer Arrow between NAV1 and NAV2.
4NAV Frequency Box – Displays NAV standby and active frequency fields, volume, and station ID. The frequency of the NAV radio selected for navigation is displayed in green.
5COM Frequency Box – Displays COM standby and active frequency fields and volume. The selected COM transceiver frequency is displayed in green.
6COM Knob – Tunes the standby frequencies for the COM transceiver (large knob for MHz; small knob for kHz). Press to move the tuning box (light blue box) and Frequency Transfer Arrow between COM1 and COM2.
7COMFrequencyTransferKey– Transfers the standby and active COM frequencies. Press and hold this key for two seconds to tune the emergency frequency (121.500 MHz) automatically into the active frequency field.
8COM VOL/SQ Knob – Controls COM audio volume level. Press to turn the COM automatic squelch on and off. Volume level is shown in the COM frequency field as a percentage.
9 DME Tuning Window – Displays DME frequency pairing mode. Display by pressing DME Softkey.
10ENT Key – Validates or confirms DME pairing mode and Auto-tune selection.
11FMS Knob – Flight Management System Knob, used to enter transponder codes, select DME modes, and Auto-tune entries when DME Tuning Window or NRST Window is present. Press the FMS Knob to turn the selection cursor on and off. The large knob moves the cursor in the window. The small knob selects individual characters for the highlighted cursor location.
12Transponder Data Box – Indicates the selected transponder code, operating mode, reply, and ident status for the transponder.
190-00498-03 Rev A |
Garmin G1000 Pilot’s Guide for Cessna Nav III |
4-3 |
AUDIO PANEL AND CNS
AUDIO PANEL CONTROLS
1 |
2 |
3 |
4 |
5 |
6 |
7 |
8 |
9 |
10 |
11 |
12 |
13 |
14 |
15 |
16 |
17 |
|
18 |
19 |
20 |
21 |
22 |
23 |
|
24 |
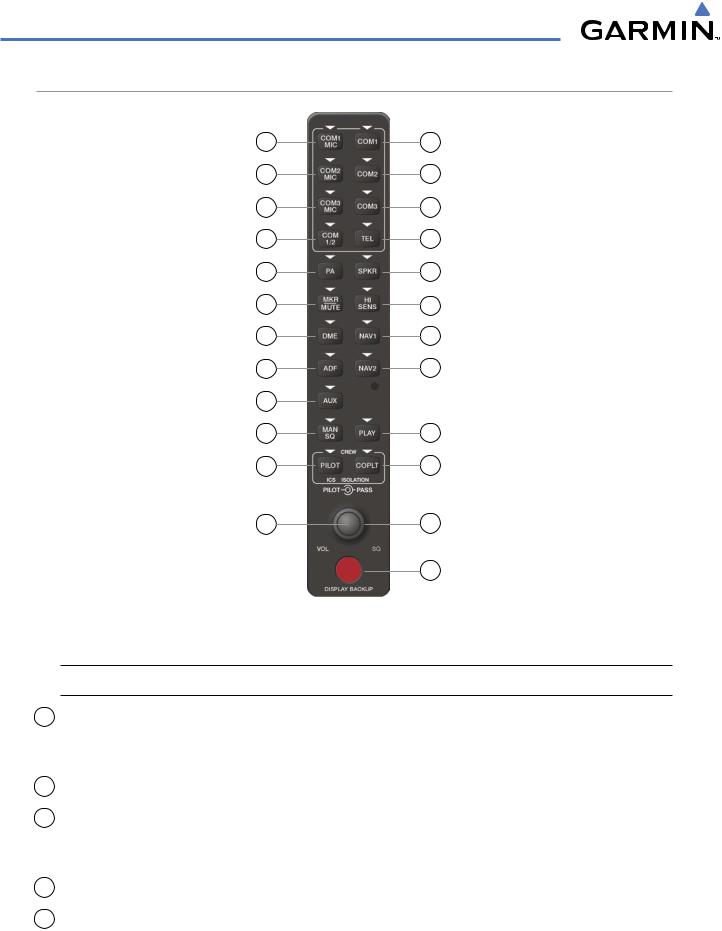
Figure 4-2 Audio Panel Controls
 NOTE: When a key is selected, a triangular annunciator above the key is illuminated.
1COM1 MIC – Selects the #1 transmitter for transmitting. COM1 receive is simultaneously selected when this key is pressed allowing received audio from the #1 COM receiver to be heard. COM2 receive can be added by pressing the COM2 Key.
2COM1 – When selected, audio from the #1 COM receiver can be heard.
3COM2 MIC – Selects the #2 transmitter for transmitting. COM2 receive is simultaneously selected when this key is pressed allowing received audio from the #2 COM receiver to be heard. COM1 receive can be added by pressing the COM1 Key.
4COM2 – When selected, audio from the #2 COM receiver can be heard.
5COM3 MIC – Not used in Cessna Nav III aircraft.
4-4 |
Garmin G1000 Pilot’s Guide for Cessna Nav III |
190-00498-03 Rev A |

AUDIO PANEL AND CNS
6COM3 – Not used in Cessna Nav III aircraft.
7COM 1/2 – Not used in Cessna Nav III aircraft.
8TEL – Not used in Cessna Nav III aircraft.
9PA – Selects the passenger address system. The selected COM transmitter is deselected when the PA Key is pressed. [(T)182T and (T)206H only, not used in Cessna 172 R/S aircraft.]
10SPKR – Selects and deselects the cabin speaker. COM and NAV receiver audio can be heard on the speaker.
11MKR/MUTE – Selects marker beacon receiver audio. Mutes the currently received marker beacon receiver audio. Unmutes automatically when new marker beacon audio is received. Also, stops play of recorded COM audio.
12HI SENS – Press to increase marker beacon receiver sensitivity. Press again to return to low sensitivity.
13DME – Turns optional DME audio on or off.
14NAV1 – When selected, audio from the #1 NAV receiver can be heard.
15ADF – Turns optional ADF receiver audio on or off.
16NAV2 – When selected, audio from the #2 NAV receiver can be heard.
17AUX – Not used in Cessna Nav III aircraft.
18MAN SQ – Enables manual squelch for the intercom. When the intercom is active, press the PILOT Knob to illuminate SQ. Turn the PILOT/PASS Knobs to adjust squelch.
19PLAY – Press once to play the last recorded COM audio. Press again while audio is playing and the previous block of recorded audio is played. Each subsequent press plays each previously recorded block. Pressing the MKR/MUTE Key during play of a memory block stops play.
20PILOT – Selects and deselects the pilot intercom isolation.
21COPLT – Selects and deselects the copilot intercom isolation.
22PILOT Knob – Press to switch between volume and squelch control as indicated by illumination of VOL or SQ. Turn to adjust intercom volume or squelch. The MAN SQ Key must be selected to allow squelch adjustment.
23PASS Knob – Turn to adjust Copilot/Passenger intercom volume or squelch. The MAN SQ Key must be selected to allow squelch adjustment.
24DISPLAY BACKUP Button – Manually selects Reversionary Mode.
190-00498-03 Rev A |
Garmin G1000 Pilot’s Guide for Cessna Nav III |
4-5 |