


FLIGHT MANAGEMENT
VORS
The VOR Information Page can be used to view information about VOR and ILS signals (since ILS signals can be received on a NAV receiver), or to quickly auto-tune a VOR or ILS frequency. Localizer information cannot be viewed on the VOR Information Page. If a VOR station is combined with a TACAN station it is listed as a VORTAC on the VOR Information Page and if it includes only DME, it’s displayed as VOR-DME.
In addition to displaying a map of the currently selected VOR and surrounding area, the VOR Information PagedisplaysVORinformationinfourboxeslabeled‘VOR’,‘INFORMATION’,‘FREQUENCY’,and‘NEAREST AIRPORT’.
|
|
VOR Identifier/Type |
|
|
- Facility Name |
|
|
- Nearest City |
Navigation Map |
|
|
|
|
|
|
|
|
Showing Selected |
|
VOR Information |
VOR |
|
- Class/Magnetic Variation |
|
|
- Region |
|
|
- Lat/Long |
|
|
|
|
|
|
Selected VOR |
|
VOR Frequency |
|
Nearest Airport Info |
|
|
|
|
|
|
- Identifier/Type (symbol) |
|
|
- Bearing/Distance to |
|
|
Airport |
Figure 5-40 VOR Information Page
The VOR classes used in the VOR information box are: LOW ALTITUDE, HIGH ALTITUDE, and TERMINAL
Select a VOR:
1)With the VOR Information Page or the Nearest VOR Page displayed, enter an identifier, the name of the VOR, or the city in which it’s located in the VOR Box.
2)Press the ENT Key.
3)Press the FMS Knob to remove the flashing cursor..
Or:
1)With the Nearest VOR Page displayed, press the MENU Key.
2)Highlight ‘SELECT VOR WINDOW’, and press the ENT Key.
3)Enter an identifier, the name of the VOR, or the city in which it’s located in the VOR Box.
4)Press the ENT Key.
5)Press the FMS Knob to remove the flashing cursor.
5-40 |
Garmin G1000 Pilot’s Guide for Cessna Nav III |
190-00498-03 Rev.A |
FLIGHT MANAGEMENT
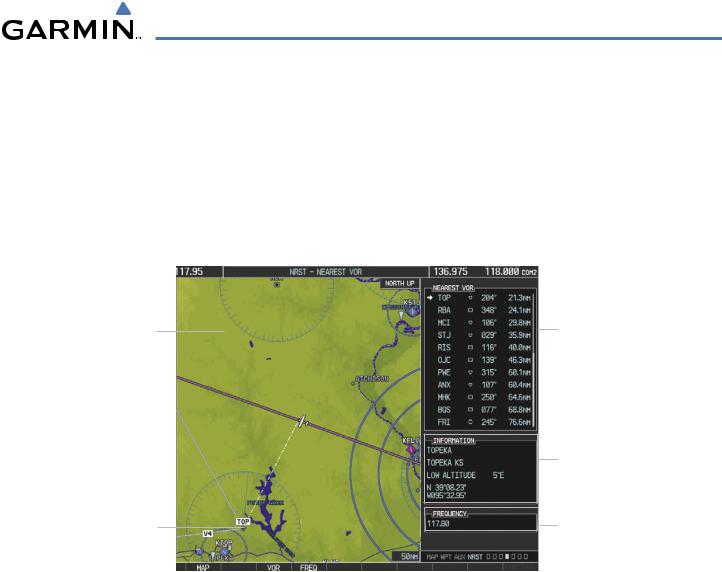
The Nearest VOR Page can be used to quickly find a VOR station close to the aircraft. Also, a NAV frequency from a selected VOR station can be loaded from the Nearest VOR Page. In addition to displaying a map of the surrounding area, the Nearest VOR Page displays information for up to 25 nearest VOR stations in three boxes labeled ‘NEAREST VOR’, ‘INFORMATION’, and ‘FREQUENCY’. The list only includes waypoints that are within 200 nm.
A white arrow before the VOR identifier indicates the selected VOR. Up to eleven VORs are visible at a time. If there are more than can be shown, each list can be scrolled. If there are no VORs in the list, text indicating that there are no nearest VORs is displayed. If there are no nearest VORs in the list, the information is dashed.
Navigation Map |
|
VOR Identifier/Symbol |
Showing Nearest |
|
- Bearing/Distance to VOR |
VOR |
|
from aircraft position |
|
|
|
VOR Information
- Facility Name/City
- Class/Magnetic Variation
- Lat/Long
Nearest VOR |
VOR Frequency |
Figure 5-41 Nearest VOR Page
190-00498-03 Rev.A |
Garmin G1000 Pilot’s Guide for Cessna Nav III |
5-41 |

FLIGHT MANAGEMENT
USER WAYPOINTS
The G1000 can create and store up to 1,000 user-defined waypoints. User waypoints can be created from any map page (except PFD Inset Map, AUX-Trip Planning Page, or Procedure Pages) by selecting a position on the map using the Joystick, or from the User Waypoint Information Page by referencing a bearing/distance from an existing waypoint or bearing from two existing waypoints. Once a waypoint has been created, it can be renamed, deleted, or moved.
|
|
|
User Wpt Identifier |
Navigation Map |
|
|
User Wpt Comment |
|
|
||
|
|
|
|
Showing Selected |
|
|
User Wpt Info |
|
|
||
User Waypoint |
|
|
|
|
|
|
- Region |
|
|
|
- Lat/Long |
|
|
|
|
Selected User |
|
|
Reference Wpt Info |
|
|
- Identifier |
|
Waypoint |
|
|
- Radial/Distance |
|
|
||
|
|
||
|
|
|
User Waypoint List |
|
|
|
- Identifier |
|
|
|
- Comment |
Softkeys |
|
|
# User Wpts Used |
|
|
||
|
|
|
|
Figure 5-42 |
User Waypoint Information Page |
||
|
|
|
Nearest User Wpt List |
|
|
|
|
|
|
|
- Identifier |
|
|
|
- Bearing/Distance from |
Navigation Map |
|
|
aircraft position |
|
|
|
|
Showing Selected |
|
|
|
User Waypoint |
|
|
|
|
|
|
|
User Waypoint Info
- Comment
- Lat/Long
Selected User |
|
Waypoint |
Reference Wpt Info |
- Identifier
- Radial/Distance
Figure 5-43 Nearest User Waypoint Page
5-42 |
Garmin G1000 Pilot’s Guide for Cessna Nav III |
190-00498-03 Rev.A |
FLIGHT MANAGEMENT
CREATING USER WAYPOINTS
User waypoints can be created from the User Waypoint Information Page in the following ways:
Creating user waypoints from the User Waypoint Information Page:
1)Press the NEW Softkey, or press the MENU Key and select ‘Create New User Waypoint’.
2)Enter a user waypoint name (up to six characters).
3)Press the ENT Key. The current aircraft position is the default location of the new waypoint.
4)If desired, highlight the Information Box and enter the latitude and longitude for the waypoint or highlight the ReferenceWaypoints Box to enter a bearing and distance from another waypoint or the bearing from two other waypoints to define the new waypoint location.
Or:
1)Press the FMS Knob to activate the cursor.
2)Enter a user waypoint name (up to six characters).
3)Press the ENT Key. The message ‘Are you sure you want to create the new User Waypoint AAAAAA?’ is displayed.
4)With ‘YES’ highlighted, press the ENT Key.
5)Highlight the Information Box and enter the latitude and longitude for the waypoint or highlight the Reference Waypoints Box to enter a bearing and distance from another waypoint or the bearing from two other waypoints to define the new waypoint location.
6)Press the ENT Key to accept the new waypoint.
7)Press the FMS Knob to remove the flashing cursor.
Figure 5-44 User Waypoint Information Page Menu
190-00498-03 Rev.A |
Garmin G1000 Pilot’s Guide for Cessna Nav III |
5-43 |

FLIGHT MANAGEMENT
Creating user waypoints from map pages:
1)Press the Joystick to activate the panning function and pan to the map location of the desired user waypoint.
2)Press the ENT Key. The User Waypoint Information Page is displayed with the captured position.
 NOTE: If the pointer has highlighted a map database feature, one of three things happens upon pressing the ENT Key: 1) information about the selected feature is displayed instead of initiating a new waypoint, 2) a menu pops up allowing a choice between ‘Review Airspaces’ or ‘Create User Waypoint”, or 3) a new waypoint is initiated with the default name being the selected map item.
3)Enter a user waypoint name (up to six characters).
4)Press the ENT Key to accept the selected name. The first reference waypoint box is highlighted.
5)If desired, highlight the Information Box and enter the latitude and longitude for the waypoint or highlight the ReferenceWaypoints Box to enter a bearing and distance from another waypoint or the bearing from two other waypoints to define the new waypoint location.
6)Press the FMS Knob to remove the flashing cursor.
EDITING USER WAYPOINTS
Editing a user waypoint comment or location:
1)With the User Waypoint Information Page displayed, press the FMS Knob to activate the cursor.
2)Move the cursor to the desired field.
3)Turn the small FMS Knob to make any changes.
4)Press the ENT Key to accept the changes.
5)Press the FMS Knob to remove the flashing cursor.
Renaming user waypoints:
1)Highlight a user waypoint in the User Waypoint List. Press the RENAME Softkey, or press the MENU Key and select ‘Rename User Waypoint’
2)Enter a new name.
3)Press the ENT Key. The message ‘Do you want to rename the user waypoint AAAAAA to BBBBBB?’ is displayed.
4)With ‘YES’ highlighted, press the ENT Key.
5)Press the FMS Knob to remove the flashing cursor.
Changing the location of an existing waypoint to the aircraft present position:
1)Enter a waypoint name or select the waypoint in the User Waypoint List, then press the ENT Key.
2)Press the MENU Key.
3)Select ‘Use Present Position’.
5-44 |
Garmin G1000 Pilot’s Guide for Cessna Nav III |
190-00498-03 Rev.A |

FLIGHT MANAGEMENT
4)Press the ENT Key twice. The new waypoint’s location is saved.
5)Press the FMS Knob to remove the flashing cursor.
A system generated comment for a user waypoint incorporates the reference waypoint identifier, bearing, and distance. If a system generated comment has been edited, a new comment can be generated.
Resetting the comment field to the system generated comment:
1)Enter a waypoint name or select the waypoint in the User Waypoint List, then press the ENT Key.
2)Press the MENU Key.
3)Select ‘Auto Comment’.
4)Press the ENT Key. The generated comment is based on the reference point used to define the waypoint.
DELETING USER WAYPOINTS
Deleting a single user waypoint
1)Highlight a User Waypoint in the User Waypoint List, or enter a waypoint in the User Waypoint field.
2)Press the DELETE Softkey or press the CLR Key. ‘Yes’ is highlighted in the confirmation window.
3)Press the ENT Key.
4)Press the FMS Knob to remove the flashing cursor.
Or:
1)Highlight a User Waypoint in the User Waypoint List, or enter a waypoint in the User Waypoint field.
2)Press the MENU Key.
3)Select ‘Delete User Waypoint’.
4)Press the ENT Key twice to confirm the selection.
5)Press the FMS Knob to remove the flashing cursor.
Deleting all user waypoints
1)Highlight a User Waypoint in the User Waypoint List.
2)Press the MENU Key.
3)Select ‘Delete All User Waypoints’
4)Press the ENT Key twice to confirm the selection..
5)Press the FMS Knob to remove the flashing cursor.
190-00498-03 Rev.A |
Garmin G1000 Pilot’s Guide for Cessna Nav III |
5-45 |