FLIGHT MANAGEMENT
5.5 DIRECT-TO-NAVIGATION
The Direct-to method of navigation, initiated by pressing the Direct-to Key on either the MFD or PFD, is quicker to use than a flight plan when the desire is to navigate to a single point such as a nearby airport.
Once a direct-to is activated, the G1000 establishes a point-to-point course line from the present position to the selected direct-to destination. Course guidance is provided until the direct-to is replaced with a new direct-to or flight plan, or cancelled.
A vertical navigation (VNV) direct-to creates a descent path (and provides guidance to stay on the path) from the current altitude to a selected altitude at the direct-to waypoint. Vertical navigation is based on barometric altitudes, not on GPS altitude, and is used for cruise and descent phases of flight.
The Direct-to Window allows selection and activation of direct-to navigation. The Direct-to Window displays selected direct-to waypoint data on the PFD and the MFD.
Direct-to Point Info
- Identifier/Symbol/Region
- Facility Name
- City
VNV Constraints
- Altitude at Arrival
- Along Track Offset
Map of Selected Point
Location of Destination
- Bearing/Distance
Desired Course
Figure 5-48 Direct-to Window - MFD
Direct-to Point Info
- Identifier/Symbol/City
- Facility Name
VNV Constraints
- Altitude at Arrival
- Along Track Offset
Direct-to Point Info
- Bearing/Distance
- Desired Course
 Activation Command
Figure 5-49 Direct-to Window - PFD
5-50 |
Garmin G1000 Pilot’s Guide for Cessna Nav III |
190-00498-03 Rev.A |
FLIGHT MANAGEMENT
Any waypoint can be entered as a direct-to destination from the Direct-to Window.
Entering a waypoint identifier, facility name, or city as a direct-to destination:
1)Press the Direct-to Key. The Direct-to Window is displayed (with the active flight plan wayoint as the default selection or a blank waypoint field if no flight plan is active).
2)Turn the small FMS Knob clockwise to begin entering a waypoint identifier (turning it counter-clockwise brings up the waypoint selection submenu - press the CLR Key to remove it), or turn the large FMS Knob to select the facility name, or city field and turn the small FMS Knob to begin entering a facility name or city. If duplicate entries exist for the entered facility or city name, additional entries can be viewed by turning the small FMS Knob during the selection process.
3)Press the ENT Key. The ‘Activate?’ field is highlighted.
4)Press the ENT Key to activate the direct-to.
Any waypoint contained in the active flight plan can be selected as a direct-to waypoint from the Direct-to Window, the Active Flight Plan Page, or the Active Flight Plan Window.
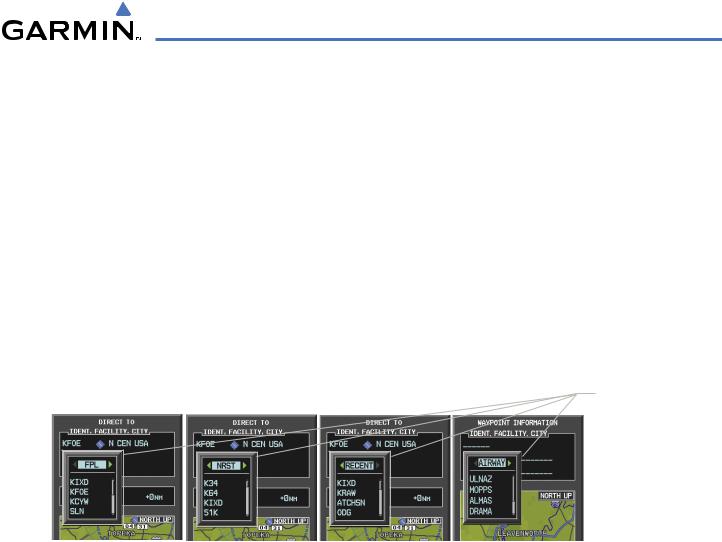
Waypoint Submenu
- Flight Plan Waypoints
- Nearest Waypoints
- Recent Waypoints
- Airway Waypoints
(only available when
active leg is part of an
airway)
Figure 5-50 Waypoint Submenu
Selecting an active flight plan waypoint as a direct-to destination:
1)While navigating an active flight plan, press the Direct-to Key. The Direct-to Window is displayed with the active flight plan waypoint as the default selection.
2)Turn the small FMS Knob counter-clockwise to display a list of flight plan waypoints (the FPL list is populated only when navigating a flight plan).
3)Select the desired waypoint.
4)Press the ENT Key. The cursor is now displayed on ‘ACTIVATE?’.
5)Press ENT again to activate the direct-to.
Or:
1)Select the Active Flight Plan Page on the MFD, or the Active Flight Plan Window on the PFD.
2)Select the desired waypoint.
3)Press the Direct-to Key.
4)Press the ENT Key. The cursor is now displayed on ‘ACTIVATE?’.
5)Press the ENT Key again to activate the direct-to.
190-00498-03 Rev.A |
Garmin G1000 Pilot’s Guide for Cessna Nav III |
5-51 |

FLIGHT MANAGEMENT
Any NRST, RECENT, or AIRWAY waypoints can be selected as a direct-to destination in the Direct-to Window.
Selecting a NRST, RECENT, or AIRWAY waypoint as a direct-to destination:
1)Press the Direct-to Key. The Direct-to Window is displayed (with the active flight plan destination as the default selection or a blank destination if no flight plan is active).
2)Turn the small FMS Knob counter-clockwise to display a list of FPL waypoints (the FPL list is populated only when navigating a flight plan, and the AIRWAY list is available only when the active leg is part of an airway).
3)Turn the small FMS Knob clockwise to display the NRST, RECENT, or AIRWAY waypoints
4)Turn the large FMS Knob clockwise to select the desired waypoint.
5)Press the ENT Key. The cursor is now displayed on ‘ACTIVATE?’.
6)Press the ENT Key again to activate the direct-to.
TheDirect-toWindowcanbedisplayedfromanypageandallowsselectionandactivationofdirect-tonavigation. If the direct-to is initiated from any page except the WPT pages, the default waypoint is the active flight plan waypoint (if a flight plan is active) or a blank waypoint field. Direct-to requests on any WPT page defaults to the displayed waypoint.
Selecting any waypoint as a direct-to destination:
1)Select the page or window containing the desired waypoint type and select the desired waypoint.
2)Press the Direct-to Key to display the Direct-to Window with the selected waypoint as the direct-to destination.
3)Press the ENT Key. The cursor is now displayed on ‘ACTIVATE?’.
4)Press ENT again to activate the direct-to.
Selecting a nearby airport as a direct-to destination:
1)Select the NRST Softkey on the PFD; or turn the FMS Knob to display the Nearest Airports Page.
2)Select the desired airport (the nearest one is already selected).
3)Press the Direct-to Key.
4)Press the ENT Key. The cursor is now displayed on ‘ACTIVATE?’.
5)Press the ENT Key again to activate the direct-to.
Direct-to destinations may also be selected by using the pointer on the navigation map pages. If no airport, NAVAID, or user waypoint exists at the desired location, a temporary waypoint named ‘MAPWPT’ is automatically created at the location of the map arrow.
Selecting a waypoint as a direct-to destination using the pointer:
1)From a navigation map page, press the Joystick to display the pointer.
2)Move the Joystick to place the pointer at the desired destination location.
3)If the pointer is placed on an existing airport, NAVAID, or user waypoint, the waypoint name is highlighted.
4)Press the Direct-to Key to display the Direct-to Window with the selected point entered as the direct-to destination.
5-52 |
Garmin G1000 Pilot’s Guide for Cessna Nav III |
190-00498-03 Rev.A |
FLIGHT MANAGEMENT
5)Press the ENT Key. The cursor is now displayed on ‘ACTIVATE?’.
6)Press the ENT Key again to activate the direct-to.
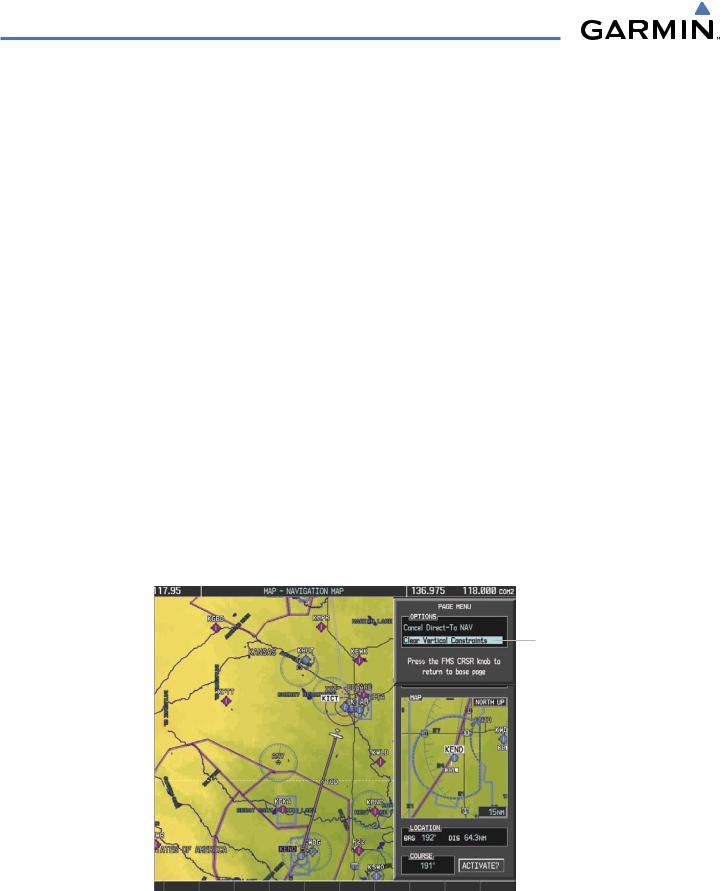
Cancelling a Direct-to:
1)Press the Direct-to Key to display the Direct-to Window.
2)Press the MENU Key.
3)With ‘Cancel Direct-To NAV’ highlighted, press the ENT Key. If a flight plan is still active, the G1000 resumes navigating the flight plan along the closest leg.
Page Menu
- Cancel Direct-To
Navigation
Figure 5-51 Direct-to Window - Cancelling Direct-to Navigation
When navigating a direct-to, the G1000 sets a direct great circle course to the selected destination. The course to a destination can also be manually selected using the course field (‘COURSE’) on the Direct-to Window.
Selecting a manual direct-to course:
1)Press the Direct-to Key. The Direct-to Window is displayed with the destination field highlighted.
2)Highlight the course field.
3)Enter the desired course.
4)Press the ENT Key. The cursor is now displayed on ‘ACTIVATE?’.
5)Press the ENT Key again to activate the direct-to.
Reselecting the direct course from the current position:
1)Press the Direct-to Key. The Direct-to Window is displayed with the destination field highlighted.
2)Press the ENT Key. The cursor is now displayed on ‘ACTIVATE?’.
3)Press the ENT Key again to activate the direct-to.
190-00498-03 Rev.A |
Garmin G1000 Pilot’s Guide for Cessna Nav III |
5-53 |