

SYSTEM OVERVIEW
1.3 G1000 CONTROLS
 NOTE: The Audio Panel (GMA 1347) and AFCS controls are described in the CNS & Audio Panel and AFCS sections respectively.
The G1000 system controls are located on the PFD and MFD bezels and audio panel. The controls for the PFD and MFD are discussed within the following pages of this section.
PFD/MFD CONTROLS
1 |
2 |
3 |
4 |
5 |
6 |
7 |
8 |
9 |
17 |
|
|
|
|
18 |
24 |
|
14 |
|
19 |
25 |
10 |
||
11 |
15 |
|||
|
|
|||
20 |
26 |
12 |
16 |
|
|
|
|||
21 |
27 |
|
|
|
22 |
28 |
13 |
|
|
23 |
29 |
|
|
|
GFC 700 AFCS Only |
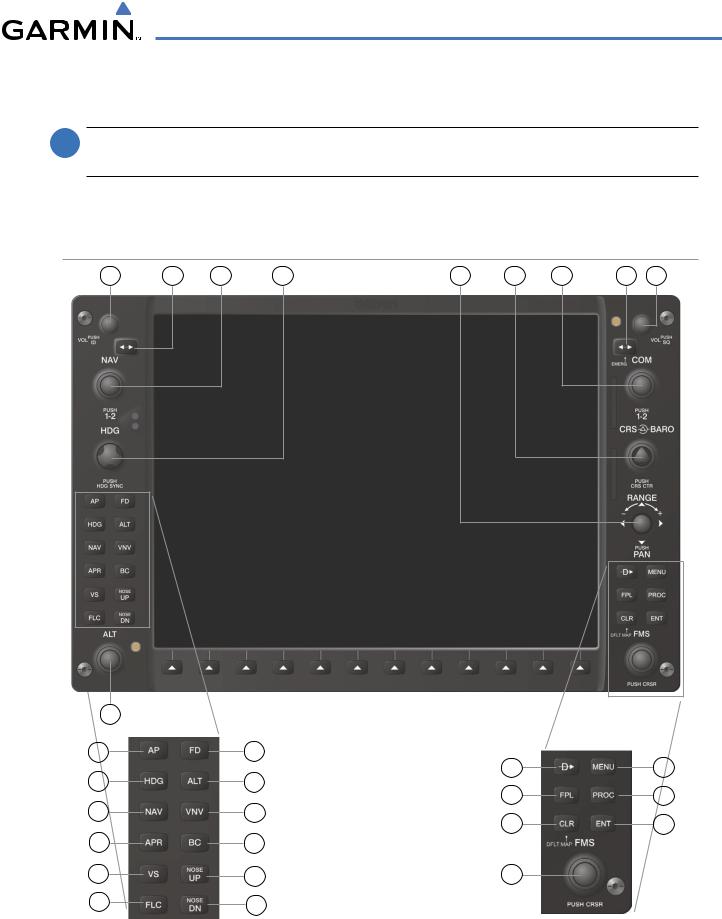
Figure 1-3 |
PFD/MFD Controls |
|
190-00498-03 Rev.A |
Garmin G1000 Pilot’s Guide for Cessna Nav III |
1-7 |

SYSTEM OVERVIEW
PFD and MFD controls function the same.
1NAV VOL/ID Knob – Controls the NAV audio level. Press to toggle the Morse code identifier ON and OFF. Volume level is shown in the field as a percentage.
2NAV Frequency Transfer Key – Transfers the standby and active NAV frequencies.
3Dual NAV Knob – Tunes the MHz (large knob) and kHz (small knob) standby frequencies for the NAV receiver. Press to toggle the tuning cursor (light blue box) between the NAV1 and NAV2 fields.
4Heading Knob – Turn to manually select a heading on the HSI. When pressed, it synchronizes the heading bug with the compass lubber line. Selected Heading provides the heading reference to the Flight Director while operating in Heading Select mode.
5Joystick – Changes the map range (distance top to bottom of map display) when rotated. Activates the map pointer when pressed.
6CRS/BARO Knob – The large knob sets the altimeter barometric pressure and the small knob adjusts the course. The course is only adjustable when the HSI is in VOR1, VOR2, or OBS/SUSP mode. Pressing this knob centers the CDI on the currently selected VOR. Selected Course provides course reference to the Flight Director when operating in Navigation and Approach modes.
7Dual COM Knob – Tunes the MHz (large knob) and kHz (small knob) standby frequencies for the COM transceiver. Pressing this knob toggles the tuning cursor (light blue box) between the COM1 and COM2 fields.
8COM Frequency Transfer Key – Transfers the standby and active COM frequencies. Pressing and holding this key for two seconds automatically tunes the emergency frequency (121.5 MHz) in the active frequency field.
9COM VOL/SQ Knob – Controls COM audio level. Audio volume level is shown in the field as a percentage. Pressing this knob turns the COM automatic squelch ON and OFF.
10Direct-to Key – Allows the user to enter a destination waypoint and establish a direct course to the selected destination (specified by the identifier, chosen from the active route, or taken from the map pointer position).
11FPL Key – Displays the active Flight Plan Page for creating and editing the active flight plan, or for accessing stored flight plans.
12CLR Key (DFLT MAP) – Erases information, cancels an entry, or removes page menus. To display the Navigation Map Page immediately, press and hold CLR (MFD only).
13Dual FMS Knob – Used to select the page to be viewed (only on the MFD). The large knob selects a page group (MAP, WPT, AUX, NRST), while the small knob selects a specific page within the page group. Pressing the small knob turns the selection cursor ON and OFF. When the cursor is ON, data may be entered in the different windows using the small and large knobs. The large knob is used to move the cursor on the page, while the small knob is used to select individual characters for the highlighted cursor location. When the G1000 displays a list that is too long for the display screen, a scroll bar appears along the right side of the display, indicating the availability of additional items within the selected category. Press the small FMS Knob to activate the cursor and turn the large FMS Knob to scroll through the list.
1-8 |
Garmin G1000 Pilot’s Guide for Cessna Nav III |
190-00498-03 Rev.A |
SYSTEM OVERVIEW
14MENU Key – Displays a context-sensitive list of options. This list allows the user to access additional features, or to make setting changes that relate to certain pages.
15PROC Key – Selects approaches, departures and arrivals from the flight plan. If a flight plan is used, available procedures for the departure and/or arrival airport are automatically suggested. If a flight plan is not used, the desired airport and the desired procedure may be selected. This key selects IFR departure procedures (DPs), arrival procedures (STARs) and approaches (IAPs) from the database and loads them into the active flight plan.
16ENT Key – Accepts a menu selection or data entry. This key is used to approve an operation or complete data entry. It is also used to confirm selections and information entries.
17Dual ALT Knob – Sets the selected altitude in the box located above the Altimeter. The large knob selects the thousands, while the small knob selects the hundreds. Altitude Select is used by the Automatic Flight Control System in certain modes, in addition to the standard G1000 Altitude Alerter function.
The following are only available with the GFC 700 AFCS.
18AP Key – Engages/disengages the autopilot and flight director. Pressing the AP Key activates the flight director and engages the autopilot in the default pitch axis and roll axis modes. Pressing the AP Key again disengages the autopilot and deactivates the flight director.
19HDG Key – Selects/deselects Heading Select Mode.
20NAV Key – Selects/deselects Navigation Mode.
21APR Key – Selects/deselects Approach Mode.
22VS Key – Selects/deselects Vertical Speed Mode.
23 FLC Key – Selects/deselects Flight Level Change Mode.
24FD Key – Activates/deactivates the flight director only. Pressing the FD Key turns on the flight director in the default pitch axis and roll axis modes. Pressing the FD Key again deactivates the flight director and removes the command bars, unless the autopilot is engaged. If the autopilot is engaged, the FD Key is disabled.
25ALT Key – Selects/deselects Altitude Hold Mode.
26VNV Key – Selects/deselects Vertical Navigation Mode.
27BC Key – Selects/deselects Back Course Mode.
2829 NOSE UP/NOSE DN Keys – Controls the active pitch reference for the Pitch Hold, Vertical Speed, and Flight Level Change modes.
190-00498-03 Rev.A |
Garmin G1000 Pilot’s Guide for Cessna Nav III |
1-9 |
SYSTEM OVERVIEW
AUDIO PANEL CONTROLS
1 |
2 |
3 |
4 |
5 |
6 |
7 |
8 |
9 |
10 |
11 |
12 |
13 |
14 |
15 |
16 |
17 |
|
18 |
19 |
20 |
21 |
22 |
23 |
|
24 |
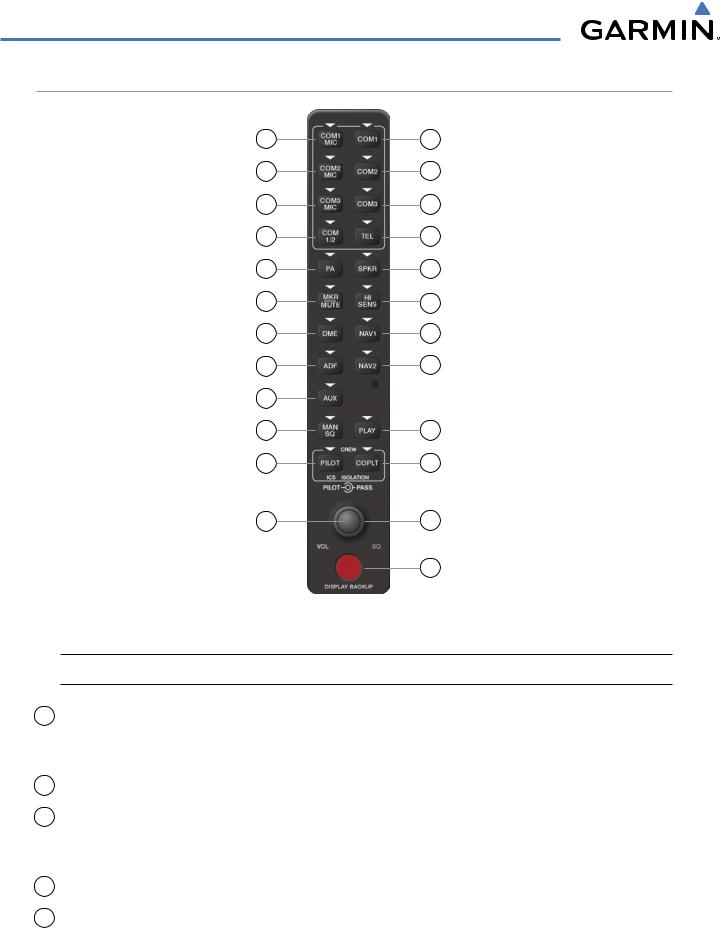
Figure 1-4 Audio Panel Controls (GMA 1347)
 NOTE: When a key is selected, a triangular annunciator above the key is illuminated.
1COM1 MIC – Selects the #1 transmitter for transmitting. COM1 receive is simultaneously selected when this key is pressed allowing received audio from the #1 COM receiver to be heard. COM2 receiver audio can be added by pressing the COM2 Key.
2COM1 – When selected, audio from the #1 COM receiver can be heard.
3COM2 MIC – Selects the #2 transmitter for transmitting. COM2 is simultaneously selected when this key is pressed allowing received audio from the #2 COM receiver to be heard. COM2 can be deselected by pressing the COM2 Key, or COM1 can be added by pressing the COM1 Key.
4COM2 – When selected, audio from the #2 COM receiver can be heard.
5COM3 MIC – Not used on Cessna Nav III aircraft.
1-10 |
Garmin G1000 Pilot’s Guide for Cessna Nav III |
190-00498-03 Rev.A |

SYSTEM OVERVIEW
6COM3 – Not used on Cessna Nav III aircraft.
7COM 1/2 – Split COM is disabled on Cessna Nav III aircraft.
8TEL – Not used on Cessna Nav III aircraft.
9PA – Selects the Passenger Address system. The selected COM transmitter is deselected when the PA Key is pressed. The Passenger Address system is disabled on the Cessna 172R/S.
10SPKR – Selects and deselects the cabin speaker. COM and NAV receiver audio can be heard on the speaker.
11MKR/MUTE – Mutes the currently received marker beacon receiver audio. Unmutes when new marker beacon audio is received. Also, stops play of the clearance recorder.
12HI SENS – Press to increase marker beacon receiver sensitivity. Press again to return to normal.
13DME – Pressing turns DME audio on or off.
14NAV1 – When selected, audio from the #1 NAV receiver can be heard.
15ADF – Pressing turns on or off the audio from the ADF receiver.
16NAV2 – When selected, audio from the #2 NAV receiver can be heard.
17AUX – Not used on Cessna Nav III aircraft.
18MAN SQ – Press to enable manual squelch for the intercom. When active, press the PILOT Knob to illuminate ‘SQ’. Turn the PILOT/PASS Knobs to adjust squelch.
19PLAY – Press once to play the last recorded audio. Pressing the PLAY Key during play begins playing the previously recorded memory block. Each subsequent press of the PLAY Key begins playing the next previously recorded block. Press the MKR/MUTE Key to stop play.
20PILOT – Pressing selects the pilot intercom isolation. Press again to deselect pilot isolation.
21COPLT – Pressing selects the copilot intercom isolation. Press again to deselect copilot isolation.
22PILOT Knob – Press to switch between volume and squelch control as indicated by the ‘VOL’ or ‘SQ’ being illuminated. Turn to adjust intercom volume or squelch. The MAN SQ Key must be selected to allow squelch adjustment.
23PASS Knob – Turn to adjust Copilot/Passenger intercom volume or squelch. The MAN SQ Key must be selected to allow squelch adjustment.
24Reversionary Mode Button – Pressing manually selects Reversionary Mode.
190-00498-03 Rev.A |
Garmin G1000 Pilot’s Guide for Cessna Nav III |
1-11 |