

AUDIO PANEL AND CNS
MARKER BEACON RECEIVER
 NOTE: The marker beacon indicators operate independently of marker beacon audio and cannot be turned off.
The marker beacon receiver is used as part of the ILS. The marker beacon receiver is always on and detects any marker beacon signals within the reception range of the aircraft.
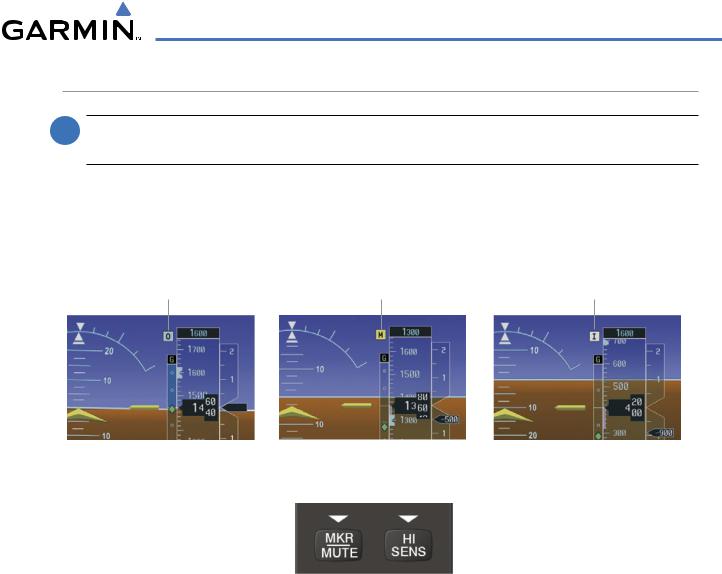
The receiver detects the three marker tones – outer, middle, and inner – and provides the marker beacon annunciations located to the left of the Altimeter on the PFD.
Outer Marker |
Middle Marker |
Inner Marker |
Indication |
Indication |
Indication |
Figure 4-27 Marker Beacon Annunciations on the PFD
Figure 4-28 Marker Beacon Keys
The Audio Panel provides three different states of marker beacon operation; On, Muted, and Deselected. Pressing the MKR/MUTE Key selects and deselects marker beacon audio. The key annunciator indicates when marker beacon audio is selected.
During marker beacon audio reception, pressing the MKR/MUTE Key mutes the audio but does not affect the marker annunciations (Figure 4-27). The marker tone is silenced, then waits for the next marker tone. The MKR/MUTEKey Annunciator is illuminated, indicating audio muting. The audio returns when the next marker beacon signal is received. If the MKR/MUTE Key is pressed during signal reception (O, M, I indication) while marker beacon audio is muted, the audio is deselected and the MKR/MUTE Key Annunciator is extinguished.
Pressing the HI SENS Key switches between high and low marker beacon receiver sensitivity. The HI SENS function (annunciator illuminated) is used to provide an earlier indication when nearing a marker during an approach. The LO SENS function (annunciator extinguished) results in a narrower marker dwell while over a station.
190-00498-03 Rev A |
Garmin G1000 Pilot’s Guide for Cessna Nav III |
4-23 |
AUDIO PANEL AND CNS
DME TUNING (OPTIONAL)
 NOTE: When another auxiliary window is turned on, the DME Tuning Window is replaced on the PFD.
 NOTE: When turning on the G1000 for use, the system remembers the last frequency used for DME tuning and the NAV1, NAV2, or HOLD state prior to shutdown.
The G1000 System tunes the optional DME transceiver. The UHF DME frequency is tuned by pairing with a VHF NAV frequency. DME frequency pairing is automatic and only the VHF NAV frequency is shown.
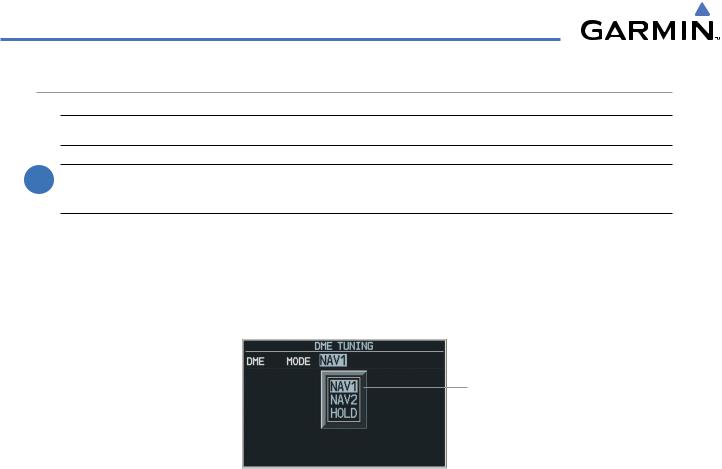
The DME Tuning Window is located to the right of the HSI in the lower right corner of the PFD. The DME transceiver is tuned by selecting NAV1, NAV2, or HOLD in the DME Tuning Window. Pressing the DME Softkey switches the DME Tuning Window on and off.
DME
Modes
Figure 4-29 DME Tuning Window
The following DME transceiver pairing can be selected:
•NAV1 – Pairs the DME frequency from the selected NAV1 frequency.
•NAV2 – Pairs the DME frequency from the selected NAV2 frequency.
•HOLD – When in the HOLD position, the DME frequency remains paired with the last selected NAV frequency.
Selecting DME transceiver pairing:
1)Press the DME Softkey to display the DME Tuning Window.
2)Turn the small FMS Knob to select the DME tuning mode.
3)Press the ENT Key to complete the selection.
Pressing the CLR Key or FMS Knob while in the process of DME pairing cancels the tuning entry and reverts back to the previously selected DME tuning state. Pressing the FMS Knob activates/deactivates the cursor in the DME Tuning Window.
See the Flight Instruments Section for displaying the DME information window.
4-24 |
Garmin G1000 Pilot’s Guide for Cessna Nav III |
190-00498-03 Rev A |